Introduction
A regular backup of Raspberry Pis is important in case of a failure of the system storage device (SD card, USB disk, SSD, NVMe …) or an unintentional change that causes the system to no longer boot or to boot incorrectly, to be able to recover and reset the system to a previous state.
raspiBackup creates a system backup of a Raspberry Pi while the system is running. See also Is a backup of a running system reliable? Shouldn’t the entire system be stopped before the backup? This can be done manually or automatically at regular intervals. A backup always contains the entire system, i.e. system data and user data. The system therefore reboots immediately once it has been restored. A restore can always be performed completely. The partition-oriented backup also supports a complete partition wise restore. In addition, it supports a delta restore for the rsync backup type, i.e., only the changes since the last backup are reversed. This significantly reduces the restore time.
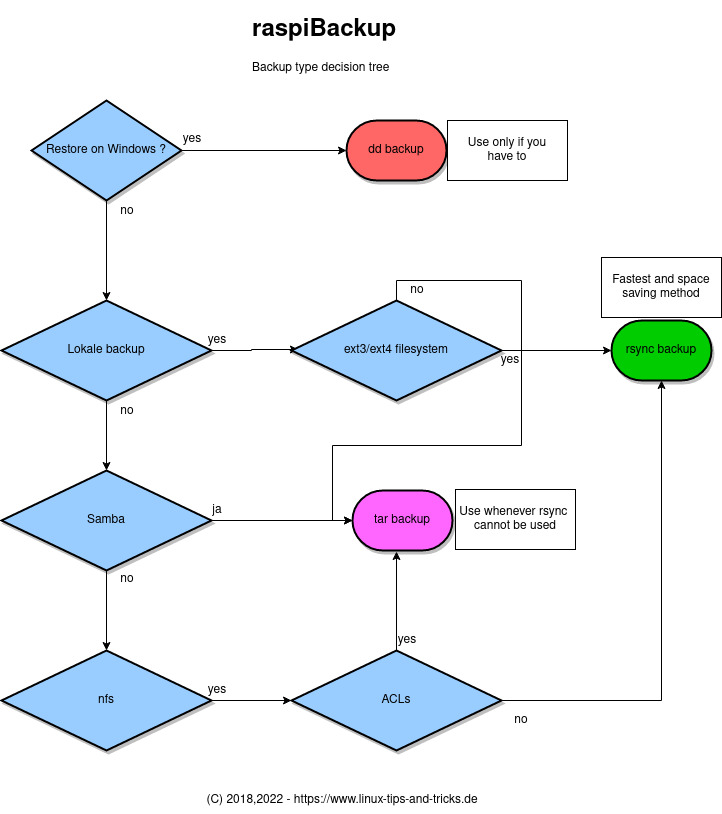
dd, tar, and rsync can be selected as Linux backup tools. In addition, dd and tar offer the option of reducing the size of backups. See here for a description of the advantages and disadvantages of each tool, as well as a decision tree to help you choose the right backup type.
raspiBackup creates a new backup each time, providing a backup history that can be accessed at any time. This differs from existing clone backup tools, which only update the latest changes in the existing clone with rsync, meaning that only a backup of the latest status is available. This means that the clone is created very fast. However, the rsync backup type also only backs up the latest changes and is therefore the fastest backup method of raspiBackup. This backup type should be used if backup speed is an important criterion.
There is a helper script called raspiBackupAndClone available, which, with a few manual configuration steps, can be used to automatically restore the backup to a device immediately after a successful backup. This ensures that there is always a clone of the latest backup on a device that can be deployed immediately if the original system stops working. If the rsync backup type is used, the backup that was just created is not restored to the clone device; instead, only all updates on the system are synchronized. This ensures that updating the clone is completed very quickly. See here for the details how to use raspiBackupAndClone.
Note
It’s planned to add the raspiBackupAndClone functionality in raspiBackup (See here).
For installation and configuration of raspiBackup there is an
installer, with which the most important options of raspiBackup can be easily and quickly configured similar to raspi-config. More specific settings can be configured in a configuration file.
All functions and applications of raspiBackup are described in the first chapter Function overview.
Further topics on this page:
- Introductory video and Youtube channel
- Contact options
- Donations
- Acknowledgements
- License and GitHub link
- Disclaimer
Introductory video and Youtube channel
There is an introductory video for raspiBackup on Youtube.
Topics covered are
- Introduction of raspiBackup with its most important features
- Visit to the most important websites for raspiBackup
- Introduction of GitHub as a question and problem interaction tool
- Live installation of raspiBackup with the menu-driven installer
The slides used there can be downloaded for reading here.
Many more videos on all kinds of raspiBackup topics can be found in the raspiBackup-Channel.
Contact options
-
Click
 ,
to create questions or problems about raspiBackup as “Issues” on GitHub.
The issues can also be created in German.
This way you can track questions and problem reports and receive a notification about answers.
That’s the preferred contact method.
,
to create questions or problems about raspiBackup as “Issues” on GitHub.
The issues can also be created in German.
This way you can track questions and problem reports and receive a notification about answers.
That’s the preferred contact method. -
Click
 ,
to find out about current activities and peripheral information about raspiBackup on Facebook.
Questions about raspiBackup are also possible. Please only report problems in GitHub.
,
to find out about current activities and peripheral information about raspiBackup on Facebook.
Questions about raspiBackup are also possible. Please only report problems in GitHub. -
Click
 ,
to follow raspiBackup on Twitter.
,
to follow raspiBackup on Twitter. -
Click
 ,
to ask questions about Raspberry backups in general and raspiBackup in particular or to read existing threads about raspiBackup in the German RaspberryForum.
,
to ask questions about Raspberry backups in general and raspiBackup in particular or to read existing threads about raspiBackup in the German RaspberryForum. -
Click
 ,
to follow raspiBackup on Reddit.
,
to follow raspiBackup on Reddit.
Note
Any other communication channels such as e-mails, which are unfortunately often used, will be ignored!
Donations
Acknowledgment of the development and maintenance effort as well as support for raspiBackup is welcome and possible as follows:
- Become a GitHub sponsor for raspiBackup
- Paypal: The email
framp att linux-tips-and-tricks dott deis known to PayPal and anyone with a PayPal account can tip this email. - Bitcoins: Address is
32MErztPzuKhN3YFEpmFtVLZTyxZ7zKPPt - Neither: Just ask at the above eMail. There is certainly an alternative. For example, donations have been sent several times in the the good old way by letter :-)
The donation is primarily used to buy consumables such as SD cards, adapters, cables etc., needed for development and testing. If the donations are sufficient, new hardware is also purchased in order to add the necessary hardware support into raspiBackup and to verify the correct functionality on the new hardware.
Acknowledgements
Over the years, many people from the community have contributed to raspiBackup through comments, suggestions and beta and fixed tests to raspiBackup. Due to the large number of contributors, it is unfortunately not possible to list every single one.
Therefore simply: Many thanks to all supporters!
Special thanks go to simonz for setting up this raspiBackup documentation repository in GitHub, the transfer of all raspiBackup pages from framps Homepage to this repository and the intensive support during the revision of the pages of the pages with help and advice as well as very helpful tools.
License and GitHub link
The code of raspiBackup is available under the GPL on GitHub.
Disclaimer
raspiBackup was created for personal use and, as it proved to be very useful, made available to the general public.
Correct functionality is tested as far as possible, but it cannot be ruled out that errors in raspiBackup may prevent the expected functionality from being guaranteed. Anyone who uses raspiBackup does so at their own risk. The creator of raspiBackup is in no way liable for any malfunction of the script.
Usage tips
At the top of the pages there are two groups of icons for operating the documentation:
![]()
- Show/hide a table of contents
- Selection of a theme
- Search function
![]()
- Language selection (German/English)
- GitHub page of the documentation project
- Suggest changes to the current page in *GitHub
Type ? to display a small keyboard navigation aid.
Note
To reduce the translation effort given the amount of documentation pages all German pages were translated with DeepL into English. Thank you very much to DeepL who offers to use the translator for free.
Function overview
With raspiBackup you can quickly and securely obtain a complete system backup of your Raspberries and a configurable backup history on a regular basis and can thus completely restore your Raspberry so that it boots again with an old backup status.
-
Automatic regular backup of a running Raspberry Pi (it backs itself up) See also Is a backup of a running system reliable? Shouldn’t the entire system be stopped before the backup?
-
Full and incremental backups
- The backup type
rsynccreates complete and then incremental backups using hardlinks. - The backup types
ddandtaralways create complete backups (also zipped). Note: With theddbackup, you can activate the option that only the space occupied by the partitions and not the entire SD card is backed up.
- The backup type
-
Two backup strategies
- A defined number of backups are kept
- Backups are kept according to the grandfather-father-son backup strategy (GVS)
-
Two backup modes:
- the normal backup mode only backs up the boot and root partition
- the partition-oriented mode backs up any number of partitions on the system device.
Note: Only partitions on the system device are backed up. Backing up partitions of other devices is not supported. Larger amounts of data can be backed up by raspiBackup using partition-oriented backup if they are stored on other partitions of the system device, such as /dev/sda3 or /dev/mmcblk0p3
-
Any number of backups from the past can be stored
Not only a single backup is created, but also a backup history. You can either define a number of backups to be kept, or you use the GFS principle (in raspiBackup called “Intelligent Rotation Strategy” see Grandfather-father-son generation principle
-
An intelligent backup strategy is available For example, backups of the last 7 days, the last 4 weeks, the last 12 months and the last n years can be saved.
-
Simple installation with menu-driven installer (comparable to
raspi-config)The most important options of raspiBackup can be configured in German, English, Finnish, Chinese and French, so that the first backup in 5 minutes can be created.
-
Open source
raspiBackup is available under the GNU license as open source and free of charge. However, a donation is still welcome 😉
-
All other options, some of which are very powerful, are documented in detail and can be defined in a configuration file.
The individual backup types are described in detail here. There is also a decision tree, to quickly find the right backup type.
-
Any directories and files can be excluded from the backup
-
Different backup types can be mixed per system (e.g. one
rsyncbackup per day, oneddbackup per week) -
Automatic stopping and starting of active services before and after the backup
-
Backup of any number of Raspberries in a backup directory
-
Messages are supported in German and English, French or Finnish.
-
Notifications
The backup run messages can be sent from raspiBackup by e-mail or Telegram, Slack or PushOver. Smilies indicate the success or failure of the backup run. Other smilies inform about other important events such as the availability of a beta or a new release or a reminder to perform a restore test to test the backup integrity.
-
Supported email clients: mailx/mail, sendEmail, ssmtp and msmtp. Unsupported e-mail clients can be integrated using an e-mail plug-in.
-
Simple update of raspiBackup to the current version
-
Simple distribution of new script versions to a larger number of hosts
-
All boot modes are supported
- Boot from a USB device or SSD (USB boot mode): Both partitions are located on a USB device. Supported by the newer Raspberries since model 3B
- Boot from the SD card: Both partitions are on the SD card (every model)
- Mixed mode: Boot from the SD card and use the root partition from a USB device. This is necessary for older Raspberries that do not support USB boot
-
Any backup destinations are possible, e.g.
- External USB stick
- External USB disk or SSD
- SMB network drive
- NFS network drive
- SSHFS network drive
- WebDAV* network drive
- FtpFS network drive
- Generally any device that can be mounted under Linux
-
An external root file system on a hard disk or USB stick is automatically backed up in hybrid boot mode during normal backup mode and restored with
tarorrsync. -
Snapshots
So-called raspiBackup snapshots can be created manually.
These are named backups that are not deleted automatically. They are used, for example, to back up important intermediate steps during system upgrades to be able to revert to previous versions at any time in the event of problems. In contrast to normal backups a free selectable descriptive text will be be added to the backup directory. That way it’s possible to identify the purpose of the snapshots.
-
Simple restoration of a backup
A backup of the
ddbackup type can also be restored from a Windows system. Win32Diskimager or similar tools can be used.tarandrsyncrequire a Linux system for a restore. It is recommended to use a preconfigured SD card with Raspberry Pi OS and start it on a Raspberry. -
Adaptation of
/etc/fstaband/boot/cmdline.txtto new UUIDs, PARTUUIDs or LABELs so that the system starts again immediately. -
Active social media channels
-
Notifications for new releases
As soon as a beta or a new release is available, raspiBackup writes a message indicating this. An upgrade is easy to perform. Likewise a downgrade back to a previous release.
-
Regression test suite
The basic functionality of raspiBackup (backup and restore) is automatically tested for all backup types and modes to ensure that the new raspiBackup release works as reliably as before.
-
Documentation
User manual with e.g. FAQs, configuration examples, NFS configuration, list of error messages and how to eliminate the error messages and much more is documented
-
Extension scripts
Various extension scripts are available.
They can extend the functionality of raspiBackup and can either be used unchanged or adapted to your own requirements.
For example, how pishrink can be used to make a
ddbackup even smaller or how a clone can be created in parallel in order to have an up-to-date boot medium that can be used at any time.An example script helps to perform further actions before and after the backup, such as mounting and unmounting the backup space.
And much, much more.
-
Extension points
For developers, raspiBackup offers various extension points, to perform pre- and post-processing during backup as well as during restore by your own code. For example there exists an extension which stops docker containers before the backup and starts them at the end again.
-
Backup of NVMe storage
Supported for Raspberry 5 and Compute Model 4 (CM4)
-
Supported operating systems
- RaspbianOS / Raspberry Pi OS
- Ubuntu
-
Simple system migration to other storage media
Each backup can be restored to an SD card, USB disk, SSD or NVMe SSD. And that easy the system has been moved to another device.
-
Support for Volumio
-
Support for gpt partitions

Supported hardware and software
raspiBackup is only supported on Raspberry Pi hardware with the Raspberry Pi OS and Ubuntu.
However, it also runs successfully on other Raspberry Pi compatible hardware and
other Linux distributions successfully. It should be noted that raspiBackup
requires the two partitions /boot and /root as they exist in Raspberry Pi OS.
This means that you can try out raspiBackup on the respective environment and if it runs successfully, you can be happy and use it. But if it does not run or gives error messages, no support is given. You can create an issue in GitHub and attach the debug log. This way framp can check whether the problem can be solved with with a few small changes. If major changes are necessary, these are not made and therefore raspiBackup cannot be used in the environment. But even if a fix eliminates the problem, the environment remains unsupported.
In particular, any Linux OS can usually be used on any hardware,
to restore a backup. Here, too, the option --unsupportedEnvironment is necessary.
If there are problems, a Raspberry must be used for the restore.
Given the fact that raspiBackup is for free, it is too expensive/too complex for framp, to
- Purchase all possible hardware for the tests
- Set up all possible hardware and software test combinations
- Test everything for each new release
framp can only support raspiBackup under the above conditions.
There is the possibility of Donation and depending on the effort involved, there is a chance that further environments will be supported by raspiBackup in the future.
When invoked, raspiBackup checks whether supported hardware and software is available
and terminates itself if not. With the option --unsupportedEnvironment this check is
not carried out and may lead to errors and program aborts.
Raspberry Pi OS (RaspbianOS) Lite and Desktop
Both Raspberry Pi OS (formerly RaspbianOS) Lite and Desktop are supported by raspiBackup. The desktop version should be used on a RPi4/RPi5 with at least 4GB memory.
Ubuntu
If the official Ubuntu version for Raspberries is used, this is supported by raspiBackup. However, at least a Raspberry Pi 4 with 4GB, better with 8GB memory, should be used. The same applies to a Raspberry Pi 5. Presumably the requirements for an Ubuntu server system are lower.
Raspberry Pi Compute Module (CM)
raspiBackup supports Raspberry Pi compute modules with an SD card, eMMC memory and NVMe.
How to make CM4 NVMe devices available on Linux to restore an NVMe backup from raspiBackup, is described on the English page.
Supported devices
raspiBackup supports the following devices and storages
- SD cards
- Disks/HDDs
- SSDs
- USB sticks
- USB SD adapters
- eMMC memory
- NVMe storage
Backup targets
In principle, anything can be used as a backup target for the backups, that can be mounted under Linux. This includes
- SMB network drives
- NFS network drives
- SSHFS network drives
- WebDAV network drives
- FtpFS network drives
Examples for SMB, NFS and WebDAV configuration can be found on backup-targets.
Language support
For displaying it’s installer dialogs and raspiBackup messages the system language is used. English is used as default if that language isn’t supported by raspiBackup yet.
- Chinese
- English
- Finnish
- French
- German
Anyone who want’s to help to add additional language support to raspiBackup is greatly welcome. Details how to add language support is described here. Don’t hesitate to create an issue to get in contact with framp and to get any help.
Quick start - installation in 5 minutes
The documentation of raspiBackup has become very extensive due to the wealth of functionality.
To make it easier to get started, this page therefore briefly explains how raspiBackup can be installed and configured in just a few minutes and then backups of the Raspberry can be created.
The chapter configuration-examples contains some examples for using raspiBackup. These can be used to familiarize yourself with the parameters and thus help with the later configuration during the installation.
Restoring a backup is described in detail on a separate page. The primary platforms (Linux, Mac or Windows) of the users are also covered there.
Note: From raspiBackup user Franjo_G there is another Instructions for installing, configuring and using raspiBackup in the German Raspberry forum.
Installation options
There are different ways to install and configure raspiBackup:
-
Download and invoke the installer on the command line to install raspiBackup. The convenient method.
curl -sSLO https://www.linux-tips-and-tricks.de/raspiBackupInstallUI.sh; sudo bash ./raspiBackupInstallUI.shHere you will find some detailed information about a few configuration options.
-
Download and invoke the installer on the command line to install raspiBackup with it’s default configuration. Intended for experienced raspiBackup users who want to install raspiBackup on additional Raspberries.
curl -sSLO https://www.linux-tips-and-tricks.de/raspiBackupInstallUI.sh; sudo bash ./raspiBackupInstallUI.sh -iHere the standard configuration is described.
-
Manually without installer for folks who don’t trust the installer and sudo.
The source code for raspiBackup and the installer can be viewed on the following pages.
The raspiBackup installer
raspiBackup has a menu-driven UI installer and basic configuraton,
raspiBackupInstallUI, with which raspiBackup can be easily installed
and the basic features configured.
There are also update functions for the installer itself and for raspiBackup.
Installation is carried out via menus and selection lists. The menu languages available are German, English, Finnish, Chinese and French.
In the raspiBackup presentation video on Youtube a demo of the installation is shown.
Preparation: The backup destination/backup directory
In the standard configuration, raspiBackup assumes that there is a
mountpoint /backup under which the backup directory is mounted.
This mountpoint should be created before the installation and then the external backup directory/device (USB disk, USB stick, NFS drive, …) should be mounted there.
In the following example, an external USB disk or USB stick is mounted:
sudo mkdir -p /backup
sudo mount /dev/sda1 /backup
Another line must then be inserted in /etc/fstab. The PARTUUID
from the following example must be adapted and the PARTUUID to use is displayed with lsblk -o PARTUUID.
PARTUUID=aeddf698-02 /backup ext4 defaults,noatime,nofail,async 0 0
Depending on the desired backup type, raspiBackup requires a certain file system for this partition. This is explained in chapter “Which file system can be used on the backup partition?”. Please note: Why is it better not to use dd as the backup type.
Before the first backup, it is advisable to check/ensure that the correct backup destination or the correct backup partition is used.
The following command is helpful here:
lsblk
Download and install the installer
To download, install and start the raspiBackup installer, execute in the command line on the Raspberry following commands or, much better, just copy and paste the following commands into an open command window.
cd ~; curl -o install -L https://raspibackup.linux-tips-and-tricks.de/install; sudo bash ./install
Note: A manual installation without sudo usage is documented on
this page.
Now you can start the installation with a standard configuration and change the major basic settings in the configuration menu.

All further settings have to be made in the configuration file
/usr/local/etc/raspiBackup.conf with an editor.
Finally, the weekly backup can be activated with raspiBackup.
The installer can be restarted at any time in the command line with
sudo raspiBackupInstallUI to update the configuration.

Systemd to start the backup automatically at regular intervals
After both backup and restore have been successfully tested and the services to be stopped before the backup have been configured, raspiBackup can be scheduled via Systemd timer for automatic execution at the desired interval.
The Systemd configuration should always be changed with the installer.
Any manual changes in the Systemd configuration file /etc/systemd/system/raspiBackup.timer
should be made “carefully”. They could easily lead to
that the installer can no longer change the configuration file.
The installer always creates a debug log in the current directory in file
raspiBackupInstallUI.log, which should be provided if there
are any installer issues.
The notification by e-mail
Notifications by e-mail require a correctly configured local MTA
such as Postfix, nullmailer, msmtp or Exim4. If Pushover, Slack or Telegram
is used, the configuration file of raspiBackup must first be manually updated
with the required configuration data for the notification tools beforehand.
See chapter General configuration.
A notification test can be carried out with the option -F.
Create a backup …
Since the backup partition is already mounted under /backup (see above),
the backup can be started. Perhaps with detailed messages the first time:
sudo raspiBackup -m detailed
Depending on the size of the installation, this may of course take a little longer…
… and test a restore!
A restore test should then be carried out (Link to the restore documentation) to verify that a consistent backup is being created and to familiarize yourself with the restore procedure.
**Because: A backup is useless if, at the moment you want to restore it, you realize that it is not usable **.
The entire restore process should be run through from time to time and tested, whether the backups created are in order and whether a system can be restored to working order. raspiBackup reminds you of this at regular intervals, to perform a restore test. The reminder interval can be configured. The default value is 6 months.
Testing is also particularly important when a new system with a new operating system is backed up again with raspiBackup. There are always changes with new operating system versions that can lead to the restore no longer working.
Further steps
After the first backup has been successfully created and restored you should take a quiet hour to find out about all the other options of raspiBackup and use them as required.
In any case, it makes sense to read through the FAQs.
Each option can be defined in the configuration file /usr/local/etc/raspiBackup.conf,
so that no further options need to be specified when raspiBackup is invoked.
Details can be found in the chapter Call and options - Backup - Options and for the options that can only be set via the configuration file in the chapter Call and options - Backup - Configuration.
Also useful: raspiBackupDialog - a convenient helper script for raspiBackup, which simplifies the use and invocation of raspiBackup.
Uninstallation
If it turns out that raspiBackup does not meet your requirements, uninstallation is available via raspiBackup Installer. However, it is advisable to first check via one of the contact channels whether the missing functionality is indeed not available in raspiBackup.
Use raspiBackup without installation
1st download of raspiBackup: curl -sSLO https://www.linux-tips-and-tricks.de/raspiBackup.sh
-
Mount the backup partition under
/backupor specify the backup partition as the last parameter parameter in the call, e.g.sudo bash ./raspiBackup.sh /media/pi -
Configure raspiBackup. See Call and options and the configuration in the raspiBackup configuration file or use the corresponding invocation options.
-
Start the backup:
sudo bash ./raspiBackup.sh
If no rsync backup is desired, the backup type tar or dd with option -t must be specified,
i.e. sudo bash ./raspiBackup.sh -t tar or sudo bash ./raspiBackup.sh -t dd.
Brief information on all invocation options of raspiBackup can be obtained with bash ./raspiBackup.sh -h.
Installer - Invocation and options
The installer is primarily designed to quickly and easily install raspiBackup and perform the most important configuration steps so that a backup can be created. However, you can also run the installer at any time to change the basic configuration. Advanced configuration always requires editing the configuration file.
Installer download, invocation and installation
Enter the following commands in a command window to download and invoke the installer
curl -sSLO https://www.linux-tips-and-tricks.de/raspiBackupInstallUI.sh; sudo bash ./raspiBackupInstallUI.sh
and use the installer menus to install raspiBackup and to configure the most important options.
Invocation if the installer was already installed
sudo raspiBackupInstallUI
Navigation
- Selection: Arrow keys
- Confirmation and selection: Enter
- Cancel/Back: ESC or Tab
- Switch between menu items and buttons: Tab
- Select (checklist): Space bar
Details on some menu items
Backup versions - Menu C3
raspiBackup offers two different ways to store backup versions to keep backup versions:
-
A maximum number of backups that is kept for each backup type (option -k). In the configuration file, the number of backups can be defined for each backup type (option –keep<type>). If the number is exceeded, the oldest backup is deleted.
-
Use of the intelligent backup strategy. Backups are created according to a specific rule which defines the number of days, weeks, months and years a backup should be kept. Older backups are deleted in each case. In the installer, the number of backups to be kept is defined with 4 numbers. The default is
7 4 12 3.- Daily backups (7)
- Weekly backups (4)
- Monthly backups (12)
- Annual backups (3)
The intelligent backup strategy is described in detail here.
Services to stop and start - Menu C6
Since raspiBackup does not back up any memory contents, all services that hold important information in memory should be stopped before the backup.
raspiBackup offers the option of automatically stop services before the backup and then restart them afterwards. All services preselected in the installer should always be stopped. As it cannot be ruled out that other services on the system may also hold important data in the memory and should be stopped before the backup, the list of services that are not active services must be carefully checked and, if necessary, these services must also be selected so that they are stopped before the backup.
After selecting the services that are to be stopped, the order in which they are to be stopped must be defined. In general, the sequence does not matter, but if a service has dependencies on another service, the service should only be stopped after the dependent service. For example all services that work with a database should be stopped before stopping the database so that they can complete any open transactions.
Regular backup - Menu C9
raspiBackup offers the possibility to create regular backups automatically.
This is done by default via Systemd, but can also be started with *Cron
if the option -t is used when the installer is started.
The day of the week on which a backup is to be created can be defined in the installer. It’s also possible to have a daily backup. The time of the backup is also defined in hours and minutes. The default is Sunday at 05:00.
Default configuration and location of the configuration file
The installer creates the following files:
-
Configuration file
/usr/local/etc/raspiBackup.confThe following default values are set in this file and can be changed with the can be changed with the installer. All other options must be changed with an editor or overwritten with a invocation option.
Option Setting backup path /backup backup mode normal backup type rsync language language of the system zip no message detail normal backup count 3 Services start none Services stop none Weekly backup no backup day Sunday backup time 05:00 a.m. Invocation and options are described in detail.
-
Systemd timer Configuration
/etc/systemd/system/raspiBackup.timer.This file controls the invocation of raspiBackup and in the standard case the weekly backup is switched off. However, it can be switched on with the installer.
-
raspiBackup.sh
/usr/local/bin -
raspiBackupInstallUI.sh
/usr/local/bin
Installer invocation options
sudo raspiBackupInstallUI {Options}
There are two different ways to invoke the raspiBackup installer raspiBackupInstallUI:
- Invoke without options or with option
-tThe installer starts with a menu via which raspiBackup can be configured. Option-tcontrols whether crond or systemd is used. - Invoke with options
If an option other than
-tis used, the installer executes the selected function immediately without a menu.
Options
The following options allow the installer to perform certain functions directly without a menu:
- -i: Re/Installation of raspiBackup
- -e: Re/Installation of the raspiBackup sample extensions
- -h: Display a help text
- -U: Update from the installer `raspiBackupInstallUI
- -u: Uninstall raspiBackup including installer
- -t: Use either crond or systemd as backup timer with option -i, default is systemd
Uninstallation
raspiBackup and the installer can also be uninstalled:
sudo raspiBackupInstallUI -u
Note: This will delete the installer as well as raspiBackup with all its files!
Call the installation without installer directly from the command line without the menu
If you do not want to use a menu-driven installation, you can run the installation of raspiBackup and the sample extensions or uninstall directly from the command line.
(This installation installs the standard configuration).
curl https://raspibackup.linux-tips-and-tricks.de/install | sudo bash -s -- -i
Any other installer option can be specified instead of -i.
Changes to the configuration can now be made manually using an editor. See Invocation and options.
You can also use the installer with its menus to adjust the configuration of the primary options and to switch the regular backup on or off.
Manual installation and configuration
Installation with the Installer is the fastest method. You can also install raspiBackup very quickly in a standard installation using the command line. However, if you want to install raspiBackup manually for various reasons, you will find the necessary steps below:
Prerequisites: Login as user pi to the home directory and an active network connection.
-
The raspiBackup installer is downloaded and started in
/usr/local/binon the Raspberry and invoked. Thereby raspiBackup is installed with its standard options. You can then start raspiBackup withsudo raspiBackupInstallUIand update the default configuration.curl -sSLO https://www.linux-tips-and-tricks.de/raspiBackupInstallUI.sh; sudo bash ./raspiBackupInstallUI.sh -i -
You can also download and install raspiBackup manually.
-
Download the necessary files:
curl -sSLO https://www.linux-tips-and-tricks.de/raspiBackup.sh curl -sSLO https://www.linux-tips-and-tricks.de/raspiBackupInstallUI.sh curl -sSL https://www.linux-tips-and-tricks.de/raspiBackup_de.conf > raspiBackup.conf -
Now the files must be copied into the corresponding directories and ownership and access rights must be adjusted:
# Move the files to the correct directories sudo mv raspiBackup.sh /usr/local/bin sudo mv raspiBackupInstallUI.sh /usr/local/bin sudo mv raspiBackup.conf /usr/local/etc # Customize ownership and access rights sudo chown root:root /usr/local/bin/raspiBackup.sh sudo chmod 755 /usr/local/bin/raspiBackup.sh sudo chown root:root /usr/local/etc/raspiBackup.conf sudo chmod 600 /usr/local/etc/raspiBackup.conf # Create the shortcuts without .sh at the end sudo ln -s /usr/local/bin/raspiBackup.sh /usr/local/bin/raspiBackup sudo ln -s /usr/local/bin/raspiBackupInstallUI.sh /usr/local/bin/raspiBackupInstallUI -
Now the installer can be invoked with
sudo raspiBackupInstallUIand raspiBackup can be configured.
-
-
A restore of a backup should then be carried out, to familiarize yourself with how to restore the backup and to test the backup. test the backup. There is nothing more annoying if, at the time when you need the backup, you realize that the backup does not contain everything or is even even unusable.
If you want to install raspiBackup on a system that does not have internet access, you must run 2.1 on a system that has an internet connection. Then copy the files to the target system and run 2.2 and 2.3 there. However, you must bear in mind that no notifications can be sent and you get no notifications from raspiBackup for new versions.
Statistics
raspiBackup checks at every startup, but at most once a day, whether there is a new release or a beta available and then informs you with a message so that an upgrade can be planned and carried out. During this check information is also transmitted, which makes it possible to collect general usage data of raspiBackup and to get an overview of the respective usage.
The information that is transmitted is
- Release
- Backup type
- Backup mode
- Backup or restore call
- Keep
- Parameters of the intelligent rotation strategy, if it is used
- OS: Raspberry Pi OS or Ubuntu
Sending the above information can be disabled with the option
DEFAULT_SEND_STATS=0
in the configuration file /usr/local/etc/raspiBackup.conf.
Updates
From time to time a new version of raspiBackup is made available for download which contains new functions, extensions and small fixes.
This is indicated by raspiBackup when it is invoked and in any notification.
You can then use the -U parameter to download and activate the latest version.
The current version is saved and can be reactivated at any time using the -V parameter.
In the case of minor changes, no new release is made available and you are not notified of the change.
With the options -U -S the current code is always
downloaded and activated. Such an update is generally not necessary and should only be carried out
if explicitly requested to do so.
Note: No backup of the currently active raspiBackup is created in this case.
Before updating, you should read which changes and new features are included in the new are included in the new version. This information can be found in the Version history. Should a serious error be discovered, a new version will be a new version will be made available immediately.
Each new version is regression tested before release.
Configuration update
If new options have been introduced in a new release, the
configuration file /usr/local/etc/raspiBackup.conf is automatically updated with the new options.
automatically. The details are described here.
Typical usecases
The following pages explain typical usecases for raspiBackup:
Typical backup usecases
Various application examples of raspiBackup and their configuration are presented and explained. They are intended to help you to find the right one from the multitude of possible applications or customize the example according to your own requirements. An overview of all options can be found in invocation and options. Various methods for restoring a backup are described in the Restore chapter.
- A Windows user wants to be able to back up his Raspberry and restore it to Windows.
- A Windows user has a 32GB SD card and only uses 12GB of it, which he only wants to back up
- A Windows user wants to create an absolutely minimal image with pishrink
- A Raspberry should be backed up as quickly as possible. The backup partition is an EXT4 file system mounted via NFS, which is provided by a NAS
- A Raspberry is to be backed up to a file system mounted via SMB, which is provided by a Windows system
- A major change to the Raspberry is intended and various intermediate states should be backed up for security reasons
- A USB boot system is to be backed up with additional partitions
- A Raspberry is to be backed up to a locally connected USB stick or a locally connected USB disk
- Once a backup has been created, it should be restored to a device immediately so that it can be used right away in the event of a backup failure
A Windows user wants to be able to back up his Raspberry and restore it to Windows.
To be able to restore an image under Windows, a dd image of raspiBackup has to be created. The following configuration options are at least necessary:
DEFAULT_BACKUPTYPE=d
DEFAULT_KEEPBACKUPS=n
A Windows user has a 32GB SD card and only uses 12GB of it, which he only wants to back up
In addition to the options mentioned, the following option is required:
DEFAULT_DD_BACKUP_SAVE_USED_PARTITIONS_ONLY=1
However, it is also necessary to shrink the root partition of the Raspberry,
as the entire free space on the SD card is backed up by default.
However, this is not possible under Windows, but a Linux system can be used
and use the tools gparted or resize2fs to shrink the root partition.
A Windows user wants to create an absolutely minimal image with pishrink
To create a minimal backup, you can use the pishrink tool. For this purpose
there is the script raspiBackupWrapper.sh, with which at the end of the backup
the dd image will be shrinked via pishrink. The option
DEFAULT_ZIP_BACKUP=1
also reduces the size of the image, but this cannot be restored directly under Windows. Unzipi it first.
A Raspberry should be backed up as quickly as possible. The backup partition is an EXT4 file system mounted via NFS, which is provided by a NAS
First, the backup partition of the NAS should be mounted. This should be done in
/etc/fstab where the NFS partition should be defined and will automatically ibe mounted under /backup.
DEFAULT_BACKUPTYPE=rsync
DEFAULT_KEEPBACKUPS=n
Since the backup file system is formatted with EXT4, raspiBackup can use hardlinks and this speeds up the backup process a lot, as only the changed files are backed up.
An example entry in /etc/fstab could look like this:
asterix:/backup /backup nfs users,rw,sync,hard,intr,noauto,user 0 0
where “asterix” is the hostname of the NAS and “/backup” is the exported NFS mount. Further information on Synology-specific settings and solutions can be found here
A Raspberry is to be backed up to a file system mounted via SMB, which is provided by a Windows system
DEFAULT_BACKUPTYPE=tar
DEFAULT_KEEPBACKUPS=n
The remote Windows backup file system should be defined in /etc/fstab and
be mounted automatically. The entire system is backed up each time.
Please note that the file system on the SMB drive has to support files larger
than 4GB, because the tar files are usually over 4GB in size. FAT32 is not
sufficient. See also Which filesystem can be used on the backup partition
An example entry in /etc/fstab could look like this:
//asterix/backup/ /backup cifs noauto,noatime,user,utf8,umask=000,uid=1000,gid=1000,credentials=/etc/samba/auth.asterix.cifsuser 0 0
A major change to the Raspberry is intended and various intermediate states should be backed up for security reasons
This requires a finished configuration of raspiBackup (see previous examples). Then raspiBackup only needs to be configured with the option
-M "This is a descriptive name of the backup"
and a backup with exactly this descriptive name will be created in the backup directory /backup.
Note: This backup is a so-called snapshot and is ignored during the backup recycle. The backup has to be deleted manually if required.
A USB boot system is to be backed up with additional partitions
In this case, the partition-oriented backup is selected and the partitions to be backed up are configured. In the example, partition 5 should also be backed up.
DEFAULT_PARTITIONBASED_BACKUP=1
DEFAULT_BACKUPTYPE=rsync
DEFAULT_KEEPBACKUPS=n
DEFAULT_PARTITIONS_TO_BACKUP="1 2 5"
A Raspberry is to be backed up to a locally connected USB stick or a locally connected USB disk
DEFAULT_BACKUPTYPE=rsync
DEFAULT_KEEPBACKUPS=n
DEFAULT_BACKUPPATH="/USBStick"
In order for rsync to use hardlinks and for the backup to be fast, the
backup partition has to be formatted with ext3/4. If you want to exchange data with Windows
and the partition was formatted with Windows, use tar as the backup type.
backup type. However, the backup will then take longer and
and requires considerably more space.
Note: If the USB partition is to be accessible from Windows, it should be formatted with NTFS.
In this case, however, no backup type rsync is possible. NTFS can only be used with the backup types dd and tar and
the DEFAULT_BACKUPTYPE has then be set accordingly.
An example entry in /etc/fstab could look like this:
LABEL=usb /USBStick ext4 defaults,noatime,nofail 0 2
Once a backup has been created, it should be restored to a device immediately so that it can be used right away in the event of a backup failure
It is often important to keep downtime to a minimum. The following helper script can help with this:
raspiBackup creates backups that must be restored in the event of a backup failure in order to restart the system. This means the system will be unavailable for a certain period of time until the backup has been restored. To minimize this downtime, there is a helper script from the raspiBackup helper scripts collection called raspiBackupAndClone. A few manual configurations are required to use this script. The exact instructions for this can be found here.
Typical restore usecases
Various application examples of raspiBackup and their configuration are presented and explained hoe to use a backup for restore. overview of all options can be found in in the Restore chapter.
Note In the following examples, /dev/sda is taken as the device to be restored.
- A system no longer started because an SD card became unusable
- A system no longer started because changes were made to the system
- A new system has been set up and a few configuration files are to be restored to the status of a backed up system
- A system is to be moved to another medium. E.g. from SD card to an SSD
- A system with a separate data partition no longer boots
A system no longer started because an SD card became unusable
In this case, the entire backup must be restored to a new SD card
sudo raspiBackup -d /dev/sda <backup>
A system no longer started because changes were made to the system
In this case, the entire backup must be restored if a normal backup was created. If there is a partition-oriented backup, the restore to the system device is much faster as no new partitioning is performed.
sudo raspiBackup -d /dev/sda -00 <backup>
In this case, only the changes since the backup are rolled back, i.e. new files are deleted, changed files are replaced by the previous contents and deleted files are restored.
A new system has been set up and a few configuration files are to be restored to the status of a backed up system
If a dd or tar backup is available, the files have to be extracted from the backups. If a rsync backup has been created, the files can simply be accessed and copied to the new system. Details on how single files can be copied are described here.
A system is to be moved to another medium. E.g. from SD card to an SSD
To do this, a snapshot is created (option -M) and then the backup is restored to the new system device.
sudo raspiBackup -M "systemmove" <backup directory>
sudo raspiBackup -d /dev/sda <backup directory>_systemmove
A system with a separate data partition no longer boots
A restore of the data partition is not necessary. Only the boot and system partition must be restored.
sudo raspiBackup -d /dev/sda -T "1 2"
If only a few changes have been made to the system partition, the -00 option can also be used.
Function details
The following pages explain various topics relating to raspiBackup in more detail.
This includes a decision tree, which helps to select the correct backup type. Furthermore the explanation of the differences between normal and partition-oriented backup mode, how the intelligent rotation strategy works, what raspiBackup snapshots are and which extension options are available.
There are also instructions on how to restore individual files for the various backup types.
Backup introduction
In normal backup mode, raspiBackup always creates a complete backup of the system. This includes the first two partitions only (/boot and /root). In partition-oriented backup mode, any number of partitions can be backed up. Which partitions to be back up can be chosen but the first two partitions have to be included all the time.
If raspiBackup has just been installed and configured, it’s recommended to create and test the first backups from the command line. Only then should the automatic backup be configured.
When configuring the notifications by e-mail or the other push services
it is very helpful to use the -F option, as this does not create a backup, but only sends the notifications.
This means that misconfiguration can be detected quickly and
can be fixed without always having to wait for a longer backup run to be completed.
Decision tree for backup types
There are different backup types and each has its advantages and disadvantages.
Different backup types can be combined. For example, every
months a full backup can be created with tar and in between a weekly rsync delta backup.
However, this requires manual configuration of Systemd timers and requires
good Systemd knowledge. The raspiBackupInstaller configures only one backup type.
All backup types can be completely restored with raspiBackup. A dd backup can also be restored with a Windows system.
A dd backup creates a consistent binary image of the system.
The entire device with the system is always read and backed up. This means that
data that has not changed is also backed up. It also means
that the restore device has to be at least as large as the original system for the restore.
No partition is resized. This causes problems especially
with SD cards, as the SD cards - although 32GB in size, for example - always have slight
differences and therefore a restore of a 32GB system to another 32GB SD card
may fail because the SD card is slightly smaller.
But it is not recommended to use the backup type dd.
Explanations are given in Why should you not use dd as a backup type?
in detail.
A ddz backup, like a dd backup, backs up the entire system. This method
puts a heavy load on the CPU as the amount of data is reduced. (It is a dd backup
with zipping switched on with -z). A restore with Windows tools is not possible.
A tar backup backs up all the data stored on the system device, although the backup is not
not as large as an dd backup, as only the data that actually exists is backed up.
Therefore, a tar backup can also be restored on devices
that is smaller than the original device. Of course, only if all
data fits on the new device.
A tgz backup backs up the entire system, like a tar backup. This method
puts a heavy load on the CPU as the amount of data is reduced. (It is a tar backup
with zipping switched on with -z)
An rsync backup only saves the data that has changed since the last backup, except for the first time.
The hard links of the ext3/ext4 file system
file system ensures that the backup is still consistent.
However, the data is not compressed. However, this in turn has the
advantage that you can easily retrieve individual files from the backup by just copying them.
This method is very fast if an initial
initial backup has already been created.
| Type | Full backup | Backup time | Backup size | Data compression | CPU loaded | Card loaded | Selective restore possible | File system |
|---|---|---|---|---|---|---|---|---|
| dd | yes | long | large | no | medium | high | no | all, fat32 only up to 4GB |
| ddz | yes | long | smaller | yes | yes | high | no | all, fat32 only up to 4GB |
| tar | yes | medium | medium | no | medium | yes | all, fat32 only up to 4GB | |
| tgz | yes | medium | medium | yes | yes | medium | yes | all, fat32 only up to 4GB |
| rsync | no | short with hardlinks | small with hardlinks | no | no | hardly | yes | ext3/ext4 |
Note
Take the advantages and disadvantages of the possible file systems into account.
Comparison of partition-oriented backup and normal backup
There exist two different backup modes:
-
Normal backup
In this mode, the first two partitions (the boot partition and the root partition) of the SD card are backed up. In addition, the
tarandrsyncbackup also back up an external root partition, i.e. a root partition stored on a USB stick or USB disk (hybrid boot mode) If the target device is larger than the source device during the restore, the second partition is automatically extended accordingly.The entire SD card can also be backed up with the
ddbackup. However, we strongly advise against using anddbackup. See: Why is it better not to use dd as a backup type?
-
Partition-oriented backup
In this mode, every partition on the system or a specific selected number of partitions are backed up with
tarorrsync. The number of partitions is arbitrary. During restore, you can also select which partitions are to be restored. If you are restoring to the original system because changes to the system have prevented it from booting, with an rsync backup you can restore only the changes instead of the entire backup, and the restore will be much faster. If the target device is larger than the source device during the restore, the last partition is expanded to use the entire target device.
Note
Only partitions of the system device are backed up. Backing up partitions on other devices is not supported. Larger amounts of data can be backed up by raspiBackup using partition-oriented backup if they are stored on other partitions of the system device, such as /dev/sda3 or /dev/mmcblk0p3
Backup directory structure
Normal backup
Each backup run creates a subdirectory in the backup directory, which has the following name: <hostname>.
A further directory is created underneath for every scheduled backup: <hostname>@<osversion>-<backuptype>-<backupdate>.
If the -M option is used (raspiBackup snapshot), the -M parameter value is appended:
<hostname>@<osversion>-<backuptype>-<backupdate>.-<-M parameter>.
Examples:
The Raspberry has the hostname “raspberrypi” and an
rsync backup is created from a Bookworm OS on 15.04.2016 at 22:29:00.
The following directories are then created:
 ├── raspberrypi
 │ └── raspberrypi@debian12-rsync-backup-20160415-222900
If -M "Hello world" is used the directory name will be
 ├── raspberrypi
 │ └── raspberrypi@debian12-rsync-backup-20160415-222900_Hello_world
Enclosed is the directory structure of a backup server, which in this case is also a Raspberry Pi. Different backup types can be combined per Pi. Each backup is stored in a new subdirectory.
Three or five additional files are always created per Raspberry system in addition to the
backup and are necessary for the restore if it is not an dd backup.
This makes it possible for Linux experts to restore a backup manually.
This is described in the chapter Manual restore.
.img- boot partition.mbr- Master Boot Record of the system.sfdisk- Partition layout of the system - output of thesfdiskcommand.blkid- (partition oriented mode) - output of theblkidcommand.parted- (partition-oriented mode) - output of thepartedcommand
root@raspiBackup:/mnt/backup/raspberrypi# tree -L 2

 .
 ├── raspberrypi@debian12-dd-backup-20160415-222900
 │ └── raspberrypi@debian12-dd-backup-20160415-222900.img
 ├── raspberrypi@debian12-rsync-backup-20160416-094106
 │ ├─── backup
 │ ├── bin
 │ ├── boot
 │ ├── boot.bak
 │ ├── dev
 │ ├── etc
 │ ├── home
 │ ├── lib
 │ ├── lost found
 │ ├── media
 │ ├── mnt
 │ ├── opt
 │ ├── proc
 │ ├─── raspberrypi-backup.img
 │ ├── raspberrypi-backup.mbr
 │ ├── raspberrypi-backup.sfdisk
 │ ├── raspiBackup.log
 │ ├── raspiBackup.msg
 │ ├── remote
 │ ├── root
 │ ├── run
 │ ├── sbin
 │ ├── selinux
 │ ├── srv
 │ ├── sys
 │ ├── tmp
 │ ├── usr
 │ └── var
 └── raspberrypi@debian12-tar-backup-20160415-204305
     ├── raspberrypi-backup.img
     ├── raspberrypi-backup.mbr
     ├── raspberrypi-backup.sfdisk
     ├── raspberrypi-tar-backup-20160415-204305.tar
     ├── raspiBackup.log
     └── raspiBackup.msg
Partition-oriented backup
root@boockworm:/mnt/backup/raspberrypi# tree -L 2
.

├── raspberrypi-backup.blkid
├── raspberrypi-backup.fdisk
├── raspberrypi-backup.mbr
├── raspberrypi-backup.parted
├── raspberrypi-backup.sfdisk
├── mmcblk0p1
│ ├── bcm2708-rpi-b.dtb
│ ├── bcm2708-rpi-b-plus.dtb
│ ├─── bcm2708-rpi-b-rev1.dtb
│ ├── bcm2708-rpi-cm.dtb
│ ├─── bcm2708-rpi-zero.dtb
│ ├── bcm2708-rpi-zero-w.dtb
│ ├─── bcm2709-rpi-2-b.dtb
│ ├─── bcm2710-rpi-2-b.dtb
│ ├── bcm2710-rpi-3-b.dtb
│ ├─── bcm2710-rpi-3-b-plus.dtb
│ ├─── bcm2710-rpi-cm3.dtb
│ ├─── bcm2711-rpi-400.dtb
│ ├── bcm2711-rpi-4-b.dtb
│ ├── bcm2711-rpi-cm4.dtb
│ ├─── bootcode.bin
│ ├── cmdline.txt
│ ├── config.txt
│ ├── COPYING.linux
│ ├── fixup4cd.dat
│ ├── fixup4.dat
│ ├── fixup4db.dat
│ ├── fixup4x.dat
│ ├── fixup_cd.dat
│ ├── fixup.dat
│ ├── fixup_db.dat
│ ├── fixup_x.dat
│ ├── issue.txt
│ ├── kernel7.img
│ ├── kernel7l.img
│ ├── kernel8.img
│ ├── kernel.img
│ ├── LICENCE.broadcom
│ ├── overlays
│ ├─── start4cd.elf
│ ├── start4db.elf
│ ├─── start4.elf
│ ├─── start4x.elf
│ ├── start_cd.elf
│ ├── start_db.elf
│ ├─── start.elf
│ └── start_x.elf
├── mmcblk0p2
│ ├─── backup
│ ├── bin
│ ├── boot
│ ├── dev
│ ├── etc
│ ├── home
│ ├── lib
│ ├── lost found
│ ├── media
│ ├── mnt
│ ├── opt
│ ├── proc
│ ├── remote
│ ├── root
│ ├── run
│ ├── sbin
│ ├── srv
│ ├── sys
│ ├── tmp
│ ├── usr
│ └── var
├── raspiBackup.log
└── raspiBackup.msg
Intelligent rotation strategy - Smart Recycle
raspiBackup can either keep a configurable number of backups or use an intelligent backup rotation strategy. It is also called the “generation principle of data backup”. The implementation was inspired by Manuel Dewald’s article “Automating backups on a Raspberry Pi NAS”. The following backups are then kept by default, if daily backups are created:
- Backups of the current day and the last 6 days
- Backups of the current week and the last 3 weeks
- Backups of the current month and the last 11 months
- Backups of the current year and the last 2 years
This can be adapted to the respective requirements using the installer.
If weekly backups are created, the daily backups are of course omitted. The respective retention periods for daily, weekly, monthly and yearly backups can be manually configured with options.
So if you only want to have weekly, monthly and annual backups, this can be configured. It should be noted that the weekly backup day then defines the backup day of the month: If, for example, Monday is configured as weekly backup day, the monthly backup is always on the first Monday of the month and the annual backup on the first Monday of the year.
Note
If several daily backups are created, the newest daily backup is always kept. For the weekly, monthly and annual backups the oldest backups are kept.
For example, with two existing daily backups from 10:00 and 13:00, the backup created at 13:00 is selected.
If there are backups on Monday and Friday during the week, the weekly backup of Monday is selected.
If there is a backup on the 1st, 10th and 20th of a month, the backup from the 1st is selected for the monthly backup.
For daily backups, weekly backups are therefore always from Monday, monthly backups always from the first of the month and annual backups always from the 1st of the year.
Graphical representation

Example - backup directory (daily backup run, default options: 7/4/12/3)
    (backup run on 17.11.2019)

    20191117 1. daily backup
    20191116 2. daily backup
    20191115 3. daily backup
    20191114 4. Daily backup
    20191113 5. Daily backup
    20191112 6. Daily backup
    20191111 7. Daily and 1st weekly backup

    20191101 1. monthly backup
    20191104 2. weekly backup
    20191001 2. monthly backup
    20191028 3. weekly backup
    20191021 4. Weekly backup
    20190901 3. monthly backup
    20190801 4. monthly backup
    20190701 5. monthly backup
    20190601 6. Monthly backup
    20190501 7. Monthly backup
    20190401 8. Monthly backup
    20190301 9. monthly backup
    20190201 10.monthly backup

    20190101 11. Monthly backup and 1st annual backup
    20181201 12. Monthly backup
    20180101 2. yearly backup
    20170101 3. annual backup
Options
The intelligent rotation strategy is activated with the --smartRecycle option.
The storage quantities can be configured with the --smartRecycleOptions option.
The --smartRecycleOptions "7 4 12 3" option is active by default.
With --smartRecycleOptions "0 4 12 0", for example, the last 4
weekly and the last 12 monthly backups are retained.
Caution
As long as the option
--smarteRecycleDryrunis not switched off raspiBackup only writes messages about which backups would be deleted and which would be kept.You can therefore first check whether the result corresponds to what you want. This prevents existing backups from being deleted unintentionally.
This is particularly important if, after switching to the intelligent rotation strategy you want to continue using the previous backup directory and not use a new directory.
If you have carefully checked that the intelligent rotation strategy deletes the correct backups and removes the desired backups, the option
--smartRecycleDryrun-(note the-at the end!) in each backup run the intelligent rotation strategy is applied and backups that are no longer required are deleted unrecoverable.Alternatively, the configuration option
DEFAULT_SMART_RECYCLE_DRYRUN=0produces the same result.
On Wikipedia - in the article Generation principle - it is nicely explained how the rotation principle works. The diagram in particular is another way of explaining the principle.
Snapshots
With the option -M, raspiBackup offers the possibility to create a kind of snapshot.
These are normal backups, but they have two special features:
- Snapshots are not automatically deleted by the selected backup strategy
- Snapshots must be given a description as a parameter to the
-Moption. This is appended to the end of the directory name and allows to give the snapshot directories meaningful names to remember their purpose.
This makes it very easy to create a snapshot out of sequence and the reason for the snapshot can be recognized by the description. This is very helpful, for example, before carrying out a software update or planning another major change. If the update goes wrong, you can quickly restore the previous status. If it was successful, the snapshot must be deleted manually from the backup directory.
Note:
raspiBackup snapshots are not snapshots in the true sense of the word as they can be created with btrfs, for example.
They are normal dd, tar or rsync backups.
rsync backups are delta backups and are therefore complete more quickly than dd or tar backups.
There is a Youtube video, in which the raspiBackup snapshots are explained and a demo is given.
Docker support
A raspiBackup user has written a raspiBackup extension which ensures that all Docker containers are stopped before the backup and finally started again.
The code is available on github
To use the extension, execute following steps:
-
Download the extension
cd /usr/local/bin sudo wget https://raw.githubusercontent.com/framps/raspiBackup/refs/heads/master/extensions_userprovided/raspiBackup_docker_pre.sh sudo wget https://raw.githubusercontent.com/framps/raspiBackup/refs/heads/master/extensions_userprovided/raspiBackup_docker_post.sh sudo chmod +x raspiBackup_docker*.sh -
The extension then has to be defined in raspiBackup. To do this, update the configuration file
/usr/local/etc/raspiBackup.confas follows.If no extension is active yet, the following definition is sufficient:
DEFAULT_EXTENSIONS="docker"Otherwise,
dockerhas to be added to the existing extensions.
Note:
There should be no commands in the DEFAULT_STOPSERVICES and DEFAULT_STARTSERVICES definitions,
that start or stop Docker.
Configuration update when upgrading to a new version
Whenever a raspiBackup version is upgraded, immediately checks are executed whether the new version requires a new configuration version. If so, the local configuration is automatically merged with the new configuration in a new configuration file of raspiBackup. The following section describes in detail how this merging is carried out.
Note: If for some reason no configuration file update has taken place during an upgrade, the update can be triggered manually with the following command:
sudo raspiBackup.sh --updateConfig
When merging the two configurations, raspiBackup writes various information messages. The following messages are written for example, when upgrading from raspiBackup 0.6.4.3 to raspiBackup 0.6.5 is upgraded.
--- RBK0241I: Current configuration v0.1.3 is merged with the new configuration v0.1.4 in /usr/local/etc/raspiBackup.conf.merged.
--- RBK0248I: Option DEFAULT_SMART_RECYCLE=0 was added.
--- RBK0248I: Option DEFAULT_SMART_RECYCLE_DRYRUN=1 was added.
--- RBK0248I: Option DEFAULT_SMART_RECYCLE_OPTIONS="7 4 12 1" has been added.
--- RBK0248I: Option DEFAULT_TELEGRAM_TOKEN="" has been added.
--- RBK0248I: Option DEFAULT_TELEGRAM_CHATID="" has been added.
--- RBK0248I: Option DEFAULT_TELEGRAM_NOTIFICATIONS="F" has been added.
--- RBK0248I: Option DEFAULT_NOTIFY_START=0 was added.
--- RBK0248I: Option DEFAULT_COLORING="CM" has been added.
--- RBK0243I: Configuration merge was successfully completed but not activated.
!!! RBK0245W: Should the current configuration in /usr/local/etc/raspiBackup.conf.bak be saved and the updated configuration activated? y/N
You can see that a new configuration file
/usr/local/etc/raspiBackup.conf.merged is created and in this file the
merge of the current configuration file
/usr/local/etc/raspiBackup.conf with the new configuration file
is carried out.
Which changes are made can be seen in the
messages RBK0248I. Finally, you will be asked whether the
merged configuration file should be activated. Of course
a backup of the existing configuration file in
/usr/local/etc/raspiBackup.conf.bak beforehand. If you answer with “yes”,
the configuration merge is completed and the following
messages:
--- RBK0240I: Current configuration /usr/local/etc/raspiBackup.conf is saved in /usr/local/etc/raspiBackup.conf.bak.
--- RBK0244I: Merged configuration /usr/local/etc/raspiBackup.conf.merged is copied to /usr/local/etc/raspiBackup.conf and activated.
This is the simplest method for updating the configuration file and is done quickly.
However, you can also answer “no” and not activate the merged configuration file immediately. You will then receive the following message:
--- RBK0247I: Now check the merged configuration file /usr/local/etc/raspiBackup.conf.merged and copy it to /usr/local/etc/raspiBackup.conf to finish the configuration update.
Within the merged configuration file, the new options are marked as follows and are therefore easy to recognize:
# Smart recycle
# >>>>> NEW OPTION added in config version "0.1.4" <<<<<
DEFAULT_SMART_RECYCLE=0
# Smart recycle dryrun
# >>>>> NEW OPTION added in config version "0.1.4" <<<<<
DEFAULT_SMART_RECYCLE_DRYRUN=1
# Smart recycle parameters (daily, weekly, monthly and yearly)
# >>>>> NEW OPTION added in config version "0.1.4" <<<<<
DEFAULT_SMART_RECYCLE_OPTIONS="7 4 12 1"`
You can now use an editor to manually view the merged
configuration file /usr/local/etc/raspiBackup.conf.merged manually with an editor,
and change it if necessary. Finally, the file for
activation file is copied to /usr/local/etc/raspiBackup.conf.
Finally, as always after an upgrade, it makes sense to perform a backup/restore cycle to test whether everything still works as before.
raspiBackup also supports the use of different
configuration files. However, the automatic configuration upgrade is only
done for the standard configuration /usr/local/etc/raspiBackup.conf.
All other configuration files have to be updated manually by
taking the configuration lines marked as new and
and copying them to the other configuration files.
Multiple backup tasks
Normally, it is sufficient to use one back-up task that can be configured with the installer, to use. However, there are also scenarios in which several different backups are different times with different retention values need to be executed. must be executed.
The raspiBackup installer only allows one backup task to be configured. Further backup tasks must then be configured manually. When configuring the raspiBackup options, an additional configuration file can be created and used. If only a few options are different, these options should be added at runtime. Otherwise configuration must be updated manually each time the raspiBackup version is updated. manually. In the following, the name raspiBackup2 is used for the second backup task.
Configuration of the first backuptask
First you configure the first backuptask with the installer and further configuration options must then be adapted in the configuration file. This configuration serves as a template for the second backuptask.
Configuration of the second backuptask
For the second backuptask, the following files must be duplicated in the same directory with the name raspiBackup2:
- /etc/systemd/system/raspiBackup.timer
- /etc/systemd/system/raspiBackup.service
- Optional /usr/local/etc/raspiBackup.conf
The files must then be adapted:
raspiBackup.service``change to raspiBackup2.servicein fileraspiBackup2.timer`:
[Timer]
OnCalendar=Sat *-*-* 01:00:00
Unit=raspiBackup2.service
The line OnCalendar must be defined according to the desired rhythm and time.
Make sure that the syntax corresponds to the Systemd timer format.
The following changes must then be made in raspiBackup2.service:
Either another configuration file is specified as follows with the -f option
[Service]
Type=simple
ExecStart=/usr/local/bin/raspiBackup.sh -f /usr/local/etc/raspiBackup2.conf
or further options are defined directly in the call. In the following example the backup type is changed to tar and the number of backups to 42.
[Service]
Type=simple
ExecStart=/usr/local/bin/raspiBackup.sh -t tar -k 42
The second backuptask must then be activated. To do this the following commands must be executed:
sudo systemctl enable raspiBackup2.timer
sudo systemctl start raspiBackup2.timer
Note: If different backup types are used, no other backup directory is required.
eMail configuration examples
raspiBackup can send an eMail when a backup finishedi. Following pages describeis the configuration for common e-mail clients. There exists an eMail Extensionpoint which can be used to call any custom eMailClients.
msmtp configuration for a web.de account
The user gNeadr from raspiBackup had problems setting up the e-mail notification for his web.de account. After he successfully managed to configure everything correctly, he fortunately offered to publish his installation and configuration steps here to make it easier for other raspiBackup users, to configure the email configuration for raspiBackup.
There is not much to configure in raspiBackup. The difficulty is to configure the eMailClient correctly.
Enclosed are the installation and configuration steps for gNeandr - Once again, thank you very much for providing it.
Raspberry Installation 2023-08-20
====================================================
SDCard 64GB microSDXC
 ext4 formatted with gparded on LX
 Label: RXXXX
Install Raspberry Pi OS with Raspberry Pi Imager v.1.7.4
OS: Raspberry PI OS Lite (32-bit) Bullseye from 2023-05-03
SD card: Generic STORAGE_DEVICE (RXXXX) - 63.8GB
Advanced settings:
- Hostname: rasp1
- SSH enabled, name: rasp1 PW: [see keypass]
- Wifi: SSID: [ssid] PW: [see keypass]
- Wifi country: DE
- Language setting: Berlin Keyboard: de
Save ==> WRITE
Setup for Static LAN with Fritzbox
(see also https://learn.sparkfun.com/tutorials/headless-raspberry-pi-setup/ethernet-with-static-ip-address)
Customize the IF file with LX Terminal on the SDCard (in the card reader):
$ ls -lt /media/xxxxx/rootfs/etc/dhcpcd.conf
interface eth0
static ip_address=192.123.123.xx/24
static routers=192.123.123.1
static domain_name_servers=192.123.123.1
Requires access with:
sudo nano /media/xxxxx/rootfs/etc/dhcpcd.conf
Then eject SDCard in the LX file manager.
Start and configure Raspberry
Then install the SD card in the Raspberry and start it/connect the power adapter.
Check with Fritzbox, change the name of the ‘raspberry’ if necessary.
Start Raspberry via SSH with :
ssh pi@192.123.123.7X (ip of the Raspberry as configured above)
Configure and update/upgrade Raspberry/RASPIAN OS
To be on the safe side, change the password … (see also https://www.raspberrypi.org/documentation/configuration/security.md) … this is done with the Raspberry Config tool:
$ sudo raspi-config
Setting e.g:
│ 1 Change User Password Change password for the 'pi' user │
│ 2 Network Options Configure network settings │
--> Enter name e.g. 'raspellX'
│ 3 Boot Options Configure options for start-up │
--> B2 Wait for network
│ 4 Localization Options Set up language and regional settings to match your │
--> Locales: de_DE.UTF-8 UTF-8
--> default : en_GB.UTF-8
--> Timezone
--> Keyboard
│ 5 Interfacing Options Configure connections to peripherals │
--> P2 SSH
│ 6 Overclock Configure overclocking for your Pi │
│ 7 Advanced Options Configure advanced settings │
--> A1 Expand Filesystem
│ 8 Update Update this tool to the latest version │
--> update the tool
│ 9 About raspi-config Information about this configuration tool |
$ sudo apt-get update
$ sudo apt-get upgrade
mSMTP for sending email e.g. from raspiBackup
This compilation is based on: https://goneuland.de/raspberry-pi-e-mails-versenden-mit-msmtp/
Installation
$ sudo apt-get install msmtp msmtp-mta mailutils
$ msmtp --version

msmtp version 1.8.11
Platform: arm-unknown-linux-gnueabihf
TLS/SSL library: GnuTLS
Authentication library: GNU SASL; oauthbearer: built-in
Supported authentication methods:
plain scram-sha-1 external gssapi cram-md5 digest-md5 login ntlm oauthbearer
IDN support: enabled
NLS: enabled, LOCALEDIR is /usr/share/locale
Keyring support: Gnome
System configuration file name: /etc/msmtprc <<===
User configuration file name: /home/pi/.msmtprc <<===
Copyright (C) 2020 Martin Lambers and others.
This is free software. You may redistribute copies of it under the terms of
the GNU General Public License <http://www.gnu.org/licenses/gpl.html>.
There is NO WARRANTY, to the extent permitted by law.
The lines marked with <<=== are important for the further mSMTP configuration!
Create (or adapt) config file for sending with WEB.de
$ sudo nano /etc/msmtprc
The following listing of “/etc/msmtprc” shows the settings for sending via an existing EMail account at WEB.de
For your own use, the lines following “# Customize” must be changed with your own values.
In the section “# Authentication methods.” different formats are possible for the password specification. The simplest way (as in the example) is the direct entry of the PW of the mail account … BUT this is not the most secure method! See also: # https://marlam.de/msmtp/msmtp.html#Authentication
$ sudo cat /etc/msmtprc

# Set default values for all following accounts.
defaults
# Use the mail submission port 587 instead of the SMTP port 25.
port 587
# Always use TLS.
tls on
# Mail account
# Everything is now configured here for the e-mail account
# Use a name of your choice
account raspi
# Host name of the SMTP server
# Customize
host smtp.web.de
# Envelope-from address
# Customize
from yyyyyy@web.de
# Authentication methods. More information can be found in the msmtp documentation:
# https://marlam.de/msmtp/msmtp.html#Authentication
auth on
# Customize
user yyyyyy@web.de
# Customize
password PxxxxxxxxxxW
# Set a default account
# Enter name from above here again
account default: raspi
Customize rights / access
The next steps adjust the rights of the file.
$ sudo chmod 600 /etc/msmtprc
Set the e-mail program with “set sendmail”:
$ sudo nano /etc/mail.rc
set sendmail="/usr/bin/msmtp -t"
$ sudo chown pi:pi /etc/msmtprc
$ ls -lt /etc/msmtprc

-rw------- 1 pi pi 566 Aug 19 19:55 /etc/msmtprc
Test of mSMTP for WEB.de
$ sudo echo "E-Mail Test" | mail -s "E-Mail Subject" yyyyyy@web.de
The WEB.de mail account will then receive this message:
Subject: E-Mail Subject: mSMTP TEST
Date: Sun, 20 Aug 2023 14:40:18 0200
From: yyyyyy@web.de
To: yyyyyy@web.de
E-mail test
raspiBackup Configuration for sending e-mails with mSMTP
Customization
The configuration file “raspiBackup.conf” is adapted to the above mSMTP setup for raspiBackup email notifications with:
$ sudo nano /usr/local/etc/raspiBackup.conf
# email to send completion status
DEFAULT_EMAIL="yyyyyy@web.de"
# sender email address used with ssmtp and msmtp
DEFAULT_SENDER_EMAIL="yyyyyy@web.de"
# Additional parameters for email program (optional)
DEFAULT_EMAIL_PARMS=""
# mailprogram
DEFAULT_MAIL_PROGRAM="mail"
Test email notification from raspiBackup with mSMTP for WEB.de
$ sudo *raspiBackup* -m detailed -F
Console output:
--- RBK0009I: rasp8: *raspiBackup*.sh V0.6.8 - 2023-08-18 (cbfe5e8) Sun 20 Aug 15:42:40 CEST 2023 started.
--- RBK0116I: Configuration file /usr/local/etc/raspiBackup.conf is used.
!!! RBK0124W: Simulation mode on.
--- RBK0151I: Backup path /media/backup8 with partition type ext4 is used.
!!! RBK0157W: No systemd services are to be stopped.
--- RBK0081I: Backup of type rsync is created in /media/backup8/rasp8/rasp8-rsync-backup-20230820-154237.
--- RBK0078I: Backup time: 00:00:01.
--- RBK0033I: Please wait until cleanup is complete.
--- RBK0159I: 5 backups are kept for the backup type rsync. Please be patient.
--- RBK0017I: Backup completed successfully.
--- RBK0010I: rasp8: *raspiBackup*.sh V0.6.8 - 2023-08-18 (cbfe5e8) Sun 20 Aug 15:42:49 CEST 2023 finished with return code 0.
--- RBK0167I: An e-mail is sent.
--- RBK0026I: Debug log file was saved in /home/pi/raspiBackup.log.
The WEB.de mail account receives this message:
Subject: rasp8: Backup completed successfully.
Date: Sun, 20 Aug 2023 15:42:50 0200
From: yyyyyy@web.de
To: yyyyyy@web.de
--- RBK0009I: rasp8: *raspiBackup*.sh V0.6.8 - 2023-08-18 (cbfe5e8) Sun 20 Aug 15:42:40 CEST 2023 started.
--- RBK0116I: Configuration file /usr/local/etc/raspiBackup.conf is used.
!!! RBK0124W: Simulation mode on.
--- RBK0151I: Backup path /media/backup8 with partition type ext4 is used.
!!! RBK0157W: No systemd services are to be stopped.
--- RBK0081I: Backup of type rsync is created in /media/backup8/rasp8/rasp8-rsync-backup-20230820-154237.
--- RBK0078I: Backup time: 00:00:01.
--- RBK0033I: Please wait until cleanup is complete.
--- RBK0159I: 5 backups are kept for the backup type rsync. Please be patient.
--- RBK0017I: Backup completed successfully.
--- RBK0010I: rasp8: *raspiBackup*.sh V0.6.8 - 2023-08-18 (cbfe5e8) Sun 20 Aug 15:42:49 CEST 2023 finished with return code 0.
--- RBK0167I: An e-mail is sent.
Exim4 configuration
The following variables are used in the description:
- eMail Domain: MYDOMAIN (e.g. dummy.de)
- Hostname of the server: HOSTNAME (e.g. myserver)
- smtp Hostname to deliver emails: SMTP_PROVIDER_HOST (e.g. mail.your-server.de)
- Userid to send emails: SMTP_INPUT_USERNAME
- Password to send emails: SMTP_INPUT_PASSWORD
Changes or additions:
-
/etc/aliases: root: HOSTNAME@MYDOMAIN, thensudo newaliases -
/etc/mailname: MYDOMAIN -
/etc/hostname: HOSTNAME.MYDOMAIN -
/etc/email-addresses: root: HOSTNAME@MYDOMAIN -
/etc/hosts: hosts:127.0.1.1 HOSTNAME HOSTNAME.MYDOMAIN -
/etc/exim4/update-exim4.conf.confdc_eximconfig_configtype='internet' dc_other_hostnames='localhost' dc_local_interfaces='127.0.0.1 ; ::1' dc_readhost='HOSTNAME.MYDOMAIN' dc_relay_domains='' dc_minimaldns='false' dc_relay_nets='' dc_smarthost='SMTP_PROVIDER_HOST' CFILEMODE='644' dc_use_split_config='false' dc_hide_mailname='true' dc_mailname_in_oh='true' dc_localdelivery='mail_spool' keep_environment= -
/etc/exim4/passwd.clientSMTP_PROVIDER_HOST:SMTP_INPUT_USERNAME:SMTP_INPUT_PASSWORD
To send e.g. status mails from raspiBackup as root, nullmailer can be used.
nullmailer configuration
To send e.g. status mails from raspiBackup as root, nullmailer can be used.
The following variables are used in the description (provider is Hetzner):
- eMail Domain: MYDOMAIN (e.g. dummy.de)
- Hostname of the server: HOSTNAME (e.g. myserver)
- smtp Hostname to deliver emails: SMTP_PROVIDER_HOST (e.g. mail.your-server.de)
- Userid to send emails: SMTP_INPUT_USERNAME
- Password to send emails: SMTP_INPUT_PASSWORD
Changes or additions:
- Installation of mail:
sudo apt install mailutils -y /etc/nullmailer/remotes:SMTP_PROVIDER_HOST smtp --auth-login --user=SMTP_INPUT_USER --pass=SMTP_INPUT_PASSWORD --ssl
If the host name is not a valid host name at the e-mail provider, the following steps are necessary:
- Install and configure Nullmailer Rewrite Wrapper.
Set
NULLMAILER_USER=SMTP_INPUT_USERandNULL_MAILER_HOST=MYDOMAINin “sendmail”. sudo chown 700 /usr/sbin/sendmail
Create a clone at the end of a backup
Note
This feature is available starting with raspiBackup version 0.7.3 and as of now in Beta
raspiBackup can restore a backup to a locally connected device immediately after creating it. This provides a so called cold backup that can be used right away to immediately restart a failed device or an OS that no longer boots by switching the boot medium. Without this feature, an existing backup must first be restored and this takes time. If the rsync backup type is used, the restore of current backup to the clone device is simply a synchronization with the backup and completes very quickly. A tar backup type always is a full restore of the backup and takes much longer.
Only the rsync and tar backup types, as well as both backup modes, are supported.
Note
In the following, the clone device is assumed to be
/dev/sda. Other examples would be/dev/mmcblk1or/dev/nvme1n1. Additionally, a PARTUUID of2a6bd249-01is assumed.
Steps to enable cloning:
-
Create a backup
-
Restore the backup to the clone device
/dev/sda -
List the PARTUUIDs of the clone device using
blkid | grep "/dev/sda"and select a PARTUUID. For example,2a6bd249-01. -
Enable cloning
-
Manually edit the configuration file /usr/local/etc/raspiBackup.conf
In the
DEFAULT_CLONE_DEVICEoption, the clone device/dev/sdamust be specified, and a PARTUUID must be configured in theDEFAULT_CLONE_PARTUUIDoption. -
Installer
In the installer, the
<clone device>and the PARTUUID must be configured asM3->C10. The PARTUUID must be separated from the clone device by spaces.Note: The cloning device must be connected.
-
-
Creating a backup and a clone
-
Command line
At the command line, specify the option
--clone <clone device>when starting the backup.<clone device>refers to the locally connected device to which the current backup is to be synchronized or restored. In the example, it would be--clone /dev/sdaNote: A PARTUUID must have been configured beforehand.
-
Regular automatic invocation
If the installer is configured to run on a regular basis, a backup and a clone are automatically created at regular intervals.
-
Important
The following checks are performed to prevent accidental overwriting of other connected devices:
- The configuration variable
DEFAULT_CLONE_PARTUUIDmust match the PARTUUID of a partition on the cloned device.- The partitioning of the clone device must match the partitioning of the running system. The size of the last partition may differ.
Caution
In certain configurations, the Raspberry Pi may boot from the cloning device after a reboot. This can occur particularly when booting via USB from a USB hard drive or USB SSD and the cloning device is also connected via USB. Thorough testing is essential in such cases.
If you want to disable the creation of a clone, you must use the installer to delete the clone device and the PARTUUID at M3->C10, or do so manually in the configuration file.
Summary of key features related to cloning
- A clone must be initialized by restoring a backup. During this process, the clone device is assigned new PARTUUIDs, and
/etc/fstaband/boot/cmdline.txtare synchronized with the new PARTUUIDs. - When cloning, the clone device is not assigned new PARTUUIDs. Since
/etc/fstaband/boot/cmdline.txtrepeatedly receive the system’s PARTUUIDs, the PARTUUIDs are continuously synchronized with those of the clone device. - During cloning,
DEFAULT_CLONE_PARTUUIDmust contain a PARTUUID of a clone partition to prevent accidentally overwriting the wrong device. Additionally, the partitioning of the clone device must match the partitioning of the system (number and size). The last partition may be smaller or larger.
Restore Introduction
raspiBackup provides complete restores, i.e. all partitions are restored or synchronized. In contrast, in partition-oriented mode, the partitions to be restored can be selected and thus only parts can be restored.
During a restore, new partitions are created on the target data device (SD card, USB disk, …)
and then with the appropriate tool (dd, tar or rsync)
the data is restored there. For the rsync backup type the option -00 can be used to
force a synchonization and thus the restore will finish much faster.
The target data device must therefore not the currently used operating system. It must be another card, USB disk, SSD or NVMe device connected with a card reader.
A restore requires a Linux systemfor a tar or rsync backup. You should usually use a Raspberry for this. Other Linux systems also work, but it is not 100% guaranteed that they will always work.
If an external root file system has been backed up (hybrid boot mode), it will also be restored to an external device.
(Only in normal backup mode with tar or rsync backup).
A manual restore of the data with the previously used backup tools dd, tar or rsync is of course also possible.
It is also possible to restore individual files (manually),
especially with the rsync backup.
The backup script can also be used to clone systems: A backup is created and then restored to another device. A typical application is to copy an SD card to an SSD or NVMe and then operate the system with the SSD/NVMe and no longer with an SD card.
A restore command usually looks like this:
sudo raspiBackup -d <Restoredevice> <Path to Backup>
where <Restoredevice> for example is /dev/sda, /dev/mmcblk1p or /dev/nvme1n1.
For a complete list of all restore options see here.
Further topics on this page:
- Recovery scenario with a Raspberry with Raspberry Pi OS
- Restore scenario for Windows users on a Windows system
- Restore scenario for Linux users
- Example calls
- How to find out the device names of the external SD card and external disk?
Recovery scenario with a Raspberry with Raspberry Pi OS
Any backup can be restored using the Raspberry Pi.
-
Start a Raspberry Pi OS on the Raspberry
-
Install *raspiBackup
-
Connect the system device to which the backup is to be restored (e.g. an SD card with an SD card reader or SSD).
-
Connect the medium that contains the backup (e.g. a hard disk) and mount it or mount a network drive with the backup data.
-
If the root partition is located on an external partition (hybrid boot mode), connect another device with a pre formatted partition which will get the external partition been restored
-
Start raspiBackup for restore to the device.
This is usually used:
- The system device
/dev/sda - The backup partition
/dev/sdbx - And a possible root partition
/dev/sdcx.
If a network drive is used, the root partition is usually /dev/sdbx.
The actual device assignment may differ and should always be checked, to avoid other partitions being overwritten by mistake.
E.g. with
sudo parted -l
Restore scenario for Windows users on a Windows system
Only a dd backup can (also) be restored directly under Windows,
with the Win32DiskImager.
Restore scenario for Linux users
Note
In principle, any Linux OS can be used to restore a backup. But with possible incompatibilities of its tools, compared to the Linux tools used for the backup Linux tools used for the backup, there may be problems. An occasional candidate for this is
sfdisk, which has changed to be incompatible with both Jessie and Bullseye.Therefore:
A restore should always be performed with the same OS that was used to create the backup.
The device to which the backup is to be restored is connected to the Linux system, the backup partition is mounted and a partition is provided for any external root file system in hybrid boot mode.
Then start raspiBackup to restore to a device.
If no Raspberry Pi OS and/or no Raspberry Pi is used, the option –unsupportedEnvironment must be specified.
See also Supported hardware and software.
Example calls
Hardware required for the restore:
-
A running Raspberry Pi with a running Raspberry Pi OS or another Linux operating system or another Linux computer with raspiBackup installed.
-
A connected target device of the backup
-
A connected backup device (via USB or network)
-
If an external root partition is to be restored or the USB boot mode is used where no mode is used where an SD card is no longer used, another disk must be connected via USB. another disk must be connected
Similarities of the example calls:
- The backed up system is called “raspberrypi” in the example call.
- The target disk that is to receive the restore of the boot/boot and root partition
boot and root partition is available in the example as
/dev/sdf. Further below is described how to find out the current value for-d - Attention: All existing data on the target data carriers will be deleted after a confirmation prompt from raspiBackup before the restore.
- The backup to be restored is available under
/remote/raspifix/disks/backup/rsync/raspberrypi/raspberrypi-rsync-backup-20141230-213032/
Restore to an SD card
sudo raspiBackup.sh -d /dev/sdf /remote/raspifix/disks/backup/rsync/raspberrypi/raspberrypi-rsync-backup-20141230-213032/
Restore to a USB device without SD card (USB boot mode)
sudo raspiBackup.sh -d /dev/sdf /remote/raspifix/disks/backup/rsync/raspberrypi/raspberrypi-rsync-backup-20141230-213032/
Restore to an SD card and an external partition (hybrid boot mode)
- To receive the restore of the external root partition, a correspondingly large partition
/dev/sdawas created on/dev/sda. Formatting is not necessary.
sudo raspiBackup.sh -d /dev/sdf -R /dev/sda1 /remote/raspifix/disks/backup/rsync/raspberrypi/raspberrypi-rsync-backup-20141230-213032/
How to find out the device names of the external SD card and external disk?
Enter the following command on the Raspberry:
fdisk -l | egrep "^Disk /|^/dev"
The output then looks like this, for example:
pi@raspberrypi:~# sudo fdisk -l | egrep "^Disk /|^/dev"
Disk /dev/mmcblk0: 8011 MB, 8011120640 bytes
/dev/mmcblk0p1 8192 122879 57344 c W95 FAT32 (LBA)
/dev/mmcblk0p2 122880 15646719 7761920 83 Linux
Disk /dev/sda: 15.5 GB, 15548284928 bytes
Disk /dev/sdb: 300.1 GB, 300069052416 bytes
/dev/sdb1 1 586072367 293036183 ee GPT
Here you can see that
- The internal SD card
/dev/mmcblk0is 8GB in size - The new external SD card
/dev/sdais 16GB in size - The external disk
/dev/sdb, to which the root partition is to be moved, 300GB in size and has a partition/dev/sdb1.
The parameter for -d is therefore /dev/sda (external SD card).
If an external root partition was also backed up, -R /dev/sdb1 (external root partition) is also required
(hybrid boot mode).
The parameters must of course be adapted to the local conditions.
Note:
A backup should be tested regularly: Whether the restore still works and still contains all data.
Nothing is more frustrating when, at the moment you need the backup, the backup is corrupt or does not contain all the data…
A test is quite simple with the Raspberry:
Insert a new SD card, restore the backup and boot from the new SD card. If no SD card is used, e.g. an SSD, the restore test can also be performed with a hard disk. as long as it is large enough to hold all the data on the SSD.
If for any reason the restore with the script fails, you can of course
at any time use the standard
Linux tools that were used for the backup - dd, tar or rsync - to manually
restore. However, this is not quite as convenient as with the script
and appropriate Linux knowledge is required ;-)
See also Manual restore of a backup.
Restore individual files/directories from a backup
Sometimes a complete restore of the entire system is not required, but only individual file(s) or directories. This is not directly supported by raspiBackup. Since raspiBackup only uses standard Linux tools to restore the entire system, this can be done manually for all backup types.
However, these activities must be carried out on a Linux system.
The easiest way to do this is with rsync backups. dd and tar backups require a few additional steps on the command line.
dd backup
First, the dd image file must be made available.
In the following example, the USB disk partition is /dev/sda1 and is mounted to
/mnt mounted with:
sudo mount -o ro /dev/sda1 /mnt
Search there for the desired backup generation and the image file.
Next, determine the sector offset in the image file with fdisk.
sudo fdisk -l raspberrypi-dd-backup-20160415-222900.img

Disk raspberrypi-dd-backup-20160415-222900.img: 7.5 GiB, 8011120640 bytes, 15646720 sectors
Units: sectors of 1 * 512 = 512 bytes
Sector size (logical/physical): 512 bytes / 512 bytes
I/O size (minimum/optimal): 512 bytes / 512 bytes
Disk label type: dos
Disk identifier: 0x000798a3

Device Boot Start End Sectors Size Id Type
raspberrypi-dd-backup-20160415-222900.img1 8192 122879 114688 56M c W95 FAT32 (LBA)
raspberrypi-dd-backup-20160415-222900.img2 122880 15646719 15523840 7.4G 83 Linux
So there are 8192 for the first partition and 122880 for the second partition.
Now the partition is mounted after /media, in the example the second, the root partition.
Note: The offset must be multiplied by the sector size, in this case 512.
sudo mount -o ro,norecovery,loop,offset=$((122880*512)) raspberrypi-dd-backup-20160415-222900.img /media
You can now access all the backup data in the /media directory.
ls /media/

backup boot dev home lost found mnt proc root sbin srv tmp var
bin boot.bak etc lib media opt remote run selinux sys usr
Unmount the partition to exit:
sudo umount /media
sudo umount /mnt
tar backup
First the tar file must be made available.
In the following example, the USB disk partition is /dev/sda1 and is mounted to /mnt with :
sudo mount -o ro /dev/sda1 /mnt
Assume that the entire directory /etc in the tar file is to be accessed.
This can be done with the following command.
tar -xf raspberrypi-tar-backup-20171028-205746.tar -C /tmp etc
But you have to be patient, because depending on the size of the tar file, this can take some time.
Finally, the /etc directory has been extracted from the tar file to /tmp. Access is now possible there.
rsync backup
Access to the rsync backup directory must be available at the beginning.
In the following example, the USB disk partition is /dev/sda1 and is mounted to /mnt with :
sudo mount -o ro /dev/sda1 /mnt
The contents can now be accessed directly:
cd /mnt/backups/raspberrypi/raspberrypi-rsync-backup-20160705-212724-8G

ls -la

total 57592
drwxr-xr-x 26 pi pi 4096 Jul 5 2016 .
drwxr-xr-x 14 root root 4096 Apr 18 2018 ...
drwxr-xr-x 2 root root 4096 Nov 15 2015 backup
drwxr-xr-x 2 root root 4096 May 29 2016 bin
drwxr-xr-x 2 root root 4096 Jan 1 1970 boot
drwxr-xr-x 3 root root 4096 Apr 20 2014 boot.bak
drwxr-xr-x 2 root root 4096 Jul 4 2016 dev
drwxr-xr-x 125 root root 12288 Jul 5 2016 etc
drwxr-xr-x 3 root root 4096 Feb 1 2015 home
drwxr-xr-x 16 root root 4096 May 29 2016 lib
drwx------ 2 root root 4096 Dec 15 2012 lost found
drwxr-xr-x 2 root root 4096 Jul 3 2016 media
drwxr-xr-x 2 root root 4096 Jan 8 2014 mnt
drwxr-xr-x 3 root root 4096 Mar 1 2015 opt
-rwxr-xr-x 1 pi pi 126799 Jul 5 2016 pi
dr-xr-xr-x 2 root root 4096 Jan 1 1970 proc
drwx------ 2 root root 4096 Jul 10 2013 .pulse
-rw------- 2 root root 256 Dec 16 2012 .pulse-cookie
-rw-r--r-- 1 root root 58720256 Jul 5 2016 raspberrypi-backup.img
-rw-r--r-- 1 root root 512 Jul 5 2016 raspberrypi-backup.mbr
-rw-r--r-- 1 root root 273 Jul 5 2016 raspberrypi-backup.sfdisk
drwxr-xr-x 4 root root 4096 Aug 15 2013 remote
drwx------ 13 root root 4096 Jul 3 2016 root
drwxr-xr-x 2 root root 4096 Jul 5 2016 run
drwxr-xr-x 2 root root 4096 May 29 2016 sbin
drwxr-xr-x 2 root root 4096 Jun 20 2012 selinux
drwxr-xr-x 3 root root 4096 Mar 7 2014 srv
dr-xr-xr-x 2 root root 4096 Jul 4 2016 sys
drwxxrwxrwx 2 root root 4096 Jul 5 2016 tmp
drwxr-xr-x 10 root root 4096 Dec 15 2012 usr
drwxr-xr-x 12 root root 4096 Jul 8 2014 var
Manual restore of an rsync backup
A backup created by raspiBackup contains all the information required for a restore and can be restored manually.
For various reasons, a raspiBackup user wanted to restore a rsync backup manually and has kindly described this in detail.
# Manually create the partitions:
sfdisk /dev/sdb < /backup/pi/pi-rsync-backup-20170812-134552/pi-backup.sfdisk

# Restore MBR:
dd of=/dev/sdb if=/backup/pi/pi-rsync-backup-20170812-134552/pi-backup.mbr count=1
sync

# Inform the operating system about partition table changes:
partprobe /dev/sdb

# Format and mount root partition
mkfs -t vfat /dev/sdb1
mkfs -t vfat /dev/sdb6
mkfs.ext4 /dev/sdb5
mkfs.ext4 /dev/sdb7

mkdir -p /mnt/sdb1
mkdir -p /mnt/sdb5
mkdir -p /mnt/sdb6
mkdir -p /mnt/sdb7

mount /dev/sdb1 /mnt/sdb1
mount /dev/sdb5 /mnt/sdb5
mount /dev/sdb6 /mnt/sdb6
mount /dev/sdb7 /mnt/sdb7

# udevadm settle waits for udevd to process the device creation events for all hardware devices, thus ensuring that any device nodes have been created successfully before proceeding:
udevadm settle

# rsync-Restore:
rsync --numeric-ids -aAHXv --exclude=/pi-backup.* /backup/pi/pi-rsync-backup-20170812-134552/mmcblk0p1/ /mnt/sdb1
rsync --numeric-ids -aAHXv --exclude=/pi-backup.* /backup/pi/pi-rsync-backup-20170812-134552/mmcblk0p5/ /mnt/sdb5
rsync --numeric-ids -aAHXv --exclude=/pi-backup.* /backup/pi/pi-rsync-backup-20170812-134552/mmcblk0p6/ /mnt/sdb6
rsync --numeric-ids -aAHXv --exclude=/pi-backup.* /backup/pi/pi-rsync-backup-20170812-134552/mmcblk0p7/ /mnt/sdb7

# Fake-HW-Clock patch:
# logItem "Updating hw clock"
echo $(date -u +"%Y-%m-%d %T") > /mnt/sdb7/etc/fake-hwclock.data

# logItem "Syncing filesystems"
sync

# umount all recovery-folders:
umount /mnt/sdb*

# Eject SD card:
eject /dev/sdb

# Clean up mount directories:
rmdir /mnt/sdb*

# Insert SD card into Pi and test!!!
# works :-)
Manual tgz restore
The backup directory created by raspiBackup contains all information required to restore this backup also manually with standard Linux tools. The following page describes how to restore a normal tgz backup.
Create the partitions on the SD card
First of all the SD card has to be plugged in in into a Raspberry which is used to restore the backup. It usually is detected as /dev/sda or /dev/sdb. Use lsblk to check what’s the device used by the SD card. In the following description I use /dev/sdb now.
Next mount the backuppartition on a mountpoint. /mnt iis used in the following description for the backup partition and hostname raspberry and /media for the target SD card partitions.
Now create the partitions with
sudo sfdisk /dev/sdb < /mnt/raspberry/raspberry-tgz-backup-20170812-134552/raspberry-backup.sfdisk
This will create two partitions.
You can check whether everything is OK with
sudo fdisk -l /dev/sdb

Disk /dev/sdb: 7.43 GiB, 7969177600 bytes, 15564800 sectors
Disk model: MassStorageClass
Units: sectors of 1 * 512 = 512 bytes
Sector size (logical/physical): 512 bytes / 512 bytes
I/O size (minimum/optimal): 512 bytes / 512 bytes
Disklabel type: dos
Disk identifier: 0xa02ea338Device Boot Start End Sectors Size Id Type
/dev/sdb1 8192 532479 524288 256M c W95 FAT32 (LBA)
/dev/sdb2 532480 15564799 15032320 7.2G 83 Linux
Restore first partition (boot partition)
sudo dd of=/dev/sdb1 if=/mnt/raspberry/raspberry-tgz-backup-20170812-134552/raspberry-backup.img
sync
You can check whether everything is OK with following commands:i
sudo mount /dev/sdb1 /media; ls /media; sudo umount /media
You should get a list of all boot files.
bcm2708-rpi-b.dtb bcm2708-rpi-zero-w.dtb bcm2710-rpi-3-b-plus.dtb bcm2711-rpi-4-b.dtb config.txt fixup4x.dat issue.txt LICENCE.broadcom start4x.elf
bcm2708-rpi-b-plus.dtb bcm2709-rpi-2-b.dtb bcm2710-rpi-cm3.dtb bcm2711-rpi-cm4.dtb COPYING.linux fixup_cd.dat kernel7.img overlays start_cd.elf
bcm2708-rpi-b-rev1.dtb bcm2709-rpi-cm2.dtb bcm2710-rpi-zero-2.dtb bcm2711-rpi-cm4s.dtb fixup4cd.dat fixup.dat kernel7l.img start4cd.elf start_db.elf
bcm2708-rpi-cm.dtb bcm2710-rpi-2-b.dtb bcm2710-rpi-zero-2-w.dtb bootcode.bin fixup4.dat fixup_db.dat kernel8.img start4db.elf start.elf
bcm2708-rpi-zero.dtb bcm2710-rpi-3-b.dtb bcm2711-rpi-400.dtb cmdline.txt fixup4db.dat fixup_x.dat kernel.img start4.elf start_x.elf
Restore second partition (root partition)
Now format the second partition with
sudo mkfs.ext4 /dev/sdb2
You can check whether everything is OK with following commands:
sudo mount /dev/sdb2 /media; df -h /media
You should get something like
Filesystem Size Used Avail Use% Mounted on
/dev/sdb2 7.0G 24K 6.6G 1% /media
Now restore the tgz Backup on the partition created just now:
sudo tar --exclude /boot --same-owner --same-permissions --numeric-owner -x -v -z -f /mnt/raspberry/raspberry-tgz-backup-20170812-13455/raspberry-tgz-backup-20170812-134552.tgz -C /media
sudo umount /media
sudo umount /mnt
During the restore you should see the list of all files restored.
Boot the restored system
Now remove the target SD card, insert it in another Raspberry and boot the Raspberry with the restored backup.
Questions and answers
The following pages answer questions about raspiBackup and explain some details.
This includes which filesystem to use on the backup partitions and how Hardlinks with rsync works.
Notifications
raspiBackup can send notifications when a backup starts or stops. These notifications include all messages logged by raspiBackup, and the notification title indicates the completion status. A notification can also be sent when a backup job finishes.
The following notification destinations are available:
- eMail - Sampleconfigurationen
- Pushover - Configurationoptions
- Telegram - Configurationsoptions
- Slack - Configurationoptions
- Any other service via the email extension or the notification extension
The main options for notifications are described here. The email extension and the notification extension are described here.
Note
Notifications are only sent when raspiBackup is running in the background, meaning it is not launched directly from the console. If you want to test the notification and its settings, you can use the -F option, which only simulates a backup run—meaning no backup is actually created—but notifications are still sent.
You also have the option to receive notifications only when raspiBackup encounters an error. Keep in mind that if raspiBackup crashes, it may not be able to send an email.
Which file system can be used on the backup partition?
Depending on which backup method you use with raspiBackup, the correct file system must be present on the backup device. In the following table below shows the different file systems for each backup method and their restrictions.
Locally connected backup partitions
| filesystem | dd | tar | rsync |
|---|---|---|---|
| fat16 | 4GB limit | 4G limit | no |
| fat32 | yes | yes | no |
| exFat | yes | yes | no |
| ntfs | yes | yes | no |
| ext2/3/4 | recommended | recommended | recommended |
Remotely connected backup partitions
| filesystem | dd | tar | rsync |
|---|---|---|---|
| SMB | yes | yes | restricted Goes via the detour with the use of a loop device. See also FAQ24. |
| NFS | yes | yes | yes |
| but only via the detour of using a loop device. Or you can switch off the backup of ACLs. See also FAQ24. |
How do hardlinks work together with rsync
People often ask how the rsync backup works and how hardlinks are used for this purpose.
The following article describes when files are created and deleted in the
file system and when hardlinks are created and
removed.
Hardlinks are a file system capability supported by the Linux file systems
ext3 and ext4. They are pointers that connect a file name with its
content on the file system. This means that hardlinks can be used to access files with
different names from different positions in the file tree.
The Linux command ln can be used for this purpose, for example.
During an initial rsync backup, all files are copied and saved in the
backup directory. For the second and each subsequent backup, only the files
that are new or have changed are copied again and deleted files are deleted.
As a result, all rsync backups except the first one are usually relatively fast, as long as the amount of data changed is kept within limits.
For all files that have not changed, hard links to the files are created in the backup directory to the files that were backed up in previous backups backups.
If files are deleted, the hard link to the previously backed up file, that exists in the previous backup is no longer created in the new backup and therefore the file in the new backup is removed.
This means that you always have full access to a backup status and unchanged files are not repeatedly backed up and take up disk space. This saves backup time and space.
A file is only deleted when it has no loner any hard links to it. This means that as long as there is still at least one backup that refers to the file via hard link, the file is not deleted and is available for a restore.
The following image shows graphically when hardlinks and files are created or deleted. There is also a corresponding Youtube video, including a demo on the system.
The following graphic shows when F2 in BD6 is deleted in the file system. However, this is only true if all backups containing F2 were deleted - i.e. BD1 - BD5.

Many file managers show the disk space used without taking into account the space saved by hard links and are therefore much too high. This is especially true for Windows file managers.
The raspiBackup FAQ17 describes how to determine the disk space actually used when using hard links. disk space when using hardlinks can be determined.
Weblinks
- du counting harldinks towards filesize - An article that explains why the du command must be executed over multiple directories, to see the savings from hardlinks
Why is it better not to use dd as a backup type?
Many users of raspiBackup use dd as backup type.
Especially users who work more with Windows than with Linux, because they can restore a
dd backup under Windows with win32imager or similar tools.
dd can of course be used as a backup tool, but there is a certain risk that does not exist with the tar and rsync backup methods. It is therefore recommended that every user of raspiBackup should use tar or rsync instead.
Why?
-
dd backs up an entire partition 1 to 1 at bit level. Errors are reported if the bits cannot be read. However, there are also file system errors occur from time to time. These are usually caused by sudden power failure. These errors are not noticed by dd. This means that dd backs up a partition including the file system errors, which are then also restored during the restore. Thus you have an exact copy of the system with file system errors. You keep creating backups in the belief that everything is OK and then delete old backups at some point. Thus, little by little unnoticed, backups without file system errors are replaced by backups with file system errors. If a restore is then required, you no longer have a backup without file system errors and can only hope that the file system errors have not damaged any important system data. Otherwise the backup is useless.
-
When restoring a dd backup, the backup is restored 1 to 1 at bit level. If the SD card is not OK, often no error is reported by dd. If you then boot the system, it does not start or there are error messages from system services. Then the users get in touch and create a problem report because raspiBackup is not working correctly. After they are then asked to perform a restore to a new SD card the problem disappears. These problem reports are unnecessary effort that should be avoided.
What now?
Switching to tar is quick and easy. The same file system can be used on the on the backup partition can be used as for dd.
However, the restore can no longer be carried out with Windows programs such as Win32DiskImager or Etcher.
Instead, you can start raspiBackup on a Raspberry. If you only have one Raspberry available, you should get a one-time “emergency SD card” with Raspberry Pi OS and raspiBackup and put it aside, until you need it…
For rsync you need an ext2/3/4 file system on the backup partition. This can be created under Linux. The restore is also done with raspiBackup on a Raspberry.
Further disadvantages of dd backups
With a dd backup, the entire partition is always backed up - even if only a fraction of the partition (e.g. 33%) is used. This means that with a 64GB partition, 42GB are always backed up for nothing, the backup process takes unnecessarily takes 66% longer and the backup occupies 66% more disk space. There is the option DD_BACKUP_SAVE_USED_PARTITIONS_ONLY with which only the existing root partition is backed up and not the entire device.
Which backup type is the best?
The most efficient backup type is rsync. By using hardlinks only files that have changed are copied and therefore all but the first backup process is completed relatively quickly. In addition, the files are unpacked and can be accessed directly if only a few files from the backup are needed. With tar and dd the backups have to be unpacked first.
Further information
How can I create a clone with raspiBackup?
raspiBackup regularly creates any backup versions that can be restored if necessary. can be restored if necessary. Often, however, you simply want to have the last backup backup on a medium so that you can use it immediately in the event of an error, i.e. a clone. in the event of an error, i.e. a clone.
raspiBackup does not offer a direct option to create a clone.
However, this is possible with the help of a small auxiliary tool: With this
a backup is created and this backup is then restored to a medium.
to a medium. If the backup type rsync is used, the restore is only a
synchronization of the changes from the last backup to the current backup and
finishes much earlier.
For all other backup types and backup modes, the restore is always a standard restore and not a synchronization.
The help tool is called raspiBackupAndClone.sh and is available on GitHub.
The following steps are necessary to use it:
Note
<clonedevice> is the device that is to receive the clone, e.g.
/dev/mmcblk0or/dev/sda.
-
Install and configure raspiBackup
-
Install
raspiBackupAndClone.sh- download
raspiBackupAndClone.shcurl -s -O https://raw.githubusercontent.com/framps/raspiBackup/refs/heads/master/helper/raspiBackupAndClone.sh - Move the script to
/usr/local/binsudo mv raspiBackupAndClone.sh /usr/local/bin - Make
raspiBackupAndClone.shexecutablesudo chmod x /usr/local/bin/raspiBackupAndClone.sh
- download
Important
Don’t forget to execute the following steps to initialize the <clonedevice> [!WARNING] Make sure that the specified <clonedevice> is the correct device. Otherwise, you risk losing data.
-
One-time initialization of the cloned device
- Create a rsync backup with
sudo raspiBackup - Restore the backup just created to the cloned device with
sudo raspiBackup -d <clonedevice> <backup directory>
- Create a rsync backup with
-
Run raspiBackupAndClone once manually
sudo raspiBackupAndClone.sh <clonedevice>and carefully test the clone
-
Use
raspiBackupAndClone.shinstead ofraspiBackup.sh- In the file
/etc/systemd/system/raspiBackup.service
change toExecStart=/usr/local/bin/raspiBackup.shExecStart=/usr/local/bin/raspiBackupAndClone.sh <clonedevice>sudo nano /etc/systemd/system/raspiBackup.service
- In the file
Move the Raspberry operating system from SD card to SSD, USB disk or USB stick
raspiBackup is designed to restore a backup to the original device configuration. device configuration. There are 3 possible scenarios:
/bootand/to SD card/booton SD card and/externally on an SSD, USB disk or USB stick (Older Rasperry, which cannot use USB boot mode) and is called hybrid boot mode/bootand/on an SSD, USB disk or USB stick (USB boot mode on newer Raspberries)
raspiBackup can also be used to easily migrate from (1) to (2) or (3).
To do this, a backup is created with raspiBackup and then restored to the new device configuration.
The following restore command is required for (2) as the migration target:
sudo raspiBackup.sh -d <SD card> -R <USB device> <Backup>
For (3) the following command is required to restore:
sudo raspiBackup.sh -d <USB device> <Backup>
Where <USB device> can be an SSD, a USB disk or a USB stick
If you want to move to a large USB device, the option
--resizeRootFS- is useful, which does not expand the root partition, because then the rest of the
the rest of the USB device can be used for further partitions.
Details on the restore can be found in “Restore/Restore”.
How can I install and try out a beta version of raspiBackup?
From time to time there is a new version of raspiBackup, which contains new features, enhancements and bug fixes.
Each new version undergoes an automated regression test, which tests the actual backup and restore functionality. Then the new functions, enhancements and bug fixes that were already tested during development are tested during development are verified again manually.
The new version is then made generally available as a beta. This
is recognizable by the smiley :-D in front of the email subject.
Now every user of raspiBackup has the possibility to test the future new
version with the new functions, enhancements and error corrections
and, in the event of an error, to create a problem record so that the problem can be
problem can be fixed.
Since it is not possible to test all possible system environment conditions, testing the beta version also helps the community to make sure that no errors will be in the new version.
The following section describes how to install a beta, uninstall it again and create problem reports.
Installing the beta is relatively simple. You use
sudo raspiBackup -U
The current raspiBackup version is saved so that you can switch back to the previous version at any time. This is done with
sudo raspiBackup.sh -V
whereby the version can be selected from a list of previous versions, which is then reactivated.
If, contrary to expectations, a problem is discovered, a problem record or issue should be created on GitHub.
It is very important to check the
output of sudo *raspiBackup*.sh --version so that it is clear exactly
which code version is used.
When a new version is available, the creator will be
will be informed via GitHub and it can be downloaded again with sudo *raspiBackup*.sh -U -S
to download it again and verify the fix.
Is an external root partition supported (hybrid boot mode)?
Older Raspberries that do not yet support USB boot mode, can be configured in such a way that only the boot partition is stored on the SD card and the root file system on an external USB disk.
raspiBackup supports external root partitions and an external root partition is also backed up.
In normal backup mode, the two Raspberry Pi OS partitions
/boot and /root of the system device are normally backed up. However, if the root partition
to an external
partition (USB stick, USB disk, …), this external partition is backed up as well as the boot
partition and the boot partition from the SD card are backed up. If
this backup is restored, the option -R must be used,
to specify the target device for the external root partition required in hybrid boot mode.
Tips for large SD cards, HDDs and SSDs
When raspiBackup was created, there were only small SD cards and disks. SSDs were still a luxury and also small. Nowadays, the SD cards are tens of GB in size and the disks and SSDs have tens of TB.
In raspiBackup Release 0.7, new features were therefore introduced to help minimize backup and restore times for large devices. For this purpose, the partition-oriented mode is to be used and not the normal mode, as this only supports 2 partitions. The assumption is that the first two partitions house the OS and other large partitions are used for data.
In partition-oriented mode, you can select which partitions are to be backed up
and which partitions are to be restored (option -T). This allows you to regularly
back up only the first two partitions on which the OS is located in a very short time.
The other large partitions, which are used for data, can be backed up separately
at other times when fast backups are not required. If the system does not boot,
only the first two system partitions have to be restored.
It is even faster if the option -00 is used when restoring an rsync backup. Then the partitions
are not reformatted and the complete partitions are not restored,
but only the changes that have occurred in the meantime are restored via rsync.
In this way, you can quickly restore individual partitions to the state they had at
the time of the backup. Of course, this only works if the device of the original system
and the file system are not defective. Otherwise, a complete long restore must be carried out.
If you want to make full use of devices > 2TB, mbr2gpt from RonR can be used toi convert the system from mbr to gpt.
Invocation and options
raspiBackup must be invoked as user root or via sudo.
raspiBackup Option1 Option2 Option3 ... Backup directory
All options that switch something on or off can be activated or deactivated
by appendedng + or - when invoking raspiBackup.
Note:
If a parameter starting with - is used on the command line this parameter has to start with \-.
This is not required if this parameter is added to the configuration file.
Example: The -z option and the -z option switch backup compression on.
The -z- option, on the other hand, switches backup compression off, regardless of
what is in the configuration file in the parameter DEFAULT_ZIP_BACKUP. This allows an
option can be switched off in the command line, although it is switched on in the
configuration file is switched on.
There are corresponding options in the configuration file for most invocation options
/usr/local/etc/raspiBackup.conf. In addition, other configuration files
can be used to selectively set or overwrite certain options.
Configuration files
In addition to /usr/local/etc/raspiBackup.conf, there are other configuration files,
which are read if available. The options have the highest priority,
that are specified when the file is called.
The priority of the option sources can be seen in the following table:
| Priority | Source |
|---|---|
| 1 | Invocation options |
| 2 | -f <configFile> |
| 3 | $(pwd)/.raspiBackup.conf |
| 4 | ~/.raspiBackup.conf |
| 5 | /usr/local/etc/raspiBackup.conf |
Note:
Options in the configuration file that require yes/on or no/off as parameters
must be 0 for no and 1 for yes.
No entry in the default column means the default is ""
Note:
During a version upgrade, only the default configuration file
/usr/local/etc/raspiBackup.conf is updated with
updated with new configuration options. All other configuration files
may need to be updated manually.
There are various options for the backup and restore call:
- Invocation options and their configuration option (Backup / Restore). The configuration options can be temporarily overwritten by the corresponding iinvocation options. overwritten by the corresponding invocation options
- pure configuration options that cannot be overwritten by an invocation option (Backup / Restore)
- General invocation and configuration options for both the backup and restore (call-options)
Help text on the console
As long as you are on the console, a list of the available
available invocation options and their current status with the
options -h or --help.
Thematic list of invocation options
A list of invocation options is also available sorted by topic.
Backup options and configurations
The invocation options and the corresponding configuration options for raspiBackup are explained in options.
Options that can only be specified in the configuration file for the backup are described in configuration.
See also General invocation options and General configuration options.
Backup options
This list contains all invocation options of raspiBackup as well as the corresponding configuration options.
Backup configuration options
The following options can only be defined in a configuration file. There doesn’t exist an invocation option. Most invocation options can be configured there also. See Backup options for more information.
Restore options and configurations
The invocation options and the corresponding configuration options for raspiBackup are explained in Options.
Options that can only be specified in the configuration file for the restore are are described in Configuration.
See also General invocation options and General configuration options.
Restore options
By default, raspiBackup restores the entire system in normal backup mode.
In partition-oriented mode, however, you can select which partitions are to be restored,
If the partition-oriented mode
the rsync backup type is used, a delta restore can also be selected for a restore (option -00).
This means that only the changed files and deleted files from the backup are copied with `rsync
and files not present in the backup - i.e. newly created files - are deleted.
This allows a very fast restore.
Independent of raspiBackup, a manual restore
of the data with the previously used backup tools dd, tar or rsync is also possible.
This requires appropriate knowledge of the Linux backup tools.
It is also possible to manually restore individual files/directories.
- -C: Check for badblocks
- -d: Restoredevice
- -N: Extensions to be called before and after the restore
- -R: External root partition
- –resizeLastPartitionFS: Letzte Partition anpassen
- –resizeRootFS: Expand root parition
- -T: Partitions to restore
- –updateUUIDs: Customize the UUIDs
- -Y: Automated restore
- -0: No partitioning
- -00: No partitioning and formatting
- -1: Ignore partitioning errors
Restore configuration options
Most of the invocation options can also be defined in the configuration file configuration file. See Restore options.
General options and configurations
The invocation options and the corresponding configuration options for raspiBackup are explained here.
Options that can only be specified in the configuration file for the backup are described in General configuration options.
See also Backup options and Backup configuration options as well as Restore options and Restore configuration options
General options
General configuration options
- DEFAULT_BACKUPPATH
- DEFAULT_COLOR_CODES
- DEFAULT_PUSHOVER_*
- DEFAULT_SEND_STATS
- DEFAULT_SENDER_EMAIL
- DEFAULT_SLACK_*
- DEFAULT_TELEGRAM_*
Note: Options in the config file that require yes/on or no/off as parameters
must be 0 for no and 1 for yes. No entry in the
in the default column means the default is ""
Thematically sorted invocation options
Backup options
- -a: Commands to start the services after the backup
- -A: The runtime log is sent in the email
- -b: Definition of the block size to be used for the dd backup
- -B: Boot partition is backed up as tar instead of dd
- -c: Allow local backup
- -D: More options for the dd backup
- –dynamicMount: Dynamic mounting of the backup partition
- –ignoreAdditionalPartitions: More than two partitions are tolerated, but only the first two partitions are backed up
- –ignoreMissingPartitions: Test whether all partitions are backed up
- -k : Number of backups to be kept
- –keep_{type}: Number of backup types to be kept
- -M: Create a raspiBackup snapshot
- -o: Commands that stop services before the backup
- -p: Backup directory
- -P : Partition-oriented backup mode
- –rebootSystem: Reboot the system after the backup
- –smartRecycle: Use of SmartReccyle
- –smartRecycleDryrun: Test mode of SmartRecycle
- –smartRecycleOptions: SmartRecycle options
- –systemStatus: Show active services at backup start
- -t : Type of backup (dd, tar, rsync)
- -T: Partitions to be backed up
- -u: Enables additional directories to be excluded from the backup process
- -z: Compression of the backup with dd or tar
Restore options
- -C: Check for bad blocks
- -d: Restoredevice
- -R: External root partition
- –resizeRootFS: Root file system adjustment
- -T: Partitions to be restored
- –updateUUIDs: UUID generation
- -Y: Automated restore
- -0: No partitioning
- -00: No partitioning and formatting
- -1: Ignore partitioning error
Options that affect the messages and the log
- -A: The runtime log is sent with the email notification
- –coloring: Coloring settings for e-mails and console messages
- -G: Language of messages (German or English)
- -l: Switch on the detailed log level
- -L: Directory where the debug log and the runtime messages are saved
- -m: Message details
- –timestamps: All messages are output with a leading timestamp
- -v: All messages from the backup tool used are logged
Options that control notifications
- -e: email address to which the notification is sent
- -E: Optional parameters for the eMailClient programs
- –eMailColoring: Control where the eMailClient used accepts coloring information -F: Simulates the backup run and helps to quickly test the email notification
- -s: eMailClientProgram for sending the eMail
Options that control update, restore and local distribution of raspiBackup
- -S: Unconditional update
- -U: Update raspiBackup with the latest version and backup the old version
- -V: Reactivate a previous raspiBackup version
- -y: Copy the current raspiBackup version to predefined local hosts via scp
Options that start and stop services before the backup and extensions
- -o: Commands that stop services before the backup
- -a: Commands that start services after the backup
- -N: Extensions to be called before and after the backup
Further options
- -f: Specification of a configuration file
- -g: Progress bar
- –unsupportedEnvironment: Unsupported HW and SW is accepted
- –updateConfig: Update of the raspiBackup configuration file
Frequently asked questions (FAQ)
- 0) How was raspiBackup created?
- 1) Is a backup of a running system reliable? Shouldn’t the entire system be stopped before the backup?
- 2) How can I restore a backup?
- 3) What can raspiBackup back up and restore?
- 4) Which Linux backup methods are available?
- 5) Is it possible to restore the backup without raspiBackup?
- 6) Is it possible to restore the backups with raspiBackup to smaller and larger SD cards?
- 7) How can I influence the partitioning of the target SD card?
- 8) On which media can I store the backups with raspiBackup?
- 9) How can I extend the function of raspiBackup and additionally execute something before or after the backup and/or restore?
- 10) Which eMailClients are supported by raspiBackup?
- 11) My eMailClient is unfortunately not supported by raspiBackup. How can I still receive emails?
- 12) I have a question about or a problem with raspiBackup. How can I get help?
- 13) I have found a bug in raspiBackup. Where can I report the bug and when will I get a fix for it?
- 14) Do I somehow get automatically informed that there is a new version of raspiBackup?
- 15) How can I go back to a previous raspiBackup version if I notice after an upgrade that the new version does not work as I expect it to?
- 16) I have a 32GB SD card of which I only need 8GB. However, a dd backup always backs up 32GB, i.e. 24GB too much.
- 17) How can I tell that the rsync backup is actually using hardlinks to save disk space?
- 18) Which services must be stopped before the backup and then restarted?
- 19) What formatting must a partition have on which a backup is stored?
- 20) I have problems backing up my backups to a Synology. How can I fix this?
- 21) The contents of the boot partition do not change. Why is the boot partition always backed up again with every backup?
- 22) How can I use different backup configurations in different backup runs?
- 23) I would like to track the backup progress. Is there an option to get a progress bar?
- 24) raspiBackup reports an error
ACL_TYPE_ACCESS, Operation not supportedwhen using the backup type rsync - 25) Error message
dev/... has unsupported feature(s): metadata_csum E2FSCK: Get a newer version of e2fsck - 26) Why do I get the message
???? RBK0160E: Destination /dev/sda with xx GiB is smaller than the backup source with yy GiBalthough both SD cards are the same size? - 27) I have a tar or rsync backup and would like to convert it to a dd backup. Is that possible?
- 28) Why do file changes disappear from a restored backup after a reboot?
- 29) I get the message rsync: chown “(file-fad)” failed: Operation not permitted (1). How can I solve this?
- 30) I like raspiBackup and would like to honor the development and support. How can I do that?
- 31) I get an error message from raspiBackup. What can I do to get rid of it?
- 32) After upgrading to v0.6.3.2 I get error messages RBK0021E: Backup program of type tar terminated with RC 1 or RBK0021E: Backup program of type rsync terminated with RC 23.
- 33) I have a Cubieboard, Banana Pi, Odroid, Hummingboard, or Beagle Board. Can raspiBackup also backup these?
- 34) I want to restore my 16GB dd backup and get the message that the target SD card is too small. Why is that?
- 35) I would like to move my root file system to a USB disk. Can I do this with raspiBackup during the restore?
- 36) What do the return codes (RC) mean with which raspiBackup ends in the event of an error?
- 37) The email subject sometimes has a smiley at the beginning. What does it mean?
- 38) Where can I ask questions and get help with Linux questions and problems that have nothing to do with raspiBackup?
- 39) Where can I find the debug log of raspiBackup?
- 40) How can I update my configuration after a version update?
- 41) Where can I find the debug log of raspiBackup?
- 42) Where can the /boot and /root partitions be located?
- 43) How can I find all the documentation pages for raspiBackup or pages on a specific topic?
- 44) Why does the image with the restore backup not start?
- 45) How can I temporarily switch options on and off in the call?
- 46) Why is it not recommended to use the dd backup type?
- 47) Where can I get help with pure Linux questions or problems that have nothing to do with raspiBackup as such?
- 48) Can I restore the backup to a running system?
- 49) My backup which I have restored to an SD card does not start. Why not?
- 50) My backup or restore takes forever. What could be the reason?
- 51) How are the progress bar statistics calculated?
- 52) How can I download and run a test version or a temporary fix from GitHub?
- 53) What are raspiBackup snapshots?
- 54) How can I access the boot partition files in the backup directory?
- 55) Why do I suddenly have duplicate PARTUUIDs on my system?
- 56) How can I start raspiBackup automatically on an unsupported system?
- 57) How can I update raspiBackup to a new release?
- 58) What do I have to consider if I want to back up to an nfs mounted backup partition with rsync?
- 59) rsync reports that files have disappeared during the backup process on the system and aborts with return code 24. How can I prevent this?
0) How was raspiBackup created?
framp had three Raspis running at home. Two of them run 7/24. Every server should be backed up regularly because unforeseen circumstances can always occur that require a restoration of a previous status. Especially the SD card of the Raspberry tends to fail from time to time. In order to be prepared for this, a script was written, which initially created a dd backup, then later, as a dd backup always backs up the entire SD card although only fractions of it are of it are used, a tar backup was created automatically. Finally a rsync backup was implemented to save backup time and space through the usage of hardlinks. and backup space. After a restore was necessary again and again and everything worked well, framp thought that the script could also be helpful for other Raspberry friends and published raspiBackup. See also 10 years raspiBackup
1) Is a backup of a running system reliable? Shouldn’t the entire system be stopped before the backup?
The safest method is of course to stop the system completely. During a backup, only what is on the storage medium is backed up and not what is still in the main memory.
Unfortunately, it is not possible to backup a Raspberry automatically without a lot of effort.
But if all active services such as mysql, samba, nfs,
owncloud, web server are always stopped before the backup
to avoid data inconsistencies, the backup can be used to restore the Raspberry.
If the services are not stopped,
there is a high probability that the backup will become inconsistent.
For this purpose, the parameters -a and -o are used to specify the corresponding stop and
start commands before and after the backup. See also FAQ18 on this.
The installer can be used to select systemd services that are to be stopped
and restarted after the backup and the parameters for
option -a and option -o are set accordingly.
2) How can I restore a backup?
Any backup can be restored using raspiBackup. (See here the details). As a Windows user you can use the appropriate Windows tools to restore dd backups. For other backup types such as tar or rsync a Linux is necessary.
However, you can use the Raspberry for this: You nstall on a new SD card Raspberry Pi OS and copy raspiBackup to it. Then you connect the device to which the backup is to be restored and the medium with the backup to the Raspberry. Then invoke raspiBackup and have the desired backup written back to the device. Then shut down the system, insert the device with the restored backup and restart the Raspberry again.
3) What can raspiBackup back up and restore?
In normal mode, raspiBackup backs up two partitions with tar or rsync: The boot and the root partition that exist on the system. If the root partition has been moved to an external medium, the external root partition is also backed up. With dd backup, the entire SD card is is backed up. In this case, however, no external root partition can be backed up (hybrid boot mode).
In partition-oriented mode, any number of partitions of the system are system are backed up. However, no other external partitions are backed up.
4) Which Linux backup methods are available?
The dd backup as well as the tar and rsync backup are available. dd and tar backups can still be compressed with zip. On this page you can find the advantages and disadvantages of the respective backup methods.
5) Is it possible to restore the backup without raspiBackup?
This has been a basic requirement for raspiBackup: It must be possible to restore the backup manually with appropriate Linux tools and knowledge.
The backup creates files that contain the readable output from the Linux commands sfdisk, blkid and fdisk from the system. This allows to first restore the partition structure of the backup with the corresponding Linux tools. Then you can restore the partition backups with the corresponding Linux tools.
6) Is it possible to restore the backups with raspiBackup to smaller and larger SD cards?
With the dd backup type you have to repartitioning after the restore and to adjust the partition size if you want to use all the space for the second partition. A dd restore to a smaller device does not work.
It works without problems on a smaller or larger device if tar or rsync backup is used. In normal backup mode the size of the root partition is automatically adjusted, i.e. reduced or enlarged accordingly. If the size is increased the entire available space is used. If more space is used by the backup of the system than the restore device has, there will of course be errors during the restore. In partition-oriented backup mode, the last partition is adjusted accordingly.
With the -0 (zero) option, the new device is not partitioned but the existing partitioning of the
of the backed up system is used.
This gives you complete control over the size of the restored partitions.
This means that before the restore you can specify exactly how
large the partitions on the new SD card should be and thus also restore to
smaller SD cards. This also works for partition-oriented backups.
A dd backup cannot be restored to a smaller card. It must be reduced in size. This can be done like this. Or you can use pishrink.
A partition-oriented backup can be restored to smaller devices by preformatting it with your desired partitions and then restoring the backup with the option -0 to restore the backup.
7) How can I influence the partitioning of the target SD card?
There are two options that influence the partitioning behavior of raspiBackup
partitioning behavior: Option -1 (one) forces raspiBackup to partition the
backup SD card to the destination SD card even if the partitions are smaller or
or larger than the target SD card. With the option -0 (zero)
option, raspiBackup does not perform any partitioning and uses the existing
partition of the target SD card. This means that you can create and format the partitions
and format them the way you want them and they will then be used by
by raspiBackup.
8) On which media can I store the backups with raspiBackup?
Generally on any device that can be mounted under Linux
- External USB stick
- External USB disk
- smb network drive
- nfs network drive
- sshfs network drive
- webdav network drive
- ftpfs network drive
9) How can I extend the function of raspiBackup and additionally execute something before or after the backup and/or restore?
There are various possibilities:
-
A wrapperscript is used and performs additional actions before and after the backup run, e.g. to save other things.
-
Any extensionpoints can be called before and after the backup and/or restore from raspiBackup. Two example extensions (see here) additionally report the CPU temperature before and after the backup run as well as the occupied main memory. An eMailExtensionPoint allows you to control any other eMail client.
10) Which eMailClients are supported by raspiBackup?
raspiBackup supports exim4, postfix and nullmailer, ssmtp, msmtp and sendEmail. Other email clients can be addressed via an email extension (for details see here).
11) My eMailClient is unfortunately not supported by raspiBackup. How can I still receive emails?
raspiBackup can use an eMailExtensionipoint to send the email. To do this, you have to write a small script, which sets the eMailParameters corresponding to the eMailClient used and calls the eMailClient with the correct syntax. An example extension for mailx is included in the extension examples.
12) I have a question about or a problem with raspiBackup. How can I get help?
First of all: The emphasis is on raspiBackup questions. For Linux questions or problems see FAQ38 and FAQ47.
There are several options:
-
In GitHub, issues can be created for questions or problems. This is the preferred option. This requires a one-time registration is necessary. This and the use of GitHub is free of charge.
-
In the Raspberry forum there is a subforum on backups, where questions about raspiBackup can be asked and problems can be reported. framp will be informed about all new threads and can dedicate himself to the thread.
See also these Notes
Note: Any other means of contact will be ignored.
13) I have found a bug in raspiBackup. Where can I report the bug and when will I get a fix for it?
As in any software, it can happen that raspiBackup has bugs. The various channels through which problems can be reported are described in FAQ12.
14) Do I somehow get automatically informed that there is a new version of raspiBackup?
raspiBackup checks whether there is a newer version each time it is called. If yes a corresponding message is displayed and the notification email indicates this in the title with a smiley ;-). Then you can go to this page to see what the new version brings and then use the parameter -U parameter to update the version.
15) How can I go back to a previous raspiBackup version if I notice after an upgrade that the new version does not work as I expect it to?
raspiBackup creates a backup every time a new version is activated with the -U option. With the option -V you can always go back to a previous version. A list of all backed up raspiBackup versions is displayed and you can select the version to restore.
16) I have a 32GB SD card of which I only need 8GB. However, a dd backup always backs up 32GB, i.e. 24GB too much.
The dd backup always backs up the whole SD card. There is the configuration parameter DEFAULT_DD_BACKUP_SAVE_USED_PARTITIONS_ONLY, which ensures that only the defined partitions are backed up. I.e. you only have to use gparted or another partitioning tool to create a smaller partition of 8GB. The current partition sizes can be checked with the lsblk command.
Alternatively, you can use raspiBackupWrapper Script after the backup with raspiBackup pishrink and reduce the dd image to the possible minimum.
17) How can I tell that the rsync backup is actually using hardlinks to save disk space?
Hardlinks are successfully used by raspiBackup when a local USB stick stick, a local USB disk or a partition mounted via NFS, formatted with ext3/ext4 is used. SMB and sshfs do not support hardlinks.
Note: Windows Explorer ignores hardlinks and therefore displays an incorrect effective disk usage. A Linux system must therefore be used to check the assignment. The Raspberry is ideal for this.
The command sudo du -sh * shows the memory space actually used
and sudo du -shl * shows the memory space that would be used,
if no hardlinks were used (the one that Windows
incorrectly displays) .
Example:
root@raspberrypi:/media/nas-backup/raspberrypi# du -sh *
4,5G raspberrypi-rsync-backup-20160822-184617
4,5M raspberrypi-rsync-backup-20160822-190436
5,2M raspberrypi-rsync-backup-20160822-195250
5,7M raspberrypi-rsync-backup-20160822-201610

root@raspberrypi:/media/nas-backup/raspberrypi# du -shl *
4,7G raspberrypi-rsync-backup-20160822-184617
4,7G raspberrypi-rsync-backup-20160822-190436
4,7G raspberrypi-rsync-backup-20160822-195250
4,7G raspberrypi-rsync-backup-20160822-2016
Note: How do hardlinks work together with rsync?. And also a Youtube video.
18) Which services must be stopped before the backup and then restarted?
All services that store any system states in databases or in the memory or on the file system should be stopped so that inconsistent data statuses are not created during the backup, which are then only noticed when the system is restored and unusable.
Systemd services can be configured with the installer that is stored in the configuration file DEFAULT_STARTSERVCIES and DEFAULT_STOPSERVCIES accordingly. Applications that do not run as system services must be be added manually with the two options in the config file. After this, the installer can no longer be used to configure these two options.
The following services should be stopped in any case:
| Service | Stop command |
|---|---|
| nfs | systemctl stop nfs-kernel-server |
| Samba | systemctl stop samba |
| Pilight | systemctl stop pilight |
| Cups | systemctl stop cups |
| Minidlna | systemctl stop minidlna |
| Apache | systemctl stop apache2 |
| Wordpress | systemctl stop wordpress |
| nginx | systemctl stop nginx |
| mysql | systemctl stop mysql |
| seafile | systemctl stop seafile |
| Owncloud | See Apache |
| FHEM | systemctl stop fhem |
| iobroker | systemctl stop iobroker |
| cron | systemctl stop cron |
The services should then be restarted using the DEFAULT_STARTSERVICES option. The sequence should then be exactly the reverse of the stop sequence.
The installer automatically ensures that the selected Systemd controlled services are stopped and started in the corresponding order. started in the appropriate order. Unfortunately, Systemd does not guarantee that the dependencies of the services are taken into account. For a few applications there are also further tips on this page that should be taken into account.
Example for -a
-a "systemctl startpilight && systemctlstartsamba && systemctl startnfs-kernel-server"
Example for -o
-o "systemctl stop nfs-kernel-server && systemctl stop pilight && systemctl stop samba"
In the configuration file it then looks like this, for example:
DEFAULT_STOPSERVICES="systemctl stop nfs-kernel-server && systemctl stop pilight && systemctl stop samba"
resp.
DEFAULT_STARTSERVICES="systemctl startsamba&& systemctl startpilight && systemctl startnfs-kernel-server"
Attention: The commands are executed as root. No sudo is necessary.
With the –systemstatus option, the debug log contains the list of started system services and the open files before the start of the backup is output.
If you explicitly do not want to stop and start any services, a colon must be specified as a service, i.e. -a : -o :
19) What formatting must a partition have on which a backup is stored?
In principle, any file system that can be mounted on Linux can be used. However, there are a few things to consider:
-
A rsync backup uses hardlinks which are supported by ext3/4. Then only changed files are backed up and identical files are linked via hardlinks. An ext4 file system which is shared via smb does not support hardlinks. An alternative is NFS. If no hardlinks are supported, rsync cannot be used.
-
FAT32 can only store files up to 4GB. A dd backup will be as large as the SD card (unless the configuration option DEFAULT_DD_BACKUP_SAVE_USED_PARTITIONS_ONLY is used) and therefore usually larger than 4GB. The same applies to the tar backup which also very quickly becomes larger than 4GB. An alternative to this is NTFS.
General recommendation: Use ext3/4 if possible. On Linux use NFS for network drives. On Windows use NTFS on exported smb network drives. Only use FAT32 if you are sure that the backups will not backups are not larger than 4GB.
20) I have problems backing up my backups to a Synology. How can I fix this?
There are several users of raspiBackup who successfully back up their backups via nfs3 on a Synology successfully. There is a special page where users of raspiBackup have described what they have configured on the Synology so that everything works.
21) The contents of the boot partition do not change. Why is the boot partition always backed up again with every backup?
This is true in 98% of cases. However, a firmware update can update the boot partition. With the configuration parameter DEFAULT_LINK_BOOTPARTITIONFILES, the boot partitions in the backup are linked with hardlinks - if these are supported. This allows you to save 60MB of backup space per backup. However, the boot partition is always backed up first to test whether it has changed from the previous backup and then replaced by a hard link. This means that this option only makes sense if you have a very small backup space.
22) How can I use different backup configurations in different backup runs?
The configuration parameters of raspiBackup are read in the following order read in and take effect. Later files or options can overwrite previous overwrite previous options.
/usr/local/etc/raspiBackup.conf./.raspiBackup.conf(current directory)~/.raspiBackup.conf(home directory)- The optional configuration file specified with the
-foption - Invocation parameter
23) I would like to track the backup progress. Is there an option to get a progress bar?
There is the option -g for dd, tar and rsync. The option should only be be used when starting raspiBackup manually.
24) raspiBackup reports an error ACL_TYPE_ACCESS, Operation not supported when using the backup type rsync
The error message looks something like this:
??? RBK0024E: Backup program rsync has received an error.
rsync: set_acl: sys_acl_set_file(media/pi, ACL_TYPE_ACCESS): Operation not supported (95)
The reason is that nfs version 4 with rsync does not support Posix ACLs. However, these are not necessary in 99% of cases.
Note: Synology does not support ACLs with NFS as of 13.5.2022.
Note: The following command will find all files with ACLs:
sudo getfacl -Rs /
The command takes time to complete.
Possible solutions:
-
use tar and not *rsync
-
As of raspiBackup release 0.7.2, the option
DEFAULT_RSYNC_BACKUP_OPTION_EXCLUDE_ACLS=1forces rsync to backup no ACLs -
use a locally connected device which is formatted with *ext4
-
use nfs nfs version3. Read this article. This option does not work with a Synology.
-
use
raspiBackupWrapper.sh, which contains code that creates a loopback device which uses an image formatted with ext4 as backup partition and can therefore store ACLs. (For experienced users only).
In Bullseye, Debian has introduced persistent journaling and thus exists /var/log/journal with ACLs on the system. If you are using raspiBackup Release 0.6.6 or earlier must at least upgrade to release 0.6.6.1 or use the workaround described on GitHub in Issue 393.
25) Error message dev/... has unsupported feature(s): metadata_csum E2FSCK: Get a newer version of e2fsck
Solution:
Before the restore, edit /etc/mke2fs.conf and remove the metadata_csum from both ext4 options
Then perform the restore with raspiBackup.
26) Why do I get the message ???? RBK0160E: Destination /dev/sda with xx GiB is smaller than the backup source with yy GiB although both SD cards are the same size?
SD cards that are specified with a certain size (e.g. 16GB) are nevertheless
different in size. With the command sudo fdisk -l /dev/mmcblk0
you get the following output, for example, which tells you the exact size:
sudo fdisk -l /dev/mmcblk0

Disk /dev/mmcblk0: 15.5 GB, 15548284928 bytes
With another SD card, also 16GB in size, you get e.g.
Disk /dev/mmcblk0: 15.9 GB, 15931539456 bytes
You can therefore transfer the first image to the second SD card but not vice versa.
Solution:
- Use a larger SD card
- Reduce the size of the source image. The pishrink tool is suitable for this.
- Create the backup with the parameter DEFAULT_DD_BACKUP_SAVE_USED_PARTITIONS_ONLY parameter (see also FAQ16)
- Before creating the backup, use gparted to make the root partition slightly smaller (several hundred MB or equal to 1 GB). Then the backup also fits on SD cards that are somewhat smaller.
27) I have a tar or rsync backup and would like to convert it to a dd backup. Is that possible?
There is a script raspiBackupRestore2Image.sh. This allows you to create a dd from a tar or rsync backup in the backup directory.
28) Why do file changes disappear from a restored backup after a reboot?
Unfortunately, the SD card is defective at the location where the file system stores changes (superblock). As this is held in the main memory, you only notice the error after a reboot.
Solution: The backup must be restored to a new error-free SD card. card that is free of errors.
29) I get the message rsync: chown “(file-fad)” failed: Operation not permitted (1). How can I solve this?
Kurt got this problem, found the solution and kindly shared. DougieLawson has described the solution to the problem .
In the end, the following entry in /etc/fstab
192.168.2.203:/data/raspi /media/nas nfs nfsvers=3,defaults 0 0
should be changed as follows
192.168.2.203:/data/raspi /media/nas nfs defaults,nfsvers=4,noatime,noauto,x-systemd.automount 0 0
BastiFanta has found another reason for this:
I had to create the NFS share with the no_root_squash option, see for more details: https://www.selflinux.org/selflinux/html/nfs03.html
30) I like raspiBackup and would like to honor the development and support. How can I do that?
For example, give a tip.
31) I get an error message from raspiBackup. What can I do to get rid of it?
There is a page where all the most common error messages from raspiBackup are described in detail including actions to fix them. Visit this page.
32) After upgrading to v0.6.3.2 I get error messages RBK0021E: Backup program of type tar terminated with RC 1 or RBK0021E: Backup program of type rsync terminated with RC 23.
These errors were ignored in previous versions. However, as this inconsistent backups can be created, they are no longer ignored. ignored.
The following options exist to eliminate the problem:
-
Stop the service that changes the file during the backup. This can be done either be done with the installer (M3->C6) if it is a system service or service or you have to manually change the two options options DEFAULT_STOPSERVICES and DEFAULT_STARTSERVICES in the configuration file with the commands commands to stop and start the service. Tip: The –systemstatus option provides a list of active services and their of the active services and their open files. This allows you to find out which service is modifying a file during the backup modified during the backup.
-
With the DEFAULT_EXCLUDE_LIST option you can exclude the files that change during the backup. files that change during the backup can be excluded from the backup. files are important files of an application then the restored application will no longer start. So check urgently beforehand whether important and test thoroughly whether the restored application starts again starts again if the files are missing.
-
inotifywait -m -e delete -e create -e move -e modify -e attrib <directory>
It may be necessary to add the -r option so that all subdirectories are also subdirectories are also monitored.
- Use the configuration options
RSYNC_IGNORE_ERRORSorTAR_IGNORE_ERRORSto ignore the error. Details can be found here
33) I have a Cubieboard, Banana Pi, Odroid, Hummingboard, or Beagle Board. Can raspiBackup also backup these?
In principle, this should be possible or is already possible for certain non Raspberry hardware. Just try it out. But raspiBackup will only for Raspberry Pi OS and Raspberry HW. I.e. if it works, be happy. But if it doesn’t work, don’t ask for support. :-)
The option --unsupportedEnvironment must then be specified as an invocation parameter.
34) I want to restore my 16GB dd backup and get the message that the target SD card is too small. Why is that?
SD cards have a certain size, e.g. 16GB, but they never have exactly this size but there are small deviations downwards and upwards. Since the dd backup is the same size as the SD card, the dd backup cannot be written back if you get a slightly smaller SD card. For this reason, the last partition of a DD backup should always be partitioned a little smaller than the maximum possible. See also also FAQ16. However, you can use pishrink to reduce the size of the dd image and then and then restore it with raspiBackup.
35) I would like to move my root file system to a USB disk. Can I do this with raspiBackup during the restore?
If it is a tar or rsync backup, this is possible. Simply use the -R option.
36) What do the return codes (RC) mean with which raspiBackup ends in the event of an error?
-
101 - A program error has been detected
-
102 - A Linux command returns an error
-
103 - raspiBackup was terminated with CTRLC.
-
105 - There were errors when stopping services
-
106 - There were errors when starting services
-
107 - A parameter in an option is incorrect
-
108 - Files are not found
-
109 - The Linux backup program dd, tar or rsync received an error during backup
-
110 - A link to a file cannot be created
-
111 - There are errors when collecting the partition information
-
112 - There are errors when creating partitions during restore
-
114 - A dd image cannot be created
-
115 - Required partitions were not found
-
116 - The restore was canceled by the user
-
117 - The backup program dd, tar or rsync used has received an error when restoring
-
118 - Specified devices were not found
-
119 - A directory cannot be created
-
120 - Linux tools required by raspiBackup are missing
-
121 - No valid boot partition could be found
-
122 - The extension BEFORE_START_SERVICES ended incorrectly
-
123 - The extension BEFORE_STOP_SERVICES ended incorrectly
-
124 - The e-mail extension ended with an error
-
130 - A file operation failed (chmod, mv, …)
-
131 - A mount failed
-
132 - The environment (HW/SW) is unsupported
-
133 - The RESTORE_EXTENSION ends incorrectly
-
134 - The BACKUP_EXTENSIONa ends incorrectly
-
135 - A file download ends with an error
-
136 - An invalid backup directory not created by raspiBackup was specified
-
137 - An invalid restore device was specified
-
138 - An invalid boot device was specified
-
138 - USBMOUNT detected
-
140 - An error occured during cleanup
-
143 - Overlay file system detected
-
144 - Creation of the backup folder on the backup partition at the end of the backup ends incorrectly
-
145 - Resize of a partition ends incorrectly
-
147 - UUID update ends with error
37) The email subject sometimes has a smiley at the beginning. What does it mean?
| smiley | meaning |
|---|---|
| ;-) | There is a newer release of raspiBackup. An upgrade should be made with the -U option. You can go back with the -V option. |
| :-D | There is a beta version of the next raspiBackup release. Beta testers are welcome and can install the beta with the -U option. After testing, you can revert to the current version with the -V option. |
| O.o | A warning message has been written. |
| :-( | The raspiBackup release is outdated and contains a serious error. It should urgently be replaced by the current release with the -U option. |
38) Where can I ask questions and get help with Linux questions and problems that have nothing to do with raspiBackup?
raspiBackup was developed to make it as easy as possible for Linux beginners to back up their Raspberry. However, a certain amount of Linux knowledge is necessary. Common problems with raspiBackup are simple Linux problems. Such questions are not answered in the contact channels. There are forums with competent members who are happy to help. A recommended one is the German Raspberry Pi forum. Another is the English Raspberry forum.
39) Where can I find the debug log of raspiBackup?
See FAQ41
40) How can I update my configuration after a version update?
This is done automatically by raspiBackup during the upgrade. See also Configuration update when upgrading to a new version.
41) Where can I find the debug log of raspiBackup?
The debug log is called raspiBackup.log for backup and raspiBackup.logr for restore.
- If raspiBackup ends successfully, the log file is located in the backup directory.
- If raspiBackup does not end successfully, the log file is located in the home directory of the caller.
- If raspiBackup was started via the console, the log file usually is located in
/home/<user>or/root. - If raspiBackup was started via cron or systemd in the background, the log file is located in
/root.
- If raspiBackup was started via the console, the log file usually is located in
- If raspiBackup ends unexpectedly or was stopped with kill, the log file is located in
/tmp. - The log file for the restore is located in current directory when
raspiBackupwas invoked. This usually is/home/<user>or/root.
42) Where can the /boot and /root partitions be located?
raspiBackup supports the following configurations in normal backup mode
backup mode, whereby only the /boot
and /root are always backed up. Other partitions are ignored.
/bootand/rooton SD card or another device (disk, SSD, …)/booton SD card and/rooton another device (disk, SSD, …) This is necessary if you have an older Raspberry that does not yet support does not yet support USB boot, but you no longer want to have the root partition on the SD card.
43) How can I find all the documentation pages for raspiBackup or pages on a specific topic?
Initially all documentation for raspiBackup was on this page.
Now everything is on this website.
44) Why does the image with the restore backup not start?
See FAQ49
45) How can I temporarily switch options on and off in the call?
Many options are used to switch something on or off. Normally
the options are defined once in the configuration file and that’s it.
However, if you want to temporarily overwrite options in the configuration file
you can use the option with a + for switch on and - for switch off.
Example: If you have switched on the zipping of dd backups by default
by default, you can temporarily switch it off with the -z- option.
46) Why is it not recommended to use the dd backup type?
See this article.
47) Where can I get help with pure Linux questions or problems that have nothing to do with raspiBackup as such?
See FAQ38
48) Can I restore the backup to a running system?
Technically this is possible, but the result is anything but a running system. system. That is why raspiBackup aborts immediately if you try to do this. A restore must always be done to another SD card or another device, which is connected to the Raspberry.
49) My backup which I have restored to an SD card does not start. Why not?
In 99.9% of cases, the SD card to which the restore is performed is defective. If you restored to another SD card, preferably a new one, the problem usually no longer occurs. There is also the option -C that you can use at restore to check the SD card for bad blocks during formatting. However, this makes the restore process take much longer. See also this page for problems with a dd backup.
50) My backup or restore takes forever. What could be the reason?
The backup and restore time depends on the size of the data to be data to be backed up as well as the performance of the backup partition. If backups are made via the network via SMB or NFS, it takes even longer. With rsync the first backup takes longer as the first backup is a full backup. Only the following backups are incremental backups and therefore usually faster.
It can happen that the backup or restore run does not end or takes an extremely long time. This is usually due to the fact that errors occur during the backup
- write or read errors that are caused by the Linux
backup tools
dd,tarorrsync.
With rsync it may also be due to the fact that ACLs are to be backed up but
authorization does not exist or ACLs are not supported by the backup partition.
The latter applies to NFS and SMB
mounted backup partitions. See FAQ24.
If the mount option sync is used, it should be replaced by the option async.
option.
Option –timestamps helps to find the step where raspiBackup takes so long. takes so long. After that, the debug log will help.
51) How are the progress bar statistics calculated?
raspiBackup does not calculate anything. Instead, the options of the offered progress bar are used instead. For dd it is the option status=progress and for rsync the option info=progress2. tar does not have its own progress indicator and therefore the data stream is streamed through pv. The details of the respective progress indicator can be found in the documentation, the options in the respective tools and the Linux tool pv tool.
52) How can I download and run a test version or a temporary fix from GitHub?
There is a script at GitHub. You have to invoke it as follows:
curl -s https://raw.githubusercontent.com/framps/raspiBackup/master/scripts/raspiBackupDownloadFromGit.sh | sudo bash -s -- <brand name>
Where <branchname> must be the GitHub branch from which you want to download
raspiBackup.sh you want to download. Then invoke this raspiBackup version
as follows (Attention: Pay attention to the leading dot !)
sudo ./raspiBackup.sh <options>
53) What are raspiBackup snapshots?
raspiBackup snapshots are special backups with two special properties:
- They are not included in the backup recycle process and must therefore be be deleted manually in the backup directory
- They have a description in the backup directory name by which a raspiBackup snapshot can be easily recognized and with which you can give a description to the snapshot so that it is easy to recognize.
A snapshot is created with the -M option and can be used very well to take a snapshot at certain times when setting up a new system so that you can go back in the event of an error. Based on the description, you can recognize which status you have saved with the snapshot.
54) How can I access the boot partition files in the backup directory?
raspiBackup saves the boot partition data in an image file. With the following commands you can access the files in this image:
sudo losetup -f <hostname>-backup.img
sudo mount /dev/loop0 /mnt
55) Why do I suddenly have duplicate PARTUUIDs on my system?
During the restore of a backup, the PARTUUID of the original system is reused for the partitions.
the partitions is used again. If this restored system is mounted on the
original system, the PARTUUIDs appear twice and there will usually be
problems when booting the original system. For these cases there is
the option -updateUUIDs when restoring, so that the same PARTUUID is not used on the restored system.
As of release 0.6.9, a new PARTUUID is always
generated. If you do not want this, you must use the option
-updateUUIDs- this must be switched off.
56) How can I start raspiBackup automatically on an unsupported system?
To do this, the file /etc/systemd/system/raspiBackup.service must be changed:
Change the line ExecStart=/usr/local/bin/raspiBackup.sh to
ExecStart=/usr/local/bin/raspiBackup.sh –unsupportedEnvironment.
57) How can I update raspiBackup to a new release?
raspiBackup reports when a new release or beta is available. An
update is started with the -U option. With the option -V you can go back
to a previous release. Betas are often updated several times.
To install the latest version, the options
-U and -S must be used.
58) What do I have to consider if I want to back up to an nfs mounted backup partition with rsync?
The partition must be exported from the NFS server with no_root_squash and nfs version 4 if no ACLs are used and nfs version 3 otherwise.
59) rsync reports that files have disappeared during the backup process on the system and aborts with return code 24. How can I prevent this?
There are the following possibilities:
- The service that deletes the file is stopped and restarted before the backup
- The file or the directory in which the file is located is excluded from the backup
- If none of this can be used, there is also the option DEFAULT_RSYNC_IGNORE_ERRORS=“24” with which raspiBackup ignores the RC24.
Attention: There are rare circumstances in which a rsync RC 24 is an error that cannot be ignored. See here at bugzilla.samba.org. This means that you should try to eliminate the error with option 1 or 2 if possible.
Error messages and -search
It can happen that raspiBackup does not run successfully and writes error messages. This is 90% of the time due to incorrect configurations or parameterization.
There are three types of raspiBackup messages:
- Information. The message number ends with the letter “I”
- Warnings. The message number ends with the letter “W”
- Error. The message number ends with the letter “E”
The error messages are self-explanatory and should indicate the specific cause. If not, the following measures will help to localize the error more precisely:
-
Start raspiBackup in the command line and not automatically via systemd in order to exclude systemd misconfigurations
-
A log file
raspiBackup.logis created in the backup directory with every successful run which contains a lot of detailed information and helps to find the causes of errors. Searching for error messages and causes in this log file can help to localize the error.If the backup aborts with errors, the log file is saved to the home directory of the caller before it is cleaned up.
Furthermore, the parameter
-vcan also help if errors occur in the Linux backup tools. -
If the information in the log file does not help you to find the cause of the error yourself, it is possible to report the error. See the notes in FAQ12 on how to report problems.
In some cases, further explanations are required for the error messages. These can be found below.
raspiBackup has about 200 error messages and to list them here completely and explain them in detail is a lot of work.
So if you are looking for an explanation for an error message and cannot find it here, first use a search engine and look for the error message number. If this does not lead to success, an issue should be created in GitHub and then it will be added here. In this way, all frequent and important error messages of raspiBackup will be collected and explained here.
Messages in the number range 0-999 are written by raspiBackup. Messages from 1000-1999 are written by the example extensions. All other number ranges can be used by your own extension messages.
In addition, raspiBackup exits with an error code that indicates the cause of the error. A list of error codes can be found at the end of this page.
raspiBackup - Error messages, causes and actions
- RBK0005E: Backup terminated with errors. See previous error messages.
- RBK0013E: There are more than two partitions that can only be backed up with backup type DD or DDZ or the -P option
- RBK0015E: An instance of raspiBackup is already active.
- RBK0019E: Option -a and -o not specified.
- RBK0020E: File system of the rsync backup directory %s does not support softlinks.
- RBK0021E: Backup program of type %1 terminated with RC %2.
- RBK0027E: No external device connected to %1. The SD card would be used for the backup.
- RBK0028E: %s is not a recovery directory of $MYNAME.“
- RBK0030E: %s file creation with dd ends incorrectly with RC %s.
- RBK0039E: Mail Program %s is not installed to send email.
- RBK0047E: An error occurred when starting services. RC %s.
- RBK0048E: An error occurred while stopping services. RC %s.
- RBK0051W: Target %s with %s is larger than 2TB and requires gpt instead of mbr. Otherwise only 2TB are used.
- RBK0061E: No boot partition files found in %s that start with %s.
- RBK0077E: Restore was terminated with errors. See previous error messages.
- RBK0086E: Restore device must not be a partition.
- RBK0087E: Restore directory %s was not created by raspiBackup.
- RBK0105I: New backup directory %1 is deleted.
- RBK0109E: Unsupported file system %s on partition %s.
- RBK0142E: Boot device cannot be recognized.
- RBK0147E: Backup of partition %1 failed with RC %2.
- RBK0150W: Maximum file size in backup directory %s is limited to 4GB.
- RBK0154E: A restore is not possible if a partition of %1 is mounted.
- RBK0160E: Target %1 with %2 is smaller than the backup source with %3.
- RBK0164E: No hardlinks can be created. RC %s.
- RBK0172E: Directory %s cannot be created.
- RBK0178E: Creation of %s file ends incorrectly with RC %s.“
- RBK0196W: %1 does not support hard links.
- RBK0197W: Sending email with %s ends incorrectly with RC %s.
- RBK0203E: Boot device cannot be recognized. Please report the problem with a debug log created with option ‘-l debug’.“
- RBK0211E: External partition %s mounted to %s is not backed up with option -P.
- RBK0263E: File system on %s does not support Linux file attributes.
- RBK0266E: The authorization to create Linux file attributes on %s is missing (file system: %s)
- RBK0268E: Only Raspberries with Raspberry PI OS are supported.
- RBK0273E: %s invalid backup directory(s) or files found in %s.“
- RBK0274E: The restore device %s has mounted partitions. Note: A restore to the active system is not possible.
- RBK0277E: Restore is not possible if ‘usbmount’ is installed.
- RBK0343E: File system check on %1 ended incorrectly with RC %2
- RBK1005E: bc not found. bc must be installed with ‘sudo apt-get install bc’.
- Exit codes
RBK0005E: Backup terminated with errors. See previous error messages.
Cause:
raspiBackup ended with an error and did not create a backup. A debug log was created in the home directory of the caller.
Further actions:
A preceding error message describes the exact cause of the termination. Search for this and rectify the cause.
RBK0013E: There are more than two partitions that can only be backed up with backup type DD or DDZ or the -P option
Cause:
raspiBackup only backs up the first two partitions in normal backup mode. If more partitions exist, this message is displayed.
Further actions:
Either delete the other partitions or use the option
--ignoreAdditionalPartitions. This explicitly states that further partitions
exist but will NOT be backed up. Alternatively you can
back up everything with the backup type dd or use the partition-oriented mode.
RBK0015E: An instance of raspiBackup is already active.
Cause:
raspiBackup prevents it from being started several times in parallel. Either raspiBackup is still running or the previous raspiBackup run terminated with an error and the lock was not removed.
Further actions:
With ps -ef | grep raspiBackup you can check whether raspiBackup is currently running.
If yes, you have to wait until raspiBackup has finished.
If not, delete the lock file with sudo rm /var/lock/raspiBackup.
RBK0019E: Option -a and -o not specified.
Cause:
raspiBackup allows a running system to be backed up. Before the backup all important running services should be stopped and restarted at the end, to avoid creating an inconsistent backup. If you have not defined any services to be stopped and started via the installer, the services have to be specified with both options in the call.
These options can be configured with the raspiBackup installer for Systemd services.
Further actions:
The two options with corresponding parameters have to be specified or the services should be defined with the installer in the configuration file. Details can be found in FAQ18.
RBK0020E: File system of the rsync backup directory %s does not support softlinks.
Cause:
A backup file system that is to receive an rsync backup has to support softlinks.
This is only supported by EXT2, EXT3 and EXT4. FAT32 or NTFS
do not support them. Details can be found in FAQ19
Further actions:
Either the backup partition should be formatted with EXT2, 3 or 4 or another backup type such as
dd or tarshould be used.
RBK0021E: Backup program of type %1 terminated with RC %2.
Cause:
A backup program (dd, tar or rsync) used by raspiBackup,
has received an error. The RC indicates the error code. Usually
the backup program writes a more detailed message that helps to find the cause.
Further actions:
RC 1 at dd Backup reports a read or write error of a file. An RC 1 for tar and RC 23 or RC 24 for rsync means that a file has changed during the backup.
RC 2 for tar means that some serious error has occurred. It is also possible permissions are missing on the backup device or there is no free space on the backup partition.
RC23 on rsync can also be an access problem or an ACL problem with NFS. See FAQ24 for the ACL problem and NFS.
The corresponding error messages from the backup tool can be found if the lines following the
executeCmd command in the debug log and they are also displayed
displayed on the console or in the e-mail.
Previous messages show the exact error message of the backup program.
If these do not help to find the cause, the -v option can be used with tar and
rsync can be used to get detailed messages from the backup programs in the
debug log, which will hopefully help.
Or you can add
DEFAULT_RSYNC_BACKUP_ADDITIONAL_OPTIONS="--info=NAME0"
in the raspiBackup config file for rsync to log only error messages and and avoid a detailed log, which you get with option -v.
After that, it often helps to enter the error message in a search engine, to find the cause. On the FAQ page there are many error messages and their causes and troubleshooting described. With rsync you will find in the debug log after the invocation of rsync all error messages from rsync and can use them to find the root cause of the termination.
Alternatively, you can have tar and rsync ignore errors. See FAQ32.
However, the backup partition is also often the cause - especially if it is a partition connected via the network connected partition (NFS, SMB) - is the problem. Mostly it is network problems or misconfigurations. It has also happened that the partition was on a device that had write errors.
If there is a read error, this is an indication that the system device or SD card should be replaced. To do this, restore the last backup to a new system device.
If the backup partition is mounted via NFS, read this article.
If authorization problems exist, ensure that the user root has all rights on the backup device.
RBK0027E: No external device connected to %1. The SD card would be used for the backup.
Cause:
raspiBackup checks whether an external partition is mounted on the backup path, because if not, the backup would be stored on the SD card, which makes no sense and if the SD card is small, it will overflow.
Further actions:
Now be /backup which is the default path. In this directory
an external backup device has to be mounted.
A corresponding entry in /etc/fstab can be used to connect the mount point /backup to an external partition.
You can check this with
findmnt /backup
If you know what you are doing, you can switch off the error message with the option -c.
RBK0028E: %s is not a recovery directory of $MYNAME.“
Cause:
raspiBackup creates a directory on the backup partition with the host name of the backed up system and the respective backups are stored in subdirectories under it. Such a backup subdirectory must be specified.
The format of the backup directory has the following appearance:
troubadix@raspbian12-rsync-backup-20250615-050123
Further actions:
Specify a correct backup directory.
RBK0030E: %s file creation with dd ends incorrectly with RC %s.
Cause:
An error occurred when creating a file with dd. RC 1 means a read or write error.
Further actions:
When restoring, the SD card is almost certainly corrupt and another SD card should be used. There are write problems on the backup medium during the backup, which must be solved. Previous messages from the backup tool provide further indication of the cause of the error.
RBK0039E: Mail Program %s is not installed to send email.
Cause:
The configured mail program for sending e-mails was not found. The error usually occurs if Postfix or nullmailer has been set up as MTA.
Further actions:
Install the configured e-mail program or install bsd-mailx or mailutils.
RBK0047E: An error occurred when starting services. RC %s.
RBK0048E: An error occurred while stopping services. RC %s.
Cause:
The commands of the -a/-o option or the configuration parameter DEFAULT_STARTSERVICES/DEFAULT_STOPSERVICES, which are to start/stop services, generate an error.
Further actions:
You have to find out which of the start commands/stop commands has an error.
Therefore, enter each start command/stop command once using sudo and watch for error messages.
The cause of the error message must then be eliminated.
RBK0051W: Target %s with %s is larger than 2TB and requires gpt instead of mbr. Otherwise only 2TB are used.
Cause:
The destination partition is larger than 2TB and therefore GPT partitioning is required on it. If the backup only has one MBR, the target partition can only be extended up to 2TB.
Further actions:
The system to be restored uses MBR and has to be converted to GPT. Then create another backup - this time with GPT. This can then be be restored to disks larger than 2TB.
RBK0061E: No boot partition files found in %s that start with %s.
Cause:
raspiBackup searches for the boot partition backup in the backup directory and does not find it.
Further actions:
A directory was specified as the backup directory which contains no or incomplete backup data.
It is documented in the Backup directory structure chapter,
which files have to be in the backup directory.
A backup directory always begins with the host name of the Raspberry followed
followed by the backup type and the creation date of the backup.
Examples: raspberrypi-dd-backup-20160415-222900 oder
raspberrypi-rsync-backup-20160416-094106
RBK0077E: Restore was terminated with errors. See previous error messages.
Cause:
There were errors during the restore. This can either be when creating the partitions or during the actual restore of the backup data.
Further actions:
First check any previous error messages. Then check the debug log
to check whether there were any problems when creating the partitions. To do this, search for Checking that no-one is using this disk right now and error messages. There
is a known problem with a new sfdisk version in Bullseye when
a backup of such a system is restored on a Linux with an older sfdisk
version is restored. The error message is
>>> line 5: unsupported command
The solution to this is to either use a Linux with the sfdisk version of Bullseye
sfdisk --version
sfdisk from util-linux 2.36.1
or manually delete the 5th line in the file with the extension .sfdisk in the backup directory.
RBK0086E: Restore device must not be a partition.
Cause:
raspiBackup wants to create partitions when restoring the backup. To do this, the entire device should be specified as the as the target device. A single partition is not allowed.
Further actions:
Instead of e.g. /dev/sdb1, which is a single partition,
specify /dev/sdb. But ATTENTION: All data on the SD card
will then be overwritten. So make sure beforehand that no other data
on other partitions are still required. See also this page for
recovery.
RBK0087E: Restore directory %s was not created by raspiBackup.
Cause:
raspiBackup generates a backup directory which follows a specific format.
Its format has to be as follows:
<hostname>-<backuptype>-backup-<date>-<time>.
For more information, see chapter Backup directory structure.
Further actions:
Rename the backup directory according to the above form.
RBK0105I: New backup directory %1 is deleted.
Cause:
An error occurred and raspiBackup deletes the empty or inconsistent new backup directory.
Further actions:
None
RBK0109E: Unsupported file system %s on partition %s.
Cause:
raspiBackup does not support this file system format
Further actions:
Create an issue in GitHub and it may be, that the filesystem support is then built into raspiBackup.
RBK0142E: Boot device cannot be recognized.
Cause:
raspiBackup cannot recognize the boot device. This usually happens when a hardware other than a Raspberry is used or an operating system other than Raspberry Pi OS or Ubuntu is used.
Further actions:
Report the problem on GitHub.
RBK0147E: Backup of partition %1 failed with RC %2.
Cause:
raspiBackup has received an error from the backup program used when backing up a partition in partition-oriented mode.
Further actions:
See RBK0021E
RBK0150W: Maximum file size in backup directory %s is limited to 4GB.
Cause:
The file system of the backup partition only allows file sizes up to 4GB and is virtually unusable for backups.
Further actions:
Another file system should be created on the backup space. Which one this depends on the backup method. On this page you will find a table from which the correct table from which the correct file system can be taken.
RBK0154E: A restore is not possible if a partition of %1 is mounted.
Cause:
When a partition is written, it should not be mounted.
Further actions:
With the command sudo mount | grep <device> (<device> is mentioned in the message)
to find out which partition is mounted and with sudo umount <partition>, where
<partition> has to be the mounted partition (e.g. /dev/sda1)
release it.
RBK0160E: Target %1 with %2 is smaller than the backup source with %3.
Cause:
The backup is larger than the device to which it is to be restored and therefore cannot be restored. The message only appears for dd backup. With tar or rsync backup, the full size of the device is not necessar.
Further actions:
A larger SD card should be used. Alternatively, you can use the tool pishrink to reduce the size of the dd image and then restore it with raspiBackup. See also FAQ26.
RBK0164E: No hardlinks can be created. RC %s.
Cause:
Hardlinks required by rsync are only supported by an ext3 or ext4 file system. See also this page.
Further actions:
Either select a different backup type such as tar or dd or use a backup partition that is formatted wth ext3 or ext4.
RBK0172E: Directory %s cannot be created.
Cause:
The root user is not authorized to create the new backup directory.
Further actions:
If the backup directory is mounted via NFS, the option
NO_ROOT_SQUASH in the /etc/exports file of the NFS server. Otherwise the
backup directory is mounted with insufficient rights.
RBK0178E: Creation of %s file ends incorrectly with RC %s.“
Cause:
dd backup of the boot partition fails with an error code. Error code RC1 is an input/output error.
Further actions:
See what the error code from dd means. If it is RC1, check the boot partition and/or the backup partition.
RBK0196W: %1 does not support hard links.
Cause:
rsync uses hardlinks to reduce backup time and space. Hardlinks are supported by ext3/ext4 filesystems, which are mounted locally or via NFS, SMB and SSHFS do not support hardlinks.
Further actions:
Either use a backup partition that supports hard links or use the tar or dd backup. Please note, however, that each backup is then a full backup and therefore requires more time and space.
RBK0197W: Sending email with %s ends incorrectly with RC %s.
Cause:
An e-mail cannot be sent.
Further actions:
In most cases, the cause when setting up the notification lies in a misconfiguration of the MTA used. Often raspiBackup does not receive an error when sending the e-mail, but it still does not arrive.
The configuration of an MTA is often complicated and is not a problem of raspiBackup. In the log of the MTA used you will find error messages that help to find the cause. In this context, reference is made to FAQ47. In any case, you should check what the RC of the mail client means and can find clues as to where the cause lies. For example, it may also be that the mail recipient has problems receiving the e-mail.
RBK0203E: Boot device cannot be recognized. Please report the problem with a debug log created with option ‘-l debug’.“
Cause:
raspiBackup tries to recognize the boot device and cannot do so for some reason.
Further actions:
A GitHub issue should be created with the debug log attached, to find the cause.
RBK0211E: External partition %s mounted to %s is not backed up with option -P.
Cause:
With the -P option, only the partitions of the system device can be backed up with raspiBackup.
Further actions:
By using the normal backup mode, a backup can also be made during a USB boot can also be performed. If there are more than 2 partitions, you can use the the –ignoreAdditionalPartitions option can be used to exclude the backup of further partitions. can be excluded.
RBK0263E: File system on %s does not support Linux file attributes.
Cause:
The rsync backup method requires that the backup partition is able to store Linux file attributes. The current file system does not support this. It is usually an NTFS file system. If the backup partition is mounted via NFS this error message is a sign that the NFS partition is not exported with no_root_squash.
Further actions:
Either the backup method dd or tar should be selected or a backup partition that supports Linux file attributes should be used. Details can be found on this page.
RBK0266E: The authorization to create Linux file attributes on %s is missing (file system: %s)
Cause:
A backup partition mounted via NFS lacks the necessary authorization for root to set all file attributes. As a rule, the NFS server does not export the backup partition with no_root_squash. This option should be set in the file /etc/exports on the NFS server for the exported partition. A file system should also be exported that supports Linux file attributes
- i.e. ext3 or ext4. ntfs or fat32 cannot be used.
Further actions:
Export the backup partition on the NFS server with no_root_squash.
RBK0268E: Only Raspberries with Raspberry PI OS are supported.
Cause:
raspiBackup is only supported for Raspberry Pi HW and Raspberry Pi OS and Ubuntu. You can use option –unsupportedEnvironment and still try to use raspiBackup, because it also runs under many other Linux distributions and raspberry-compatible hardware. In case of errors, however, no support is provided due to a lack of test hardware and software and time. See supported hardware and software
Further actions:
Use the –unsupportedEnvironment option and hope that raspiBackup can handle can handle the existing software and hardware.
RBK0273E: %s invalid backup directory(s) or files found in %s.“
Cause:
Only backup directories created by raspiBackup should exist in the backup directory of a system. Any other directories or files will generate this error message. This usually happens when you manually rename backup directories.
Further actions:
Delete or move directories or files not created by raspiBackup to other locations.
RBK0274E: The restore device %s has mounted partitions. Note: A restore to the active system is not possible.
Cause:
A restore may not be performed onto the running system. Also the restore device should not be mounted. This check prevents the accidental overwriting an active and otherwise used device. If usbmount is active, it has to be first deactivated.
Further actions:
The restore device should be released with umount or usbmount must be deactivated.
RBK0277E: Restore is not possible if ‘usbmount’ is installed.
Cause:
usbmount interferes with the restore of a backup and must not be installed.
Further actions:
Uninstall usbmount with the command sudo apt-get remove usbmount.
It is even better to prepare a dedicated SD card with a small Raspberry Pi OS (Raspberry Pi OS
lite) and use this SD card for the restore. There is no
usbmount is installed.
RBK0343E: File system check on %1 ended incorrectly with RC %2
Cause:
The file system is checked after the restore. This should not have any errors If there are errors, the restore is aborted.
Further actions:
The RC %2 indicates the exact error from fsck on partition %1. Usually the device on which the restore was performed is not OK and should be replaced by another device (e.g. new SD card).
RBK1005E: bc not found. bc must be installed with ‘sudo apt-get install bc’.
Cause:
The disk example extension requires bc for computing.
Further actions:
Install bc with sudo apt-get install bc so that the disk example extension outputs valid values.
Exit codes
Normally raspiBackup terminates with an error code 0. In case of error, raspiBackup terminates with one of the following error codes. An error message provides more detailed information on the cause of the error.
- RC_ASSERTION=101
- RC_MISC_ERROR=102
- RC_CTRLC=103
- RC_STOP_SERVICES_ERROR=105
- RC_START_SERVICES_ERROR=106
- RC_PARAMETER_ERROR=107
- RC_MISSING_FILES=108
- RC_NATIVE_BACKUP_FAILED=109
- RC_LINK_FILE_FAILED=110
- RC_COLLECT_PARTITIONS_FAILED=111
- RC_CREATE_PARTITIONS_FAILED=112
- RC_DD_IMG_FAILED=114
- RC_SDCARD_ERROR=115
- RC_RESTORE_FAILED=116
- RC_NATIVE_RESTORE_FAILED=117
- RC_DEVICES_NOTFOUND=118
- RC_CREATE_ERROR=119
- RC_MISSING_COMMANDS=120
- RC_NO_BOOT_FOUND=121
- RC_BEFORE_START_SERVICES_ERROR=122
- RC_BEFORE_STOP_SERVICES_ERROR=123
- RC_EMAILPROG_ERROR=124
- RC_MISSING_PARTITION=125
- RC_FILE_OPERATION_ERROR=130
- RC_MOUNT_FAILED=131
- RC_UNSUPPORTED_ENVIRONMENT=132
- RC_RESTORE_EXTENSION_FAILS=133
- RC_BACKUP_EXTENSION_FAILS=134
- RC_DOWNLOAD_FAILED=135
- RC_BACKUP_DIRNAME_ERROR=136
- RC_RESTORE_IMPOSSIBLE=137
- RC_INVALID_BOOTDEVICE=138
- RC_ENVIRONMENT_ERROR=139
- RC_CLEANUP_ERROR=140
- RC_NOT_SUPPORTED=143
- RC_TEMPMOVE_FAILED=144
- RC_RESIZE_ERROR=145
- RC_UUID_UPDATE_IMPOSSIBLE=147
raspiBackupDialog - a comfortable help script for raspiBackup
An agile user of raspiBackup - Franjo-G - has written a very useful little helper script called raspiBackupDialog. help script with the name raspiBackupDialog, which shows in a dialog the most important invocation options for the backup and restore in a dialog and with which then triggers raspiBackup. raspiBackup snapshots are supported. Very especially easy to perform the restore: Before the restore, the list of existing the list of existing backups is displayed and you can select which backup should be restored.
Tip
It is recommended to download raspiBackupDialog after successful installation and configuration of raspiBackup and try it out.
Installation and call
raspiBackupDialog is available as a helper script in the GitHub repository.
It can be downloaded to the current directory as follows:
curl -s https://raw.githubusercontent.com/framps/raspiBackup/master/scripts/raspiBackupDownloadFromGit.sh | bash -s -- master helper/raspiBackupDialog.sh
Now it can be called with :
sudo ./raspiBackupDialog.sh
If you don’t want to download it every time, you can make it permanently available on your Raspberry as follows:
sudo mv ./raspiBackupDialog.sh /usr/local/bin
sudo chown root:root /usr/local/bin/raspiBackupDialog.sh
It can then be called at any time as follows:
sudo raspiBackupDialog.sh
Invocation options
sudo raspiBackupDialog.sh --select # Starts a restore. The image can be selected from a list.
sudo raspiBackupDialog.sh --last # Starts a restore from the last backup.
sudo raspiBackupDialog.sh --backup # Starts a backup.
sudo raspiBackupDialog.sh --delete # A backup can be selected for deletion.
sudo raspiBackupDialog.sh --mountfs "fstab" # The backup directory is mounted according to the fstab entry.
sudo raspiBackupDialog.sh --mountfs "*.mount" # The backup directory is mounted via systemctl start *.mount.
If the directory was already mounted, it will not be unmounted. Otherwise it will be remounted.
Dynamic mount also works with cron.
* * * * /usr/local/bin/raspiBackupDialog.sh --mountfs "backup.unit" or "fstab" --cron
Example dialog for a backup
sudo raspiBackupDialog.sh

Please choose your preferred language
German = 1
English = 2
2
Should a backup be created or an existing backup restored?
backup 1
restore 2
1
Are there more than the 2 standard partitions /boot and /root on the system drive ? y/N
n
Should a comment be inserted at the end of the backup directory?
This backup is then not included in the backup strategy and is not automatically recycled.
y/N
n
raspiBackup is now started
Backup targets
raspiBackup mounts a backup partition in order to store the backups on it. This means that any device from which a partition can be mounted under Linux can be used as a backup target.
This includes locally connected SD cards, disks connected via USB, SSDs, USB sticks and SD-USB adapters as well as NVMe SSDs. Furthermore, SMB and NFS can be used, to connect non-locally connected backup partitions. SSHFS, CurlFtpFS and WebDAV also work for storing backups on remote servers. The AVM FRITZ!Box also supports SMB and can therefore also be used as a backup target.
Note
The respective backup targets have to have a formatted partition in which the backups are stored. See Advantages and disadvantages of the respective Filesystems.
In addition to the following chapters, see also How to access external data from the Raspberry Pi.
NFS as backup target
NFS is a widely used file system under Linux to access files remotely and is perfect for storing backups. Unfortunately, there are different nfs versions and different implementations - depending on the nfs server used. In particular, the nfs servers behave differently with regard to ACLs.
ACLs are not normally used on Raspberries and therefore do not need to be copied to the backup. However, if ACLs are used, it becomes complicated to get them into the backup via nfs. The backup type tar supports ACLs. ACLs are also backed up in the EXT3/4 file system.
nfs version 4 does not support ACLs. nfs version 3 usually does. However, Synology does not support ACLs with version 3 either. The option nfsvers=3 or nfsvers=4 can be used to define which nfs version should be used for the mount.
It makes a lot of sense to store the backups from raspiBackup to a NAS and to use the NFS protocol for this purpose. The following describes how to configure this on a Synology. Of course, you can also use any other NAS as long as it supports NFS. A Raspberry can also be configured and used as an NFS server.
Note: Starting with release 0.7.2, there is a configuration option that allows you to disable ACL backup.
raspiBackup - Using NFS using the example of a Synology
Important: The partition on the NAS must be exported with no_root_squash,
so that rsync can be used. In the UI, no-mapping must then be entered for squash
must be entered.
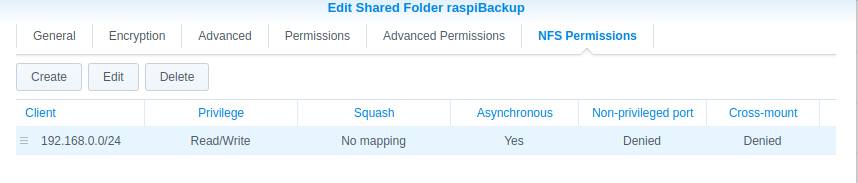
You must NOT activate NFS4 as shown in the screenshot! It must NFS3 must be used. I could not manage it with NFS4.

Configuration of a Synology and the Raspberry to back up a rsync backup via NFS on a Synology
Essentially, the following steps must be carried out:
- Create a shared NFS folder on the Synology
- Mount the shared NFS folder on the Raspi in
/etc/fstab. - Install and configure raspiBackup via Installer (do not configure an automatic backup)
- Test the backup and restore from the command line
- Set up the regular backup in the crontab via Installer
It is recommended that you read the FAQ before starting, where the most important questions and answers about raspiBackup.
Create a shared NFS folder on the Synology
In DSM, Control Panel -> Shared Folder -> Create, create a shared folder
shared folder e.g. with the name raspiBackups. You do not need a recycle bin
not. The NFS permissions must be set as follows (Note:
raspiBackup runs as root). Hostname or IP: Hostname or IP of the NFS
client, e.g. 192.168.0.10. Privilege: read/write, squash: no assignment,
Security: sys.
Entry of the shared NFs folder on the Raspi in the fstab
The following entry in /etc/fstab causes the Synology NFS folder to be mounted
under the mountpoint /backup under the assumption that 192.168.0.11 is the Synology
is:
192.168.0.11:/volume1/raspiBackups /backup nfs rw 0 0
**It is strongly recommended to use the mountpoint /backup and not e.g.
/home/pi/backup or other directories **.
Manual mount of the shared NFS folder
Now you can check if the backup space on the Synology is shared with
showmount -e 192.168.0.11. Then you can use sudo mount /backup to manually mount the NFS
folder manually. With the above entry in /etc/fstab the
automatically after every reboot, and a manual mount is no longer necessary.
mount is no longer necessary.
Test the write access
You can now test the write access with sudo bash -c 'echo "Raspberry was here" > /backup/killroy.txt' and sudo cat /backup/killroy.txt.
If there are problems, tips from experienced Synology users on Synology
and raspiBackup.
Installation and configuration of raspiBackup
Install raspiBackup according to these instructions.
Specify rsync as backup method and /backup as backup path.
Do not configure the regular backup yet.
Test the backup and restore from the command line
Set up the regular backup in the installer
Call up the installer and configure the regular backup time.
Note on ACLs
ACLs can actually be backed up with NFS3. This works, for example, if you set up a Raspberry as an NFS server (see https://linux-tips-and-tricks.de). However, this does not work with a Synology - even if NFS3 is used.
An inquiry to Synology on 13.5.2022 provided the following answer:
Unfortunately, I have to inform you that both Linux ACL and setfacl are not supported by DSM. I would be pass this on as feedback to our development department as a function request.
Hints and tips from raspiBackup users who use a Synology as backup space
Note from Udo
Udo has described in the comment what you have to do so that the automount of the Synology to work when booting the Raspberry.
It has been reported several times that there can be problems with Synologies with hardlinks used by rsync when NFS4 is used. With
192.168.0.42:/backup /backup nfs rw,nfsvers=3 0 0
the NFS3 protocol is used so that the backup script runs successfully. Furthermore, softlinks with SMB are not supported unless at least SMB version 3 is used.
Note from Markus
My backup runs with raspiBackup in the following configuration:
- Raspberry with Raspbian Wheezy
- raspiBackup.sh, version 0.5.7.10e
- Synology NAS DS213, with current DSM version
Synology NAS Share: /volume1/backup Synology NAS Share NFS rules: Hostname or IP: *, Privilege: Read/Write, Squash: No assignment Synology NAS Share permissions (console): d——— 5 root root 4096 Dec 15 06:01 backup Raspberry Pi mountpoint: /media/nas-backup
Raspberry Pi fstab entries for NFS3 and NFS4
# Entry for the NAS backup, mount with NFS version 3
192.168.X.XXX:/volume1/backup /media/nas-backup nfs rw,nfsvers=3 0 0
# Entry for the NAS backup, mount with NFS version 4
#192.168.X.XXX:/volume1/backup /media/nas-backup nfs4 rw 0 0
Extract from raspiBackup.conf stored under /usr/local/etc/
cat /usr/local/etc/raspiBackup.conf
# path to store the backupfile
DEFAULT_BACKUPPATH="/media/nas-backup"
# how many backups to keep
DEFAULT_KEEPBACKUPS=4
# type of backup: dd, tar, xbmc or rsync
DEFAULT_BACKUPTYPE="rsync"
Notes from Alfred
Alfred got the following error message from rsync
rsync: chown "/mnt/nas/arami nta/araminta-rs ync-backup-2016 1029-190948/mmc blk0p1/overlays /.w1-gpio-overl ay.dtb.ansSC4" failed: Operation not permitted (1)"
Then he used the rsync command he found in the raspiBackup.log, the raspiBackup to create the backup in order to reproduce the problem and and to debug specifically without raspiBackup. Since he uses the -P mode mode, he had to execute the following commands first:
sudo mkdir /tmp/mmcblk0p1
sudo mount /dev/mmcblk0p1 /tmp/mmcblk0p1
He then accidentally made a mistake that led to the solution: This is the rsync command he executed:
rsync --exclude="/mnt/nas" --exclude=/proc/* --exclude=/lost found/* --exclude=/sys/* --exclude=/dev/* --exclude=/boot/* --exclude=/tmp/* --exclude=/run/* --exclude=mmcblk0p1/overlays/* --numeric-ids -aHAXx -v /tmp/mmcblk0p1 "/mnt/nas/test.backup"
This command worked without an error message. But it was because forgot to use ‘sudo’. When the command was executed again with sudo the error message appeared again. IMHO this indicates an access problem on the Synology NAS. After changing the NFS permissions on the NAS from ‘map all users to admin’ to ‘no mapping’, bingo, it worked again with sudo. it also worked with sudo.
Note from Chris
A TAR backup was successfully created via NFS 4.1 on a QNAP NAS as follows.
Contents - /etc/fstab:
<NAS-IP/hostname>:/<share name> /backup nfs4 defaults,_netdev,noatime 0 2
QNAP NAS side (share):
Access right -> sync = "no wdelay"
Access right -> secure (Yes)
Host: IP from Raspi
Security: sys,
Squash option: read/write
Squash option: "Assign root user only"
Anonymous GID: guest
Anonymous UID: guest
SMB as backup destination
It is actually recommended to use NFS instead of SMB to store the backups from raspiBackup. Then you can use backup type rsync and only ever create a delta backup instead of a full backup, which is necessary with SMB. But there may still be reasons why you want to store a raspiBackup on an SMB drive.
The following describes how to configure this on a Synology
AutoFS is also configured.
If autoFS is not already used, the same behavior can be achieved with raspiBackup using the
option dynamicMount to achieve the same behavior.
To automatically mount the SMB backup partition when raspiBackup uses it, a shared folder must be defined and configured on the NAS.
In the following instructions, the shared folder name “raspiBackup” is assumed.
Installation of autoFS
sudo apt install autofs
AutoFS configuration
-
/etc/auto.cifssynoRaspiBackup -fstype=cifs,rw,credentials=/home/pi/scratch.conf,cache=none,iocharset=utf8,file_mode=0664,dir_mode=0775,vers=3.1.1,soft,iocharset=utf8 ://<synologyIP>/raspiBackup
This defines an SMB shared folder with the name raspiBackup
is defined on the NAS with the mountpoint synoRaspiBackup.
-
/etc/auto.master./mnt /etc/auto.cifs --timeout=600 --ghost
ensures that the SMB partition of the NAS in `/mnt/synoRaspiBackup is automatically mounted as soon as it is accessed.
Definition of the SMB access data
/home/pi/raspiBackup.confuser=<AdministratorName> password=<AdministratorPassword>
Make access data readable only for the user pi
chmod 600 /home/pi/raspiBackup.conf
Definition of the SMB partition as backup partition in raspiBackup
Call the raspiBackupInstaller with sudo raspiBackupInstallUI
and definition of /mnt/synoRaspiBackup (M3 -> C2)
AVM FRITZ!Box as backup target
If you don’t have a NAS, but would like to back up your Raspberries with raspiBackup, you can of course also use the NAS storage of a Fritzbox. However, you have to use backup type tar for this, as the SMB protocol does not support hardlinks and therefore no rsync backup which provides incremental backups can be used.
An article from andwil.de was very helpful for using a Fritzbox for this purpose. It explains very nicely what needs to be configured on the Fritzbox side and the Raspberry side.
Here is an example line in the /etc/fstab:
//192.168.0.1/FRITZ.NAS/USB-Sandisk3-2Gen1-01 /backup cifs noauto,user,vers=3.0,credentials=/home/pi/.smbcredentials,noserverino,uid=1000,gid=1000 0 0
In addition
chmod 600 ~/.smbcredentials
ensures that the Fritzbox access data can only be read by the user. This is not absolutely necessary with the Raspberry, where normally only one user works on it. But it is good practice to always make sure data can only be read and changed by the respective user.
Then a backup with
sudo raspiBackup -t tar
can be created.
After the restoretest was successful, the backup type should be configured to tar in the installer and the time of the regular backup configured.
WebDAV as backup destination
For raspiBackup, davfs must be used because it mounts the WebDAV drive in the same way as it is done for all other drives in Linux. It can then be accessed both via the command line and with a file manager. Other tools for accessing WebDAV cannot be used.
Installation of davfs2
sudo apt install davfs2
Create the mountpoint
sudo mkdir -p /remote/webdav
Define the access data
-
/etc/davfs2/secrets/remote/webdav <userid> <password>
Make access data readable only for the user pi
sudo chmod 600 /etc/davfs2/secrets
sudo chown root:root /etc/davfs2/secrets
Create entries in /etc/fstab
# t-online
https://webdav.mediencenter.t-online.de        /remote/webdav   davfs   rw,noauto,user  0       0
# 1&1
https://sd2dav.1und1.de          /remote/webdav   davfs   rw,noauto,user  0       0
# ownCloud
https://cloud/owncloud/remote.php/webdav          /remote/webdav   davfs   rw,noauto,user  0       0
# seafile
https://seafile/seafdav       /remote/webdav  davfs   rw,noauto,user  0       0
Since davfs stores the program for mounting in /usr/sbin/mount.davfs,
mountexpects it in/sbin`, you have to set up the following link:
sudo ln -s /usr/sbin/mount.davfs /sbin/mount.davfs
Due to an error in the WebDAV implementation at t-online no files can be created.
The message always appears that the file
exists - although it does not. Therefore, the
/etc/davfs2/davfs2.conf the following line must be inserted,
to switch off the locks.
use_locks 0
If you want to mount the disk space automatically when booting the system
the noauto in the /etc/fstab must be removed. This is for
raspiBackup if the dynamicmount option is used.
Tips for home automation
The following pages provide information on various applications: Whether and which services should be stopped and started, which special features should be to be taken into account, whether and which actions should be taken before and after the backup and/or before and after the restore.
This page is based on feedback from raspiBackup users who are familiar with the respective applications and can describe exactly what to look out for with the the respective applications. Therefore, feedback on the GitHub discussion page is very welcome.
raspiBackup Tips for specific applications
OpenHAB
Works without problems. See here on the OpenHAB website.
ioBroker
ioBroker uses ACLs. If you are backing up to a Synology or QNAP connected via NFS, you must switch off the saving of ACLs so that rsync does not abort. See FAQ24](faq.md#faq24) on how to do this.
If you restore a backup, you can use ioBroker to recreate the missing
ACLs again. You should also stop the ioBroker before the
backup with systemctl stop iobroker and restart it after the backup with systemctl start iobroker after the backup. This can be done either directly in the
raspiBackup configuration file at DEFAULT_START_SERVICES and
DEFAULT_STOP_SERVICES or you can use the raspiBackup installer
and select the ioBroker as the service to be stopped and started. The
installer then generates the corresponding commands in the configuration file.
FHEM
FHEM does not use ACLs. See FAQ24 how to get rid of any ACL error messages.
FHEM runs as a system service and thus appears in the installer as a service and can be can simply be selected there with M3->C6, so that FHEM is stopped before the backup is stopped and restarted at the end.
The following commands are used for manual configuration in the Config:
systemctl stop fhem
for DEFAULT_STOPSERVICES
resp.
systemctl start fhem
for DEFAULT_STARTSERVICES
SmartHomeNG
SmartHomeNG runs as a system service and therefore appears in the installer as a service and can simply be selected there with M3->C6, so that SmartHomeNG is stopped before is stopped before the backup and restarted at the end.
If you want to configure it manually in the Config, you should include the following commands:
systemctl stop smarthome
for DEFAULT_STOPSERVICES
resp.
systemctl start smarthome
for DEFAULT_STARTSERVICES
Helpful links on the subject of backup
- Shrinking images on Linux
- rpi-clone: A shell script to clone a running Raspberry Pi SD card to a USB mounted SD card
- sysmatt: Backup, Restore, Customize and Clone your Raspberry Pi SD Cards
- Automatic RPi Image Downsizer
- How To Take Hot Backup Of Raspberry Pi Without Removing The SD Card
Other backup tools
Below is an incomplete list of other backup tools that can be used to back up a Raspberry.
- rpi-clone: Backup of a Raspberry via rsync. Cmdlinetool
- piclone: Clone an SD card via
cp. The UI is included in the Raspberry Pi OS desktop. No Cmdline version. - image-backup: From RonR in the English Raspberryforum. Cmdlinetool.
- borg: Very powerful data backup tool that supports deduplication (English) Only suitable for experienced Linux users.
- restic: Very powerful data backup tool (English). Only suitable for experienced Linux users.
- urbackup](https://www.urbackup.org/): Very powerful backup tool. Only suitable for experienced Linux users.
- rpi-backup: Script to quickly create an img backup directly without using dd. Cmdlinetool
- pibackup: Creates a dd backup, shrinks the dd image and keeps a configurable number of backups. Cmdlinetool.
- shrink-backup: Another backup tool, which works similar to rpi-clone and image-backup. Cmdlinetool.
- pi-safe
- pibackup - RaspberryFpc: Creates a backup of the first two partitions and compressed the image with zstd. UI Tool
- pibackup - Chocorean: Creates a shrinked backup and rotates versions. Cmdlinetool
Miscellaneous
In the following chapters, interested raspiBackup users will find more information about raspiBackup, its development, how the logo was created, what the development environment of raspiBackup looks like and a list of the countries in which raspiBackup is used.
Version history
The current list of raspiBackup releases as well as their new features and bugfixes can be found on GitHub.
raspiBackup Logo
Friendly forum members from the German Raspberry Forum have helped with their knowledge and great effort to create a logo for raspiBackup.
![]()
It represents the SD card that is being backed up (now it is usually an SSD -
but when raspiBackup was created, it was always an SD card). The red folder
at the bottom is the backup folder. And the little paperclip at the bottom right makes sure
that the backups don’t fall out of the upside-down backup folder
![]() and the green arrows indicate the respective backup and restore process.
and the green arrows indicate the respective backup and restore process.
Here is a selection of beautiful logos that were created during the discussion and brainstorming:
![]()
10 years raspiBackup (Retrospective by framp)
Today (August 07, 2023) 10 years ago the first version of raspiBackup was stored in my local cvs.
revision 1.1
date: 2013-08-07 21:28:14 0200; author: framp; state: Exp; commitid: 10052029FC71A98602F;
Initial version
=============================================================================
Unfortunately, this cvs no longer exist.
In the wayback machine from 6_2013 I found an almost initial version of raspiBackup on my website. I put it on my website for viewing as raspiBackup_201306.sh. It had 314 lines of code. Now it has about 8000 LOCs.
My son gave me a Raspberry for Christmas 2013. I enthusiastically started working with it and quickly added a second Raspberry, which was then used in production. As SD cards unfortunately only have a limited ilife time, raspiBackup was created. At first it was only used privately - but but after it did its job very well, it was made available to the community.
I had underestimated the amount of work involved: there is a difference between writing and using a small script yourself and having it used by other users. A lot of tests for incorrect input and system and system environments had to be added. Corresponding error messages also had to be written. As the error messages are only short, various websites were created in parallel, on which the functionality of raspiBackup, as well as more detailed descriptions of the error messages and how the errors can be corrected.
The installer was then created to simplify the initial installation. Soon friends of raspiBackup were also found who helped to add language support for Finnish, Chinese and French in addition to German and English.
There was a lot of feedback and suggestions from raspiBackup users on what else would be useful features in raspiBackup. Without these suggestions from raspiBackup users, raspiBackup would still have the initial functionality that I need @home. There were and are many helpers. Initially I once maintained a website on which all helpers were listed. At some point it just became too much and I took the website off the net.
Thanks to this help, raspiBackup has continued to develop over the last 10 years. in its range of functions. At first, all feedback came via the comment function on my website. However, this proved to be very cumbersome and eventually the cvs code was moved to GitHub. This simplified the creation of feature requests considerably. In addition reporting bugs and questions about raspiBackup usage is much easier.
Relatively quickly, I then registered in the German Raspberry Forum. The members there helped me a lot to get to know my Raspberry and how to use it. At some point I then asked whether it wouldn’t make sense to create a backup subforum, which was then done. Since then I have been helping in the subforum for questions about raspiBackup.
I don’t really think much of videos, but prefer textual descriptions descriptions, because you can search in them. But in the boring Corona period I did create various videos about raspiBackup and published them on Youtube. I didn’t put much effort into it - in contrast to other people who publish very fancy videos on Youtube: A few slides and then I explained them in presentation mode. Later I added videos with practical use of raspiBackup on the command line. But the number of people watching the videos is growing. So the effort was not useless.
Franjo from Raspberryforum wrote a small tool called raspiBackupDialog, with which the backup and restore with raspiBackup can be done dialog guided.
At some point I also created a Facebook group for raspiBackup. Initially users could contact me directly. But that became too much for me at some point, as it eventually led to an unpaid 7/24 hotline support for raspiBackup.
Finally I set up a Paypal account to which everyone can pay if he likes raspiBackup can donate. Furthermore anyone can donate as a sponsor via GitHub.
Of course, this won’t make me rich, but it is a recognizable acknowledgement of the work, that I put into raspiBackup development and support.
I can also use it to buy test hardware, because I cannot and will not shut down my productive systems to test and maintain raspiBackup. In addition, I am no longer prepared to invest a cent in required HW for raspiBackup. raspiBackup is available for free and users should show their appreciation and finance the required HW through donations.
For example, a user donated a CM4 so that I iwas able to add and test NVMe support in raspiBackup.
From the general small donations I was able to purchase an RPi4 with 8GB memory and add Ubuntu support in raspiBackup.
Finally, someone donated so that I could buy an RPi5. The donation was made because there was a problem with rpi-clone that could not be reproduced on an RPi4. So then I was finally able to reproduce and fix the intermittent problem on the RPi5. (rpi-clone is a useful clone tool - not a backup tool like raspiBackup, but often requested, which I also keep an eye on).
In May 2025, simonz put a lot of effort and energy into a new git repository raspiBackupDoc, to bring the previous documentation of raspiBackup on my website into this repository and to improve the documentation significantly. All tooling as well as the transfer and customization from my web pages into this repository is due to him. This repository and the generated raspiBackup documentation will replace the documentation on my website in the future.
In addition, many small scripts were created to support the use of raspiBackup.
Herewith I give out a virtual round of free beer to celebrate the day.
Regression tests executed before a new release
Each new version of raspiBackup is subjected to a regression test before release. Due to the many options and possible hardware and and software environments, a complete regression test is not possible. However, this ensures that the primary functionality of raspiBackup to create a backup for the various backup types and modes is definitely successful. Also, all new features, although they were of course already tested during development, are also tested again.
The regression test is carried out in a virtualized environment on a Linux desktop, in which a Raspi per Qemu is simulated. (See development-environment.)
A Raspberry Pi OS Lite is taken as the basis.
This is installed with the standard options of raspiBackup via
dd, tar and rsync in normal mode, both for a pure SD
card system as well as for a pure USB boot system. In addition, a tar and
rsync backup is created in partition-oriented mode.
Afterwards, all the respective backups are restored with raspiBackup, these images are started via Qemu and the following tests are carried out:
/boot/firmware/cmdline.txtis downloaded from the VM viascpto the host and checked/etc/fstabis downloaded from the VM to the host viascpand checked- IP address 8.8.8.8 is pinged in the VM and tested to see if the ping was successful
- The number of active services of the original image is verified with
service --status-all.
Every user of raspiBackup who uses additional options is strongly advised to carefully test backup and restore after a version upgrade of raspiBackup. In this context, please refer to the disclaimer.
Development environment
raspiBackup is primarily developed on a Linux desktop, but of course tested on a real Raspberry. For this purpose there are various Raspberry Pi OS images created in advance, which are first restored with *raspiBackup and then tested manually with the new or modified code of raspiBackup After successful testing, a new version of raspiBackup will be made generally available.
In the beginning, all possible test variants were always tested manually. However, this is quite time-consuming and many SD cards are worn out in the process. For this reason, the regression tests are now executed in a simulated Raspberry running on a Raspberry 5. This is much faster and since then SD no longer breaks so often.
All source code is maintained in a git repository. New releases are created in a development branch. When a new release is ready to be made generally available and all regression tests have been successfully completed, the new version is made available as a beta. This allows raspiBackup users to test the new version and provide feedback. In addition, the beta will be used on framps local Raspberries. After about 4 weeks the new code will be merged into the main branch and the new version will be published.
raspiBackup is open source and therefore all releases are synchronized in GitHub. This also includes the development branch, which is synchronized from time to time.
raspiBackup writes its git code version (commit sha) in the following message RBK0009I
--- RBK0009I: raspifix: raspiBackup.sh V0.6.3.2 (5c98a16) started at Sun Jun 3 09:46:08 CEST 2018
The hexadecimal number in brackets (5c98a16 in this example) allows you to view the corresponding code whenever a problem is reported with raspiBackup and the cause of the problem can be found more easily. That is why it is important, to mention the message RBK0009I in every problem report. This also makes it possible to build a hotfix on this code version. This is usually done and the hotfix is verified before it is included in the next release.
Most issues are managed in GitHub. For each new release there exists on GitHub a summary of the bugfixes and new functionality.
Users of raspiBackup worldwide
As of January 2024, raspiBackup has users in 70 countries around the world:
- AD Andorra
- AE United Arab Emirates
- AL Albania
- AM Armenia
- AR Argentina
- AT Austria
- AU Australia
- BE Belgium
- BG Bulgaria
- BN Brunei
- BR Brasilia
- CA Canada
- CH Switzerland
- CL Chile
- CM Cameroon
- CN China
- CO Colombia
- CY Cyprus
- CZ Czech Republic
- DE Germany
- DK Denmark
- EE Estonia
- ES Spain
- EU Europe
- FI Finland
- FR France
- GB United Kingdom
- GE Georgia
- GH Ghana
- GR Greece
- HK Hong Kong
- HR Croatia
- HU Hungary
- ID Indonesia
- IE Ireland
- IL Israel
- IN India
- IP
- IR Iran
- IT Italy
- JE Jersey
- JP Japan
- KE Kenya
- KR South Korea
- KZ Kazakhstan
- LI Liechtenstein
- LT Lithuania
- LU Luxembourg
- LV Latvia
- MD Moldova
- MK North Macedonia
- MT Malta
- MX Mexico
- MY Malaysia
- NG Nigeria
- NL Netherlands
- NO Norway
- NZ New Zealand
- PA Panama
- PH Philippines
- PL Poland
- PT Portugal
- RO Romania
- SC Seychelles
- SE Sweden
- SG Singapore
- SI Slovenia
- SK Slovakia
- TH Thailand
- TR Turkey
- TW Taiwan
- UA Ukraine
- US United States of America
- VN Vietnam
- ZA Zaire
Version of this documentation
Last commit
commit 9b521f2d6355846c1dcc3296cb5f889b7b64301b
Author: framp <framp@linux-tips-and-tricks.de>
Date:   Thu Jun 18 21:35:46 2026 +0200

    Fix typo in user reference in installation guide
Build: 2026-06-18T19:37+00:00 (with: mdbook v0.5.2)
Markdown Playground
Extensionpoints
It is possible to integrate your own code extensions before and after the back-up process of the script. This is useful if changes are actually necessary in the backup script, but which then have to be would have to be updated again after each update of raspiBackup to a new version. version. The extensions are independent of the version of raspiBackup and are therefore recommended in this case.
Example extensions are available and can be used as a template for your own extensions. The CPU temperature as well as the main memory and backup partition memory and backup partition allocation as well as the partition allocation before and after the backup. The last extension is only called up at the end of the backup and can be used if the backup is successful and can trigger different actions if the backup is successful or unsuccessful.
Anyone who has created useful extensions for the community is welcome to post them in the German Raspberry Pi Forum and name the download location. If extension features are missing, please create an Issue at GitHub.
In addition, there are interesting extensions provided by raspiBackup users written extensions.
Extension invocation locations during backup
The extensions are called at the following points in the backup process are called:
- eMail extension (mem)
- Notification extension (notify), if activated (DEFAULT_NOTIFY_START)
- Slack*, Pushover and Telegram notifications, if configured and if switched on (DEFAULT_NOTIFY_START)
- BEFORE_STOPSERVICES (defined commands are executed)
- STOP_SERVICES (defined commands are executed)
- PRE_BACKUP_EXTENSION
- READY_BACKUP_EXTENSION
… Creating the backup …
- POST_BACKUP_EXTENSION
- START_SERVICES (defined commands are executed)
- AFTER_STARTSERVICES (Defined commands are executed)
… Cleanup tasks, such as deleting obsolete backups (may take longer) …
- FINAL_COMMANDS (from release 0.6.8) (defined commands are executed)
- eMail (mail) plugin
- Notification (notify) plugin
- Slack, Pushover and Telegram notifications if configured
… Final housekeeping …
- Exit
Extension invocation positions during restore
The various extensions are called at the following points in the restore process are called:
- PRE_RESTORE_EXTENSION
… restore the backup …
- POST_RESTORE_EXTENSION
Example extensions
-
The easiest way is to install and activate the sample extensions with the Installer. and activate them. Either via the menu sequence Install components->Install sample extensions or directly via the command line with the
-eoption.raspiBackupInstallUI.shor
raspiBackupInstallUI.sh -e -
If you want to install the sample extensions manually, you can download the
tgzfile with this link with a browser or download it directly to the Raspberry as follows and copy it to/usr/local/bin:wget http://www.linux-tips-and-tricks.de/raspiBackupSampleExtensions.tgz -O raspiBackupSampleExtensions.tgz tar -xzf raspiBackupSampleExtensions.tgz -C /usr/local/bin
This will copy the following scripts to /usr/local/bin:
-
raspiBackup_mem_pre.shandraspiBackup_mem_post.sh- Reports memory usage of the Raspberry before and after the backup -
raspiBackup_temp_pre.shandraspiBackup_temp_post.sh- Reports the CPU temperature of the Raspberry. Reports the CPU temperature of the Raspberry before and after the backup -
raspiBackup_disk_pre.shandraspiBackup_disk_post.sh- reports the disk usage before and after the backup. Reports the disk usage before and after the backup -
raspiBackup_execute_post.sh- Is called at the end of the backup. Helpful if you want to use your own success/error notification function is to be used.
To activate the extension, the following additional invocation parameter for raspiBackup is necessary:
-N "temp mem disk execute"
or add the following line to the configuration file
DEFAULT_EXTENSIONS="temp mem disk execute"
Notification extension
For notifications via Slack, Pushover and Telegram no extensions need to be
written. It is sufficient to configure the notifications in raspiBackup.
If you want to supply other notification targets, you can do this in a script
with the name raspiBackup_notify.sh.
Example extensions
The following extensions can have a pre and/or post script and
must be called raspiBackup_<extension>_pre.sh and/or
raspiBackup_<extension>_post.sh.
- temp
- mem
- disk
All other extensions must not have _pre and _post at the end.
The extensions generate the following messages:
--- RBK1001I: Memory usage - Pre backup - Used: 97 MB Free: 130 MB - Post backup - Used: 98 MB Free: 121 MB
--- RBK1000I: CPU temperature pre and post backup: 53.2'C - 55.8'C
--- RBK1002I: Disk usage pre backup: Used: 1.30 TiB Free: 2.18 TiB
--- RBK1003I: Disk usage post backup: Used: 1.30 TiB Free: 2.18 TiB
--- RBK1004I: Free change: -256.00 KiB (0.00 %)
Messages
The example extensions use messages that start from the number range 1000 such as RBK1000I. If you create your own extensions, you should write messages, they should start at 2000 and not use the range below 1999.
Interface
An extension receives current status code of raspiBackup in as parameter. A status code of 0 in the poster extensions means: the backup was successful. Any other status code means that the backup was unsuccessfull.
eMailExtension
If you want to program the sending of emails yourself, you can use the email extension.
This is particularly helpful if the email programs supported by the script do not support your own email client.
In addition, the appearance of the email can be changed as desired.
An extension that uses mailx can be found in the example extensions.
The following parameters are passed to the e-mail extension:
email="$1" # target email address
subject="$2" # email subject
content="$3" # email contents
parms="$4" # addtl email parms passed with -E
append="$5" # file to append
Access to the backup directory, messages, and debug log
raspiBackup writes the following information to the file /tmp/raspiBackup.vars at the very end:
BACKUP_TARGETDIR=<Backup directory name>
BACKUP_TARGETFILE=<Backup file name>
MSG_FILE=<Message file name>
LOG_FILE=<Log file name>
This information can be read with source /tmp/raspiBackup.vars so that the variables BACKUP_TARGETDIR, BACKUP_TARGETFILE, MSG_FILE, and LOG_FILE are set and the files can be accessed.
Hints
-
Attention: The extensions run with root rights and can therefore damage or even destroy the running system in case of errors!
-
Both scripts (
preandpost) are not necessary. One is sufficient. -
The parameter
-Fis very helpful for testing extensions. This means that the actual backup process is skipped and the script run very quickly. -
The extensions are called in the scope of raspiBackup. Therefore there is access to its internal script variables. However, this is strongly discouraged, as the internals can change at any time. For this reason, it is also advisable to provide your own variables with an extension-specific prefix, to avoid possible conflicts with variable names used by raspiBackup.
-
If you would like to share your extension code, you are welcome to create a pull request on GitHub. There, all extensions are available in source code to extend them and add new ones.
Extension scripts
In the meantime, various extension scripts for raspiBackup have been developed. These are not officially supported and are intended as examples for your own extension of raspiBackup functionality and can be adapted to your own requirements.
They are available for download on GitHub:
-
raspiBackupAndClone.sh: This script creates a backup version with raspiBackup and then restores the current backup to a connected device. This way you always have a current backup system after the backup, from which you can boot, if the system device has been corrupted. If you use the partition-oriented backup with rsync, the restore is only a synchronization of the changes to the previous state and this is much faster than a full restore with tar or dd.
Note: If the system no longer boots due to any misconfiguration, the cloned backup will of course not help, as it contains the same misconfiguration. In this case you have to restore an manually restore an older, still functioning backup.
Detailed instructions on how to configure raspiBackupAndClone are available here.
-
raspiBackupWrapper.sh: This can be used to execute before and after raspiBackup various things. The code already mounts the backup partition and unmounts it if it was not mounted before. In addition it’s possible to invoke pishrink afterwards to shrink a dd image as small as possible. There is some bash script knowledge necessary to customize the script to your needs.
Note This script was created when raspiBackup had no extension points. Normally it is sufficient to use the existing extension points to extend the functionality of raspiBackup for your own needs.
-
raspiBackupNfsWrapper.sh: The script checks whether an NFS server is available and only then starts raspiBackup. Apart from a few definitions of the NFS server, nothing needs to be adjusted.
-
raspiBackupRestore2Image.sh: This script can be used to restore a tar or rsync backup, which was created in normal backup mode, into a dd backup. In addition, pishrink is used to minimize the size of the dd image as much as possible. kmbach suggested the creation of the script. The script does not require any changes.
-
raspiImageMail.sh: This script was created by the raspiBackup user kmbach because he wanted to receive an eMail at the end of the call of raspiBackupRestore2Image.sh. The raspiBackup eMail configuration parameters are used for this purpose. The script does not require any changes.
-
raspiBackupAndJSON.sh: If you want to examine the messages generated by raspiBackup after the backup, can use this script to generate the messages in JSON format and parse them and parse them much easier, e.g. with
jq. -
raspiBackupDialog.sh: This script created by Franjo is a raspiBackup upstream script with which backups can be created more easily. script with which backups can be created and restored more easily. Details can be found in the chapter raspiBackupDialog - a convenient helper script for raspiBackup.
User-written extensions
There are also Extensions, written by raspiBackup users and made generally available in the raspiBackup repository via PR. Any user written extensions are welcome in a PR.
There is also described how to access the backup directories, messages and debug log that have been created.
Language support for languages other than DE and EN (L10N)
raspiBackupInstallUI and raspiBackup initially printed messages in German and English only. But both are able to print messages in any language from a coding point of view (I18N). Anybody who is willing to help to add support for a yet unsupported language is welcome to translate raspiBackup messages.
Note
Don’t hesitate if you’re willing to add a new language to raspiBackup even you don’t have any programming experience. You don’t have to fiddle with the programming stuff. You have only to translate all messages into your native language. You even don’t have to create a PR to get the new language into raspiBackup. All this programming stuff will be handled by raspiBackup developers for you.
Just add your interest in an issue on GitHub and you will immediate get individual support to add new messages in your native language to raspiBackupInstallUI and raspiBackup.
Right now following languages are supported:
- ZH - Chinese
- EN - English
- FI - Finnish
- FR - French
- DE - German
Basic activities to add a new language to raspiBackup
There exist two files printing messages: raspiBackup and raspiBackupInstallUI.
Following steps have to be done to support a new language to them:
-
For every message a new line for the new language has to be added to the code. Example for FI:
MSG_RUNASROOT=2
MSG_EN[$MSG_RUNASROOT]="RBK0002E: $MYSELF has to be started as root. Try 'sudo %s%s'."
MSG_DE[$MSG_RUNASROOT]="RBK0002E: $MYSELF muss als root gestartet werden. Benutze 'sudo %s%s'."
MSG_FI[$MSG_RUNASROOT]="RBK0002E: $MYSELF tulee käynnistää root-oikeuksin. Suorita 'sudo %s%s'."
The line starting with
MSG_FIwas added in order to support Finnish.FIare the first two characters of the variable $LANG on a system which usesFIas system language.Example for a German system:
echo $LANG
de_DE.UTF-8
and that’s why
MSG_DEis used. -
The help text in raspiBackup may optionally also be translated. For every language a bash function
usageLL()may be created which has to follow bash syntax. Just use the existing functionusageENas a template. -
To enable the new language the following line in the code has to be updated:
SUPPORTED_LANGUAGES=("EN" "DE")To enable Finnish the line has to be changed changed to
SUPPORTED_LANGUAGES=("EN" "DE" "FI")